


Limit the Bandwidth Windows Updates Uses in Windows 10
By Timothy Tibbettson 06/15/2023 |
If you've ever experienced the slowdown caused by large Windows Updates you can now decide what percentage of bandwidth is allocated and more.
These settings can be found in Delivery Optimization Settings. You can press the Windows Key + S and begin typing until you see Delivery Optimization Settings and click on it. If you'd like to do it the hard way, go to Start, Settings, Update & Security, Windows Updates, Advanced options, Delivery Optimization, Advanced options. Yeah, we like the other way better too.
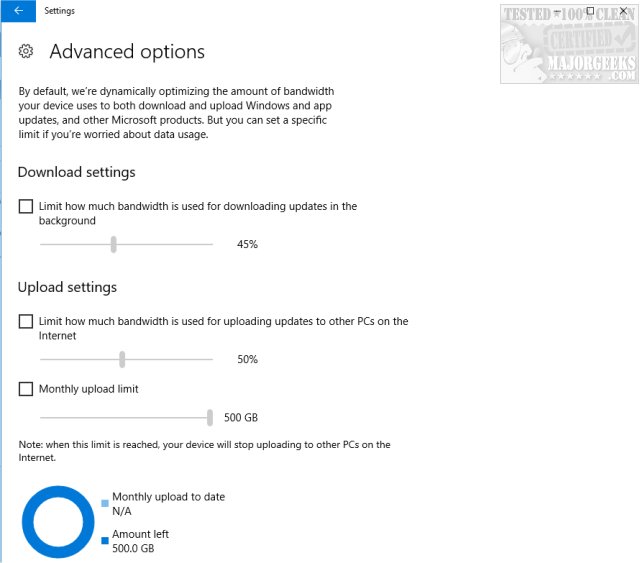
From here we think you'll find it self-explanatory. You can check the box next to Download settings and or Upload settings and choose a percentage of bandwidth you want to let your Updates use using the slider. Optionally, those on metered connections can decide how much bandwidth can be used monthly from 5-500GB.
If you're not sure how much bandwidth is being used, clicking the back arrow in the top left brings you back to the basic Delivery Optimization window. Scroll down and look for Activity monitor. Here you can see the Download Statistics and Upload Statistics, so you can see where you can trim the fat if needed.
As you can see, one limitation here is that download, and upload statistics only show the last month, so you're going to want to check it towards the end of the month, if possible. Usually, we'd suggest a program to monitor your bandwidth, but that app will only start watching when you install it, so there's no point. Hopefully, you found this article at the end of the month.
There you have it. We set our bandwidth usage to 25% because we have experienced the slowdowns caused by Windows Updates. 25% is an excellent place to start if you're unsure.
comments powered by Disqus
These settings can be found in Delivery Optimization Settings. You can press the Windows Key + S and begin typing until you see Delivery Optimization Settings and click on it. If you'd like to do it the hard way, go to Start, Settings, Update & Security, Windows Updates, Advanced options, Delivery Optimization, Advanced options. Yeah, we like the other way better too.
From here we think you'll find it self-explanatory. You can check the box next to Download settings and or Upload settings and choose a percentage of bandwidth you want to let your Updates use using the slider. Optionally, those on metered connections can decide how much bandwidth can be used monthly from 5-500GB.
If you're not sure how much bandwidth is being used, clicking the back arrow in the top left brings you back to the basic Delivery Optimization window. Scroll down and look for Activity monitor. Here you can see the Download Statistics and Upload Statistics, so you can see where you can trim the fat if needed.
As you can see, one limitation here is that download, and upload statistics only show the last month, so you're going to want to check it towards the end of the month, if possible. Usually, we'd suggest a program to monitor your bandwidth, but that app will only start watching when you install it, so there's no point. Hopefully, you found this article at the end of the month.
There you have it. We set our bandwidth usage to 25% because we have experienced the slowdowns caused by Windows Updates. 25% is an excellent place to start if you're unsure.
comments powered by Disqus
