


Uninstall This App Now Because It Isn't Compatible With Windows 10
By Timothy Tibbettson 06/15/2023 |
With millions of possible configurations, some people have experienced problems upgrading to Windows 10. In this article, we're looking at the "Windows 10 is no longer supported on this PC. Uninstall this app now because it isn't compatible with Windows 10" error. The most common error code here is Oxc1900208. The fix is a bit complicated, made easy with a one-click batch and PowerShell download.
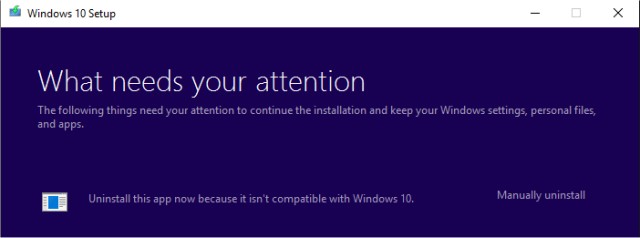
The problem here is twofold. You might need the application Windows 10 wants you to uninstall, or in some cases, the application doesn't exist.
How to Fix Using a PowerShell Script
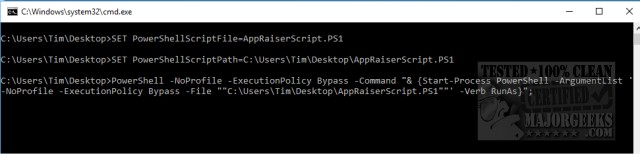
Download AppRPS.Zip and extract the contents wherever you like. The ZIP file contains two files; appraiser.bat and AppRaiserScript.PS1. Right-click on appraiser.bat and select Run as administrator. The PowerShell script will then execute and do all the work for you.
Just start the Windows 10 installation again, or click on Refresh if you left the installation running.
How to Fix it the Hard Way
We think the batch file and PowerShell script are the way to go, but if you like doing things the hard way, welcome to the club. Also, it's possible the PowerShell script didn't work for you, and you have no choice.
Because this might seem complicated, we want to tell you what we're doing here. Somewhere there's an application blocking the Windows 10 installation. We want to back up the application and delete the executable causing the error and replace it after Windows 10 installs. Also, once you've determined what application is causing the problem, you can just uninstall that app if you don't need it.
1: Be sure you can see hidden files and folders.
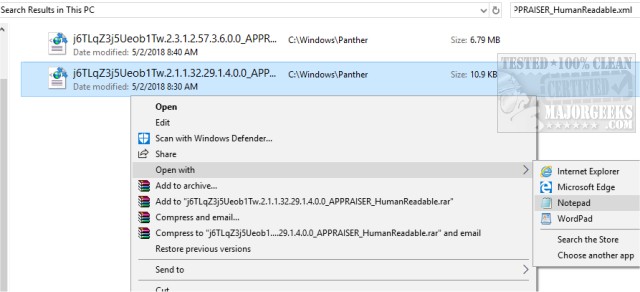
2: Select This PC in File Explorer and type in *_APPRAISER_HumanReadable.xml in the search box.
3: Right-click on the file that ends with _APPRAISER_HumanReadable.xml and select Open with and select Notepad.
4: Press CTRL+F to open Find and type in DT_ANY_FMC_BlockingApplication. and make sure, or change the value to True.
5: Press CTRL+F again and this time type in LowerCaseLongPathUnexpanded. The Value here is the program causing the problem and where it's located. Make a backup to another drive or the cloud of that programs directories or at least the executable.
6: Copy the path to the program and paste it into File Explorer. You can now delete the file causing the problem and continue with your Windows 10 installation.
7: After Windows 10 has installed, get the backup copy and restore the file or folders you deleted.
That's it!
comments powered by Disqus
The problem here is twofold. You might need the application Windows 10 wants you to uninstall, or in some cases, the application doesn't exist.
How to Fix Using a PowerShell Script
Download AppRPS.Zip and extract the contents wherever you like. The ZIP file contains two files; appraiser.bat and AppRaiserScript.PS1. Right-click on appraiser.bat and select Run as administrator. The PowerShell script will then execute and do all the work for you.
Just start the Windows 10 installation again, or click on Refresh if you left the installation running.
How to Fix it the Hard Way
We think the batch file and PowerShell script are the way to go, but if you like doing things the hard way, welcome to the club. Also, it's possible the PowerShell script didn't work for you, and you have no choice.
Because this might seem complicated, we want to tell you what we're doing here. Somewhere there's an application blocking the Windows 10 installation. We want to back up the application and delete the executable causing the error and replace it after Windows 10 installs. Also, once you've determined what application is causing the problem, you can just uninstall that app if you don't need it.
1: Be sure you can see hidden files and folders.
2: Select This PC in File Explorer and type in *_APPRAISER_HumanReadable.xml in the search box.
3: Right-click on the file that ends with _APPRAISER_HumanReadable.xml and select Open with and select Notepad.
4: Press CTRL+F to open Find and type in DT_ANY_FMC_BlockingApplication. and make sure, or change the value to True.
5: Press CTRL+F again and this time type in LowerCaseLongPathUnexpanded. The Value here is the program causing the problem and where it's located. Make a backup to another drive or the cloud of that programs directories or at least the executable.
6: Copy the path to the program and paste it into File Explorer. You can now delete the file causing the problem and continue with your Windows 10 installation.
7: After Windows 10 has installed, get the backup copy and restore the file or folders you deleted.
That's it!
comments powered by Disqus
