


How to Backup and Restore the Start Menu in Windows 10
By Timothy Tibbettson 06/15/2023 |
The Windows 10 Start Menu has numerous options to suit everyone's needs, including folders, Tiles, Groups, sizes, removed items, and much more. If you've spent a lot of time getting your Start Menu just right, here's an undocumented method to back up your Start Menu.
While it might at first seem complicated to some, all we have to do is back up a registry tree and an XML file.
How to Backup the Start Menu in Windows 10
1: Backup Registry Tree
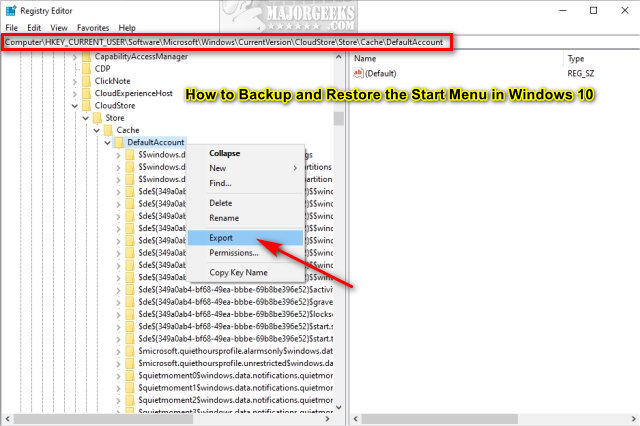
Open the Registry Editor, copy and paste:
HKEY_CURRENT_USER\Software\Microsoft\Windows\CurrentVersion\CloudStore\Store\Cache\DefaultAccount into the search bar and press Enter.
Right-click on Default Account and click on Export.
Select a file name, location, and click on Save.

2: Backup DefaultLayouts.xml
Open File Explorer. You might need to be sure you can see hidden files, folders, and protected operating system files.
Copy and paste %LocalAppData%\Microsoft\Windows\Shell in File Explorer.
Right-click on DefaultLayouts.xml and click on Copy.
Go to the folder you backed up the Registry tree, right-click and click Paste.
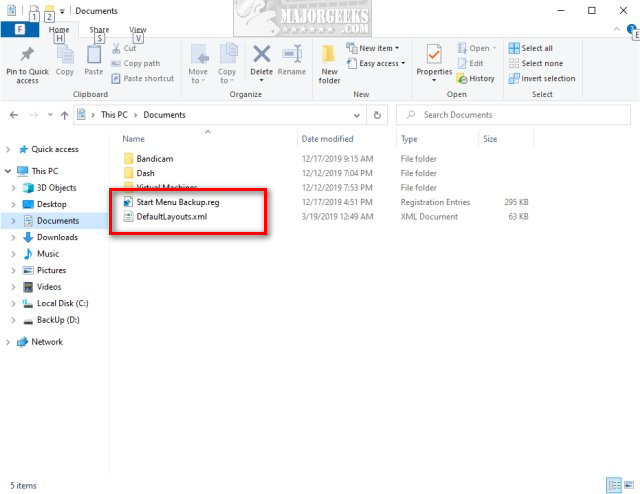
You can now backup the registry and XML file anywhere you like.
-=- Advertisement -=-
How to Restore the Start Menu in Windows 10
Open the Registry Editor, copy and paste:
HKEY_CURRENT_USER\Software\Microsoft\Windows\CurrentVersion\CloudStore\Store\Cache\DefaultAccount into the search bar and press Enter.
Right-click on Default Account and click on Delete.
Double-click on the .reg file you backed up earlier to restore your saved Start Menu registry settings.
Right-click on DefaultLayouts.xml that you saved earlier and click on Copy.
Open File Explorer and type in %LocalAppData%MicrosoftWindowsShell.
Right-click and click on Paste and click on Replace the file in the destination.
Close all open programs and reboot.
Your Start Menu has been restored.
Support MajorGeeks and Show Your Geek Pride With MajorGeeks T-Shirts, Cups, and More!
comments powered by Disqus
While it might at first seem complicated to some, all we have to do is back up a registry tree and an XML file.
How to Backup the Start Menu in Windows 10
1: Backup Registry Tree
Open the Registry Editor, copy and paste:
HKEY_CURRENT_USER\Software\Microsoft\Windows\CurrentVersion\CloudStore\Store\Cache\DefaultAccount into the search bar and press Enter.
Right-click on Default Account and click on Export.
Select a file name, location, and click on Save.
2: Backup DefaultLayouts.xml
Open File Explorer. You might need to be sure you can see hidden files, folders, and protected operating system files.
Copy and paste %LocalAppData%\Microsoft\Windows\Shell in File Explorer.
Right-click on DefaultLayouts.xml and click on Copy.
Go to the folder you backed up the Registry tree, right-click and click Paste.
You can now backup the registry and XML file anywhere you like.
How to Restore the Start Menu in Windows 10
Open the Registry Editor, copy and paste:
HKEY_CURRENT_USER\Software\Microsoft\Windows\CurrentVersion\CloudStore\Store\Cache\DefaultAccount into the search bar and press Enter.
Right-click on Default Account and click on Delete.
Double-click on the .reg file you backed up earlier to restore your saved Start Menu registry settings.
Right-click on DefaultLayouts.xml that you saved earlier and click on Copy.
Open File Explorer and type in %LocalAppData%MicrosoftWindowsShell.
Right-click and click on Paste and click on Replace the file in the destination.
Close all open programs and reboot.
Your Start Menu has been restored.
Support MajorGeeks and Show Your Geek Pride With MajorGeeks T-Shirts, Cups, and More!
comments powered by Disqus
