


How to Center Your Taskbar Icons in Windows 10
By Timothy Tibbettson 06/15/2023 |
Have you ever wanted to move all your Taskbar icons from the left to the middle, similar to the Macintosh Dock? Here's how.
Before we begin, the directions might seem a bit strange (they are), but stick with us, it works or watch the step-by-step video below.
1: Create a Folder
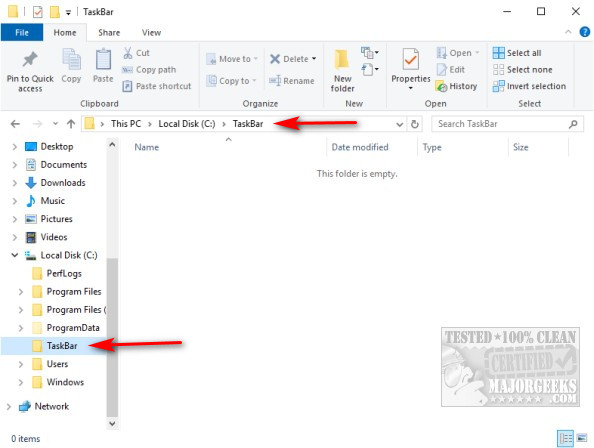
You need to create a folder anywhere you like and name it anything you want. For our tests, we made a folder called Taskbar on our C drive.
2: Create Two Shortcuts to the New Folder
For this step, we need to create two new Toolbars with shortcuts to the new folder you just created.
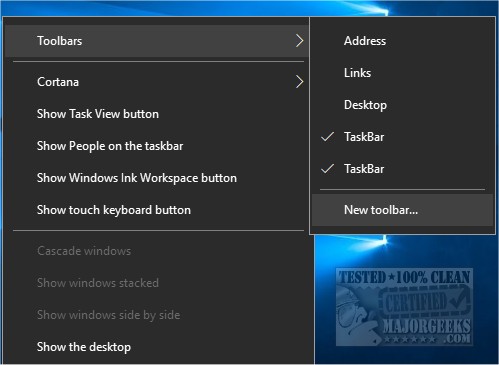
Right-click on the Taskbar and select Toolbars, New toolbar.
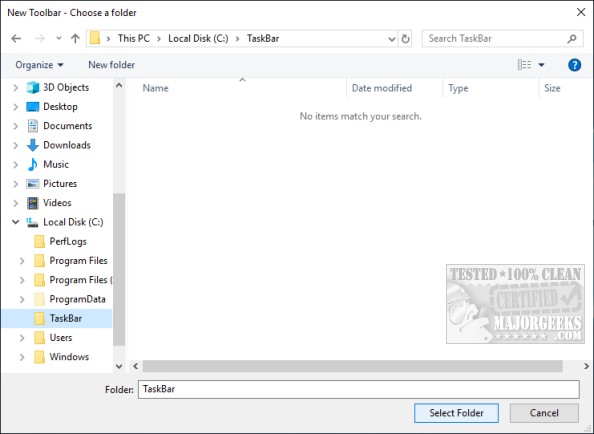
Click on the folder you created and then Select Folder. Now repeat the steps and make a second shortcut.
You should now see the two new shortcuts on the bottom right.

3: Taskbar and Shortcut Settings
Right-click on the Taskbar and uncheck Lock the taskbar if it isn't already.
Drag one of the two folder shortcuts as far to the left as you can, right next to the Start menu. If you have File Explorer still open, drag that icon a little left of center. We place the icon a little left of center because as you open multiple programs, you'll find your icons don't stay in the center, but push to the right a bit as seen in the last screenshot below. Your Taskbar should now look like this:

4: Final Steps
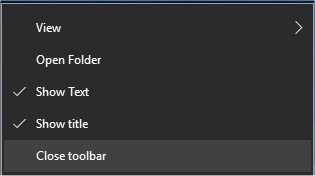
Almost there. Right-click on both shortcuts and uncheck Show Title and Show Text.
Right-click on the Taskbar and check Lock the taskbar.
If you want to restore your Taskbar, right-click on the Taskbar, select Toolbars and uncheck the two shortcuts you added.
comments powered by Disqus
Before we begin, the directions might seem a bit strange (they are), but stick with us, it works or watch the step-by-step video below.
1: Create a Folder
You need to create a folder anywhere you like and name it anything you want. For our tests, we made a folder called Taskbar on our C drive.
2: Create Two Shortcuts to the New Folder
For this step, we need to create two new Toolbars with shortcuts to the new folder you just created.
Right-click on the Taskbar and select Toolbars, New toolbar.
Click on the folder you created and then Select Folder. Now repeat the steps and make a second shortcut.
You should now see the two new shortcuts on the bottom right.
3: Taskbar and Shortcut Settings
Right-click on the Taskbar and uncheck Lock the taskbar if it isn't already.
Drag one of the two folder shortcuts as far to the left as you can, right next to the Start menu. If you have File Explorer still open, drag that icon a little left of center. We place the icon a little left of center because as you open multiple programs, you'll find your icons don't stay in the center, but push to the right a bit as seen in the last screenshot below. Your Taskbar should now look like this:
4: Final Steps
Almost there. Right-click on both shortcuts and uncheck Show Title and Show Text.
Right-click on the Taskbar and check Lock the taskbar.
If you want to restore your Taskbar, right-click on the Taskbar, select Toolbars and uncheck the two shortcuts you added.
comments powered by Disqus
