


How to Change DPI Scaling Settings and Fix Those Blurry Apps
By Corporal Punishmenton 01/19/2026 |
 Hey Geeks - you may have noticed that some applications look blurry or pixelated on your screen, especially if you are running hires, like 4K+ on your new PC. Windows tries to scale the applications to match your display settings, but not all applications support this feature, especially if you are running older apps like Office 10. But it's not just limited to older apps. Electron-based apps, like Slack and Discord, and some of the modern niche software suffer from DPI scaling issues with high-res.
 This is where adjusting your DPI scaling comes in, and below I will explain how to override the DPI scaling behavior of Windows and make your applications look crisp and clear.
What is DPI and Why Does It Matter
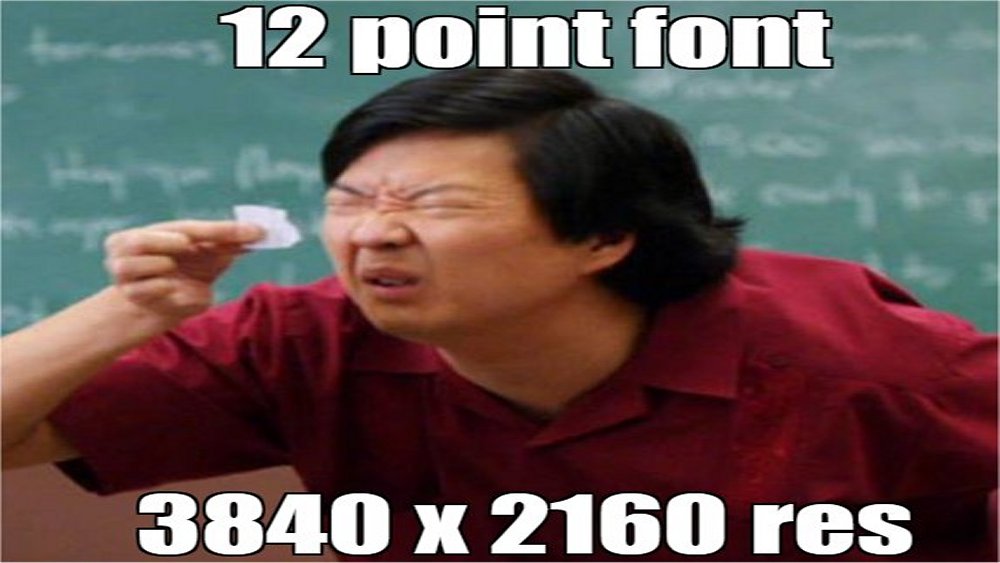
DPI stands for dots per inch, and it measures how many pixels are displayed on a physical one-inch area of the screen. The higher the DPI, the more detailed and sharp the image. However, some applications are designed for a specific DPI setting, or legacy applications may have no DPI awareness at all. If you have a different DPI setting on your Display, it may need to scale properly and appear blurry or distorted. For example, as you can see in the screenshot of my Photoshop 12, which is circa 2010 the fonts and icons are unreadable and unresponsive to the 200% scale setting. 4K monitors weren't introduced until three years later, so compatibility is going to be a thing. Sure, I could upgrade, but I'm holding off on subscription-based as long as possible. Let me hear a "Hell Yeah" from all you cheap Geeks out there! Plus, I find myself using other apps like GIMP anyway. So the better choice is to fix it.
Why Apps Look Blurry and How Windows Tries to Help
Windows 10 introduced DPI scaling to make apps more usable on high-res displays. Essentially, it blows up text, icons, and other UI elements so they’re legible on your monster monitor. But when apps aren't DPI-aware, this scaling can backfire, leaving things blurry or distorted.
To solve this problem, Windows can scale applications by a certain percentage based on the DPI setting of your monitor. You can do this by right-clicking on your Desktop - choose Display, then Scale. My machine is at 3840x2160 px, and I scale to 200% so that fonts and icons are legible -- but this setup can cause problems.
If one app is giving you grief, the real fix is overriding DPI behavior at the application level.
How to Override DPI Scaling in Windows
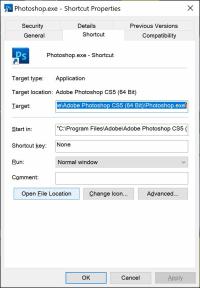
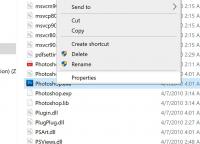
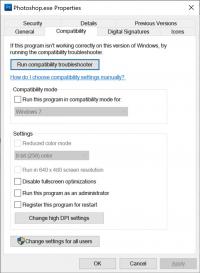
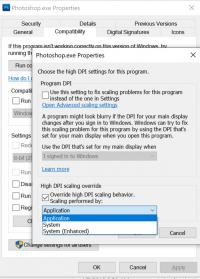
To fix this problem, Windows 10 and 11 offer a "Override High DPI Scaling Behavior" feature. Windows 11 calls it "Change High DPI Settings" but the options are the same. This feature allows you to choose how application scaling is handled. You can access the settings by right-clicking on the application's executable file, selecting Properties, and then going to the Compatibility tab. A checkbox says, "Override high DPI scaling behavior. A drop-down menu lets you choose one of three options. NOTE: You must be working with the actual EXE of the application, not a shortcut to it. If you use a shortcut, choose Open File Location, which will bring you to the EXE you need.
The three options you can choose with DPI Scaling are; Application, System, and System Enhanced. The option you choose will depend on the application and your display settings, but here are some general guidelines:
Application
If you want Windows to scale the application according to your display settings, choose "Application ." Application is the default option and works well for most applications that support DPI scaling.
System
If you want the application to scale according to its built-in settings, choose "System ."This option may work better for some older applications that do not support DPI scaling or have their own scaling mechanisms.
System (Enhanced)
If you want the system to scale the application using bitmap stretching, choose "System (Enhanced) ."This option may improve the appearance of some applications that use bitmap graphics but also may introduce some artifacts or blurriness.
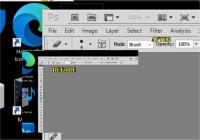
It will be good to try each setting to see which looks best for each application. If things go weird, you can always go back to the default. Just select the check box for High DPI Scaling and click OK. Try an option and see what it looks like. You may need to restart the application or log out and back in for the changes to take effect. In the screenshots below, I used System Enhanced, and the Photoshop fonts and icons now look perfect and legible.
Trusted Free Tools for DPI Woes
Enhanced Mode not doing it for you? Here are a few free tools on MajorGeeks that can help you manage display settings and older app compatibility:
These utilities offer more granular control over text and icon scaling, especially if you're not ready to dive deep into compatibility settings for every app.
Bottom Line
Still rocking Photoshop from 2010? No shame in that game. With 4K and 8K monitors becoming standard, striking the right balance between high resolution and usability can be a pain—especially if you're running apps that aren't DPI-aware. DPI scaling can make or break your high-res experience. While Windows does its best to compensate, older software often needs some manual TLC. Rather than ditching your legacy apps or downgrading your display, a quick DPI tweak can keep everything looking sharp.
comments powered by Disqus
