


How to Find, View, and Save Windows Spotlight Background Images in Windows 10
By Timothy Tibbettson 06/15/2023 |
Windows Spotlight can show you different backgrounds and suggestions on your lock screen. In this tutorial, we give you the option to view and back up all of your Windows Spotlight images.
One problem with backing up the folder is that you back up all sorts of icons, including Dolby, Xbox, and more that you don't need. Because of this, we can use a Powershell script that will only back up your 1920x1080 images, or you can manually browse and copy the files.
1: Backup With PowerShell Script
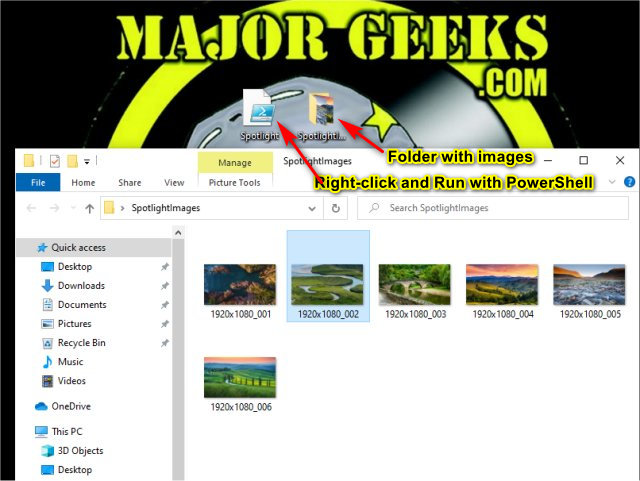
The Powershell script will automatically copy all the 1920x1080 images to a SpotlightImages folder on your Desktop.
Download the PowerShell script.
Right-click and choose Run with PowerShell.
Open the SpotlightImages folder on your Desktop.
This tweak is included as part of MajorGeeks Registry Tweaks.
In the following two steps, we can view or backup some, or all images if you want to manage all pictures.
2: View Windows Spotlight Background Images
The Windows Spotlight folder is located at:
%LocalAppData%\Packages\Microsoft.Windows.ContentDeliveryManager_cw5n1h2txyewy\LocalState\Assets
The simplest way to view a Windows Spotlight image is to right-click on an image and click on Open with, then select your photo viewer.
Of course, you might have dozens of images, so we can change the file extensions to JPG so you can see them in File Explorer and find the images you want to backup.
Copy the files anywhere you like. For this example, we created a folder called Images on our C drive.
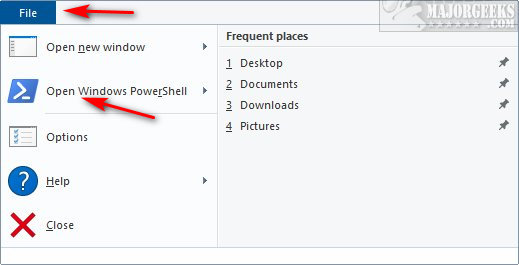
Click on the folder with your images and click File > Open PowerShell.
Type in the following two commands and press Enter after each and close PowerShell.
cmd
ren * *.jpg
All files should now have a jpg extension so you can see what the images are.

3: Backup With File Explorer
As you did in Step 2, copy and paste %LocalAppData%\Packages\Microsoft.Windows.ContentDeliveryManager_cw5n1h2txyewy\LocalState\Assets into File Explorer address bar.
Press CTRL+A to highlight all the files in that folder. Now you can drag and drop them to where you want them saved.

comments powered by Disqus
One problem with backing up the folder is that you back up all sorts of icons, including Dolby, Xbox, and more that you don't need. Because of this, we can use a Powershell script that will only back up your 1920x1080 images, or you can manually browse and copy the files.
1: Backup With PowerShell Script
The Powershell script will automatically copy all the 1920x1080 images to a SpotlightImages folder on your Desktop.
Download the PowerShell script.
Right-click and choose Run with PowerShell.
Open the SpotlightImages folder on your Desktop.
This tweak is included as part of MajorGeeks Registry Tweaks.
In the following two steps, we can view or backup some, or all images if you want to manage all pictures.
2: View Windows Spotlight Background Images
The Windows Spotlight folder is located at:
%LocalAppData%\Packages\Microsoft.Windows.ContentDeliveryManager_cw5n1h2txyewy\LocalState\Assets
The simplest way to view a Windows Spotlight image is to right-click on an image and click on Open with, then select your photo viewer.
Of course, you might have dozens of images, so we can change the file extensions to JPG so you can see them in File Explorer and find the images you want to backup.
Copy the files anywhere you like. For this example, we created a folder called Images on our C drive.
Click on the folder with your images and click File > Open PowerShell.
Type in the following two commands and press Enter after each and close PowerShell.
cmd
ren * *.jpg
All files should now have a jpg extension so you can see what the images are.
3: Backup With File Explorer
As you did in Step 2, copy and paste %LocalAppData%\Packages\Microsoft.Windows.ContentDeliveryManager_cw5n1h2txyewy\LocalState\Assets into File Explorer address bar.
Press CTRL+A to highlight all the files in that folder. Now you can drag and drop them to where you want them saved.
comments powered by Disqus
