


Three Ways to Remove or Update Older Versions of Java
By Timothy Tibbettson 11/20/2022 |
In this tutorial, we show you three ways to remove or update older or multiple versions of Java installed on your computer. Oracle (the owners of Java) recommends that you remove older versions.
Web browser add-ons that we take for granted can be an often overlooked area of insecurity on your computer. We have seen numerous computers with 2 and 3 versions of Java installed. It used to be simple to identify because each Java version would install to a different folder, but now all Java versions are installed in the same folders.
Keeping old and unsupported versions of Java on your system presents a serious security risk.
Removing older versions of Java from your system ensures that Java applications will run with the most up-to-date security and performance improvements on your system.
This short video walks you through all three possible steps:
There are numerous ways to update or remove Java:
1: The quickest way to uninstall Java is in your Settings or Control Panel.
Windows 10 - Click Start > Settings > Apps. Click on the Java you'd like to uninstall and click on Uninstall.
Windows 7 - Click Start > Control Panel > Uninstall a Program. Doule-click on any Java versions you'd like to remove.

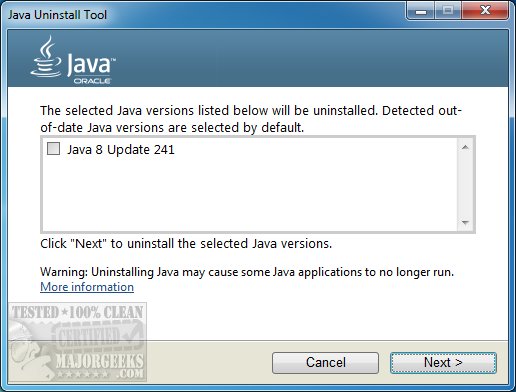
2: Download the official Java Uninstall Tool from MajorGeeks. The Java Uninstall Tool runs as a portable app and can be used to remove older versions of Java installed on your computer as well as provide a link to download the latest version.
The Java Uninstall Tool runs as a portable app and can be used to remove older versions of Java installed on your computer as well as provide a link to download the latest version.
3: There are a handful of excellent uninstallers that not only uninstall but also verify all files, folders, and registry entries are also deleted. Here are our top picks:
IObit Uninstaller
Geek Uninstaller
Wise Uninstaller
HiBit Uninstaller
If you're looking to install the latest Java version of Java, you can download it from Majorgeeks.
comments powered by Disqus
Web browser add-ons that we take for granted can be an often overlooked area of insecurity on your computer. We have seen numerous computers with 2 and 3 versions of Java installed. It used to be simple to identify because each Java version would install to a different folder, but now all Java versions are installed in the same folders.
Keeping old and unsupported versions of Java on your system presents a serious security risk.
Removing older versions of Java from your system ensures that Java applications will run with the most up-to-date security and performance improvements on your system.
There are numerous ways to update or remove Java:
1: The quickest way to uninstall Java is in your Settings or Control Panel.
Windows 10 - Click Start > Settings > Apps. Click on the Java you'd like to uninstall and click on Uninstall.
Windows 7 - Click Start > Control Panel > Uninstall a Program. Doule-click on any Java versions you'd like to remove.
2: Download the official Java Uninstall Tool from MajorGeeks. The Java Uninstall Tool runs as a portable app and can be used to remove older versions of Java installed on your computer as well as provide a link to download the latest version.
The Java Uninstall Tool runs as a portable app and can be used to remove older versions of Java installed on your computer as well as provide a link to download the latest version.
3: There are a handful of excellent uninstallers that not only uninstall but also verify all files, folders, and registry entries are also deleted. Here are our top picks:
If you're looking to install the latest Java version of Java, you can download it from Majorgeeks.
comments powered by Disqus
