


How to Rename Computer (1) to This PC After Windows Update
By Timothy Tibbettson 06/15/2023 |
Some Windows 10 users have reported that their computer was renamed Computer (1) instead of This PC following a Windows Update. While the computer remains fully functional, here's how to change the name back to This PC.
Luckily, unlike most problems with Windows, there's only one fix for this particular problem.
Open File Explorer and type in shell:programs in the where you usually see Quick Access.
You can also type in, or browse to C:\UsersAppData\Roaming\Microsoft\Windows\Start Menu\Programs.
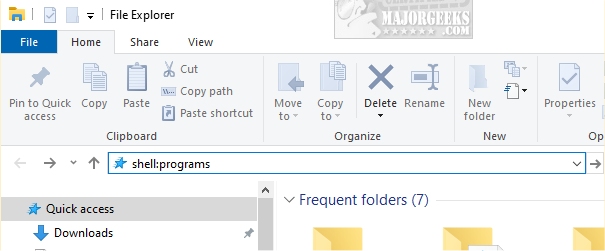 to this pc 1.jpg)
Double-click on the Windows System folder to open that.
Delete everything that ends with (1). These could include computer (1), File Explorer (1), Control Panel (1), and Run (1).
Some people suggest all you need to do now is right-click on This PC and choose Pin to Start.
Reboot and see if the problem is solved. If not, check back here for a possible additional step below.
Open File Explorer and enter shell:programs again. Click on View and verify that the box that says Hidden items is checked. Now click on Options.
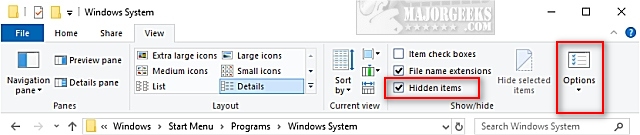 to this pc 2.jpg)
Click on the View tab and scroll down to Hide protected operating system files (Recommended) and uncheck that.
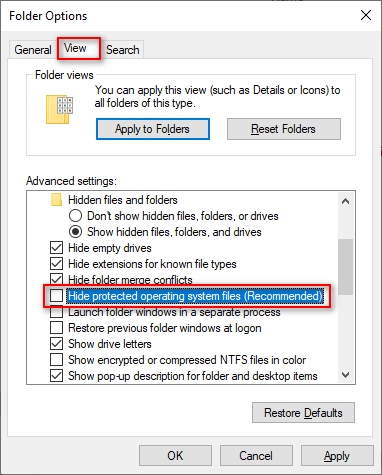 to this pc 3.jpg)
Open Desktop.ini and replace computer.lnk=@%SystemRoot%system32shell32.dll,-9216 with computer (1).lnk=@%SystemRoot%system32shell32.dll,-9216
comments powered by Disqus
Luckily, unlike most problems with Windows, there's only one fix for this particular problem.
Open File Explorer and type in shell:programs in the where you usually see Quick Access.
You can also type in, or browse to C:\UsersAppData\Roaming\Microsoft\Windows\Start Menu\Programs.
Double-click on the Windows System folder to open that.
Delete everything that ends with (1). These could include computer (1), File Explorer (1), Control Panel (1), and Run (1).
Some people suggest all you need to do now is right-click on This PC and choose Pin to Start.
Reboot and see if the problem is solved. If not, check back here for a possible additional step below.
Open File Explorer and enter shell:programs again. Click on View and verify that the box that says Hidden items is checked. Now click on Options.
Click on the View tab and scroll down to Hide protected operating system files (Recommended) and uncheck that.
Open Desktop.ini and replace computer.lnk=@%SystemRoot%system32shell32.dll,-9216 with computer (1).lnk=@%SystemRoot%system32shell32.dll,-9216
comments powered by Disqus
