


How to Restore Your SSD Performance by Secure Erasing It
By Timothy Tibbettson 07/18/2023 |
It is now known that you should never do a low-level format on your SSD as that can cause slowdowns. You should do a secure erase which is faster and doesn't wear out the SSD. It puts all the SSD cells back into a null state where they are ready to have data written to them. Here is a specific step-by-step guide to correctly formatting an SSD drive.
Notes:
Before you begin, this guide is assuming you need to format your drive and your SSD manufacturer lacks a tool to do this.
Samsung SSD owners can skip all this and use Samsung SSD Magician. Other SSD owners might also check their manufacturer to see if they offer a tool that can secure erase your SSD drive. We have some of these for companies including Corsair, OCZ, SanDisk, Intel, and Transcend in our SSD tools section.
You also need to own Parted Magic ($11) and download Rufus. At the time of this guide, this is the only way to secure erase an SSD drive properly.
If your SSDs are in RAID mode, you will need to delete the RAID Array in your BIOS. Find Intel Rapid Storage Technology and change the BIOS boot mode from RAID to AHCI until you are done with secure erasing your SSDs then you can recreate your RAID Array and change the boot mode to RAID if that's what you were on before.
All your data will be deleted.
1: Download and purchase Parted Magic ($11) or try the older free version at here. There are known issues with the older freeware version, so we recommend spending the $11. It's cheaper than a new SSD.
2: After you buy your license and get the download link, go ahead and download the Parted Magic ISO and use Rufus to create that ISO onto a bootable USB Flash Disk
3: Boot off the USB Flash disk by restarting your computer and hitting the appropriate button to get the boot options then select the USB flash disk. In my case, on my MSI laptop, it is the F11 key which F11 key which gives me the boot options. Consult with your computer's manufacturer to see which key gives you the boot options during boot up.
4: Once you boot off the USB Flash Disk, you will get a list of options on how you want to proceed, select the first option from the top (I believe it's "boot off live image 64-Bit")
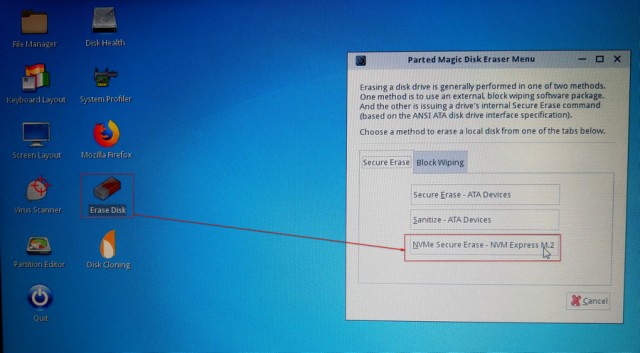
5: Once you're at the Parted Magic desktop, double click Erase Disk, then choose NVMe Secure Erase or you can merely choose Secure Erase - ATA Devices right away if you don't have an m.2 SSDs
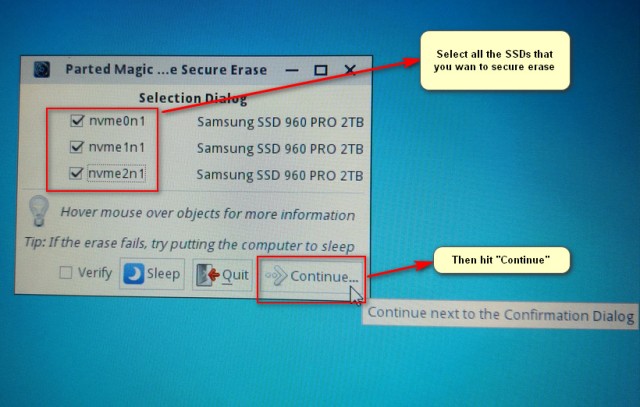
6: Select all the m.2 SSDs that you want to secure erase then hit "Continue."
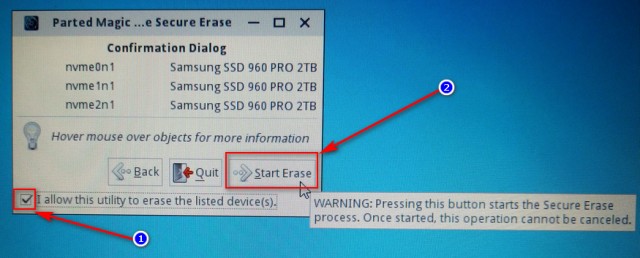
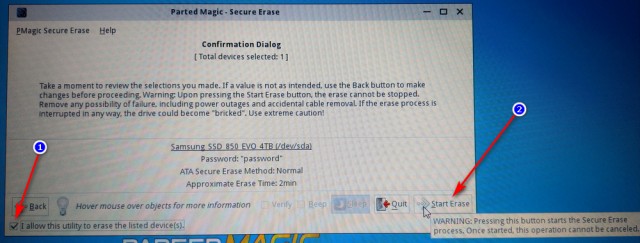
7: Check the box corresponding to "I allow this utility to erase the listed device(s)." then hit "Start Erase."
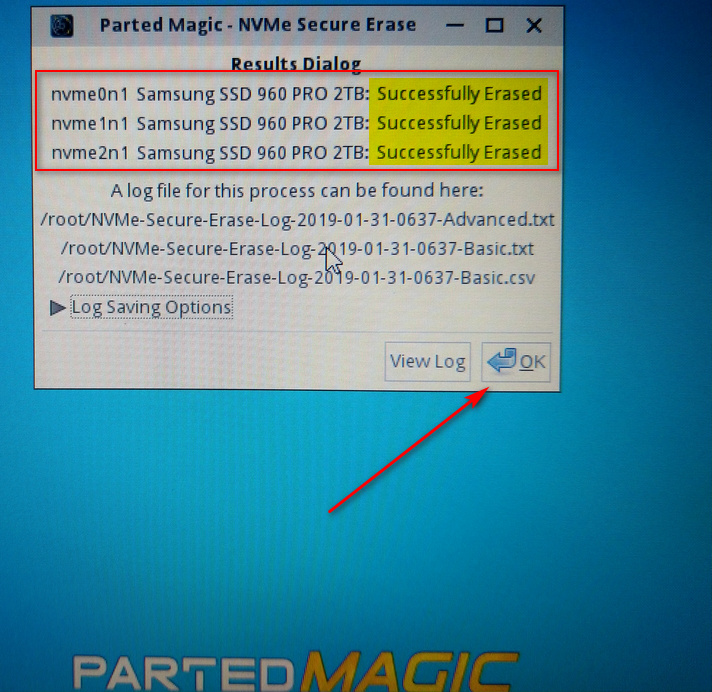
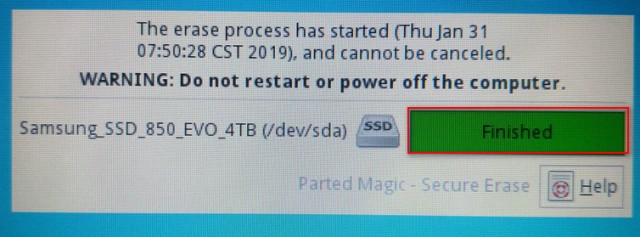
8: You will then see a message confirming that the secure erase was completed.
9: Now let's secure erase the 2.5" SSD. Double Click on the Erase Disk icon again from the desktop but this time choose Secure Erase - ATA Devices
10: You might get a warning message that your SSD was "Frozen." If so, click on the Sleep, then wake your computer back up again.
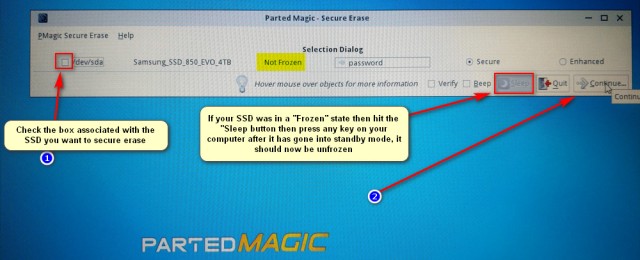
11: Now check the box at the bottom left to allow the secure erase to be done then hit "Start Erase."
12: You will then get a notification that the Secure Erase was done
You can now install Windows (or restore from an image) and enjoy the full performance of your SSD.
Thanks to Ultra Male for this excellent write-up and allowing us to share it with you.
We use Western Digital SSD drives because they have excellent software to transfer Windows to the new drive from your old drive.
comments powered by Disqus
Notes:
Before you begin, this guide is assuming you need to format your drive and your SSD manufacturer lacks a tool to do this.
Samsung SSD owners can skip all this and use Samsung SSD Magician. Other SSD owners might also check their manufacturer to see if they offer a tool that can secure erase your SSD drive. We have some of these for companies including Corsair, OCZ, SanDisk, Intel, and Transcend in our SSD tools section.
You also need to own Parted Magic ($11) and download Rufus. At the time of this guide, this is the only way to secure erase an SSD drive properly.
If your SSDs are in RAID mode, you will need to delete the RAID Array in your BIOS. Find Intel Rapid Storage Technology and change the BIOS boot mode from RAID to AHCI until you are done with secure erasing your SSDs then you can recreate your RAID Array and change the boot mode to RAID if that's what you were on before.
All your data will be deleted.
1: Download and purchase Parted Magic ($11) or try the older free version at here. There are known issues with the older freeware version, so we recommend spending the $11. It's cheaper than a new SSD.
2: After you buy your license and get the download link, go ahead and download the Parted Magic ISO and use Rufus to create that ISO onto a bootable USB Flash Disk
3: Boot off the USB Flash disk by restarting your computer and hitting the appropriate button to get the boot options then select the USB flash disk. In my case, on my MSI laptop, it is the F11 key which F11 key which gives me the boot options. Consult with your computer's manufacturer to see which key gives you the boot options during boot up.
4: Once you boot off the USB Flash Disk, you will get a list of options on how you want to proceed, select the first option from the top (I believe it's "boot off live image 64-Bit")
5: Once you're at the Parted Magic desktop, double click Erase Disk, then choose NVMe Secure Erase or you can merely choose Secure Erase - ATA Devices right away if you don't have an m.2 SSDs
6: Select all the m.2 SSDs that you want to secure erase then hit "Continue."
7: Check the box corresponding to "I allow this utility to erase the listed device(s)." then hit "Start Erase."
8: You will then see a message confirming that the secure erase was completed.
9: Now let's secure erase the 2.5" SSD. Double Click on the Erase Disk icon again from the desktop but this time choose Secure Erase - ATA Devices
10: You might get a warning message that your SSD was "Frozen." If so, click on the Sleep, then wake your computer back up again.
11: Now check the box at the bottom left to allow the secure erase to be done then hit "Start Erase."
12: You will then get a notification that the Secure Erase was done
You can now install Windows (or restore from an image) and enjoy the full performance of your SSD.
Thanks to Ultra Male for this excellent write-up and allowing us to share it with you.
We use Western Digital SSD drives because they have excellent software to transfer Windows to the new drive from your old drive.
* As an Amazon Associate, we earn a commission if you purchase an item using our affiliate links
comments powered by Disqus
