


How to Set up an Ftp Server on Windows 10
By Timothy Tibbettson 06/16/2023 |
For someone who needs an FTP server briefly, Windows 10 has a built-in FTP server. We should note that the Windows 10 FTP server wouldn't be one we'd use regularly, but again, in a pinch, it can get the job done. Here's how.
There are two steps required; turning on Internet Information Services and the FTP server followed by configuring the firewall. Additionally, we will be adding a few freeware FTP servers you can download at the bottom of this article.
1: Enable FTP Server
Press the Windows Key + S and begin typing and click on Turn Windows Features On or Off. You can also press the Windows Key + R, type appwiz.cpl and press enter.
Scroll down and enable Internet Information Services, then expand FTP Server and check those boxes.
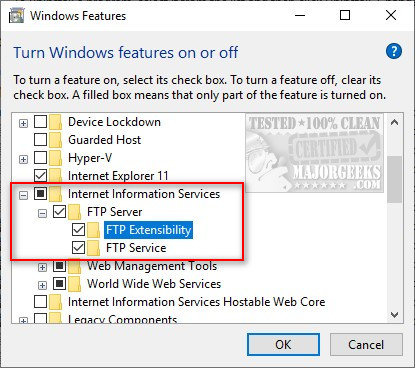
Click on OK to install the required files. This process usually takes a few minutes.
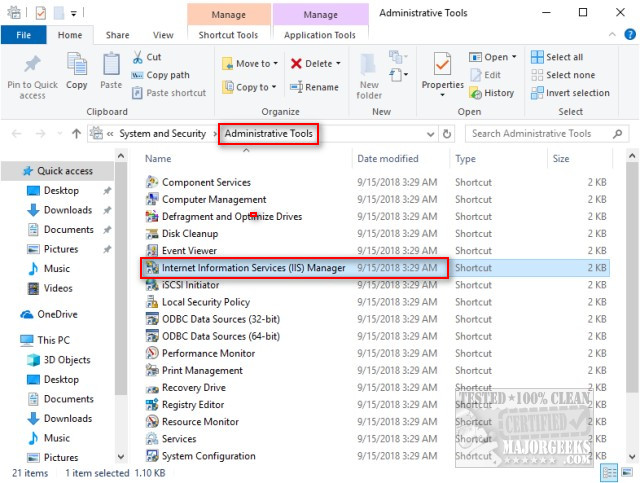
Now open Administrative Tools by clicking on Start > Windows System > Windows Administrative Tools. Optionally, you could search for Administrative Tools.
Double-click on Internet Information Services (IIS) Manager.
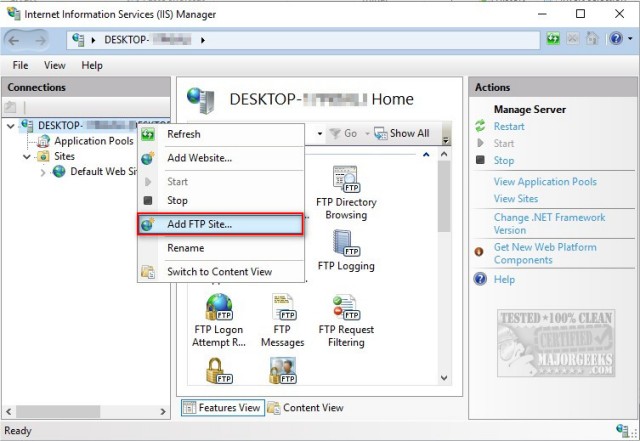
Right-click on your computer name where you see Connections and select Add FTP site.
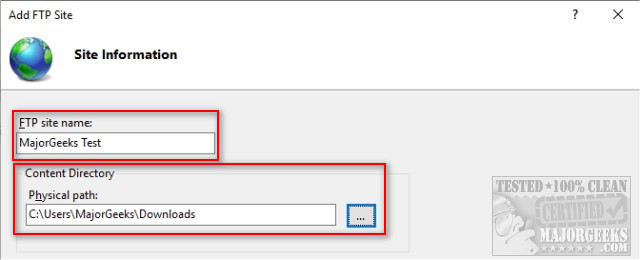
Name your FTP server and browse to the path of the folder(s) you want to make available.
Next, you can assign an IP address, port, start automatically, and SSL, which should be on. You should be able to run your FTP with the default settings. Making any changes here is for advanced users.
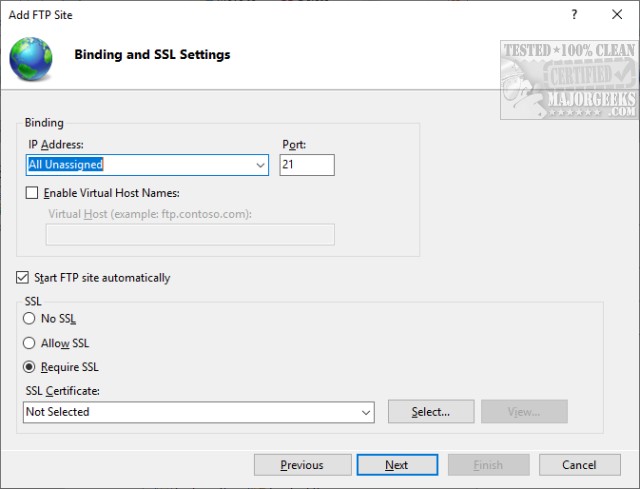
Because you want to use SSL, this means you need the additional step of creating your own SSL certificate. Comodo SSL Certificate Auto-Installer supports IIS and is your best bet, but once again, we're installing another program to get the Windows FTP working giving you one more reason to download a free FTP server. If you need a quick one-time FTP server, then you can select No SSL.
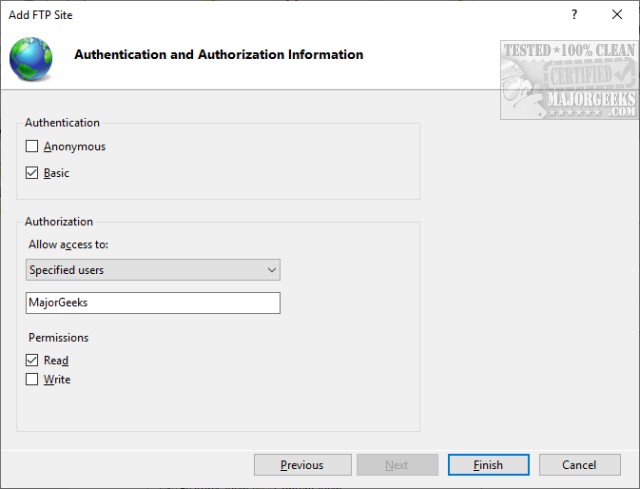
Finally, we can decide who can access the FTP server. You can select Anonymous or Basic and specify which groups can access the FTP server. Finally, you can pick read or write access. Selecting write will allow that user to make changes. Click Finish to start the FTP Server.
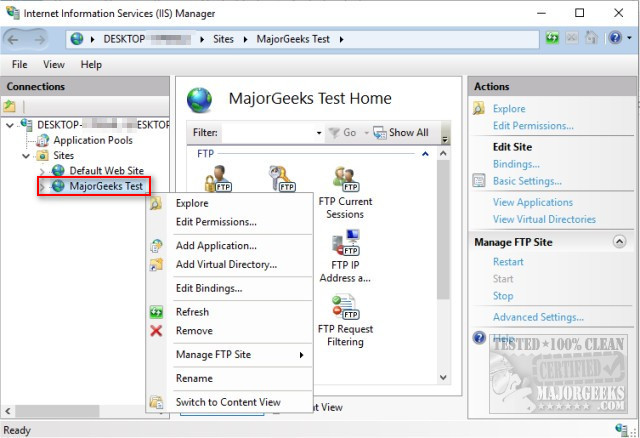
You should now see your FTP server added to the list of Connections we discussed earlier. Right-click on your FTP server where you see Connections, and you can edit permissions, add applications, manage settings, and more.
Are you still here? Well, now we need to configure the Windows Firewall settings. Yay!
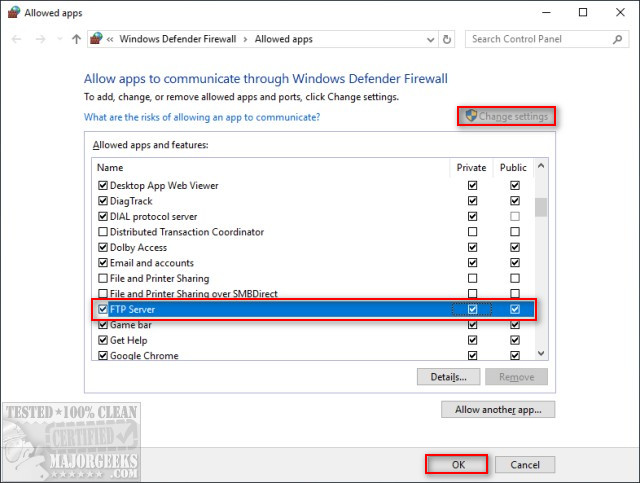
Press the Windows Key + S and begin typing, then click on Allow an app through Windows Firewall. Click on Change settings. Scroll down to FTP server and check that as well as the Private and Public settings. Click on OK.
In case you missed it, we've mentioned numerous times that the Windows FTP server wouldn't be our first choice, not to mention this isn't this most secure way to host an FTP server. You can check out our available FTP tools here.
Filezilla Server is one freeware app that could save you a lot of time and trouble.
comments powered by Disqus
There are two steps required; turning on Internet Information Services and the FTP server followed by configuring the firewall. Additionally, we will be adding a few freeware FTP servers you can download at the bottom of this article.
1: Enable FTP Server
Press the Windows Key + S and begin typing and click on Turn Windows Features On or Off. You can also press the Windows Key + R, type appwiz.cpl and press enter.
Scroll down and enable Internet Information Services, then expand FTP Server and check those boxes.
Click on OK to install the required files. This process usually takes a few minutes.
Now open Administrative Tools by clicking on Start > Windows System > Windows Administrative Tools. Optionally, you could search for Administrative Tools.
Double-click on Internet Information Services (IIS) Manager.
Right-click on your computer name where you see Connections and select Add FTP site.
Name your FTP server and browse to the path of the folder(s) you want to make available.
Next, you can assign an IP address, port, start automatically, and SSL, which should be on. You should be able to run your FTP with the default settings. Making any changes here is for advanced users.
Because you want to use SSL, this means you need the additional step of creating your own SSL certificate. Comodo SSL Certificate Auto-Installer supports IIS and is your best bet, but once again, we're installing another program to get the Windows FTP working giving you one more reason to download a free FTP server. If you need a quick one-time FTP server, then you can select No SSL.
Finally, we can decide who can access the FTP server. You can select Anonymous or Basic and specify which groups can access the FTP server. Finally, you can pick read or write access. Selecting write will allow that user to make changes. Click Finish to start the FTP Server.
You should now see your FTP server added to the list of Connections we discussed earlier. Right-click on your FTP server where you see Connections, and you can edit permissions, add applications, manage settings, and more.
Are you still here? Well, now we need to configure the Windows Firewall settings. Yay!
Press the Windows Key + S and begin typing, then click on Allow an app through Windows Firewall. Click on Change settings. Scroll down to FTP server and check that as well as the Private and Public settings. Click on OK.
In case you missed it, we've mentioned numerous times that the Windows FTP server wouldn't be our first choice, not to mention this isn't this most secure way to host an FTP server. You can check out our available FTP tools here.
Filezilla Server is one freeware app that could save you a lot of time and trouble.
comments powered by Disqus
