


How to Show or Hide the Safely Remove Hardware Icon
By Timothy Tibbettson 06/15/2023 |
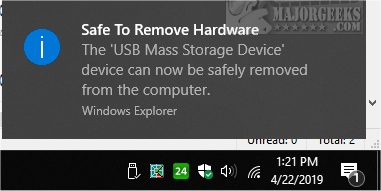
The Safely Remove Hardware icon protects a USB device if ejected. However, many of us either have a device plugged in all the time or never used this icon. Here's how to hide the icon from view. We also discuss a related problem when you have greyed-out options when trying to turn an icon on or off.
1: Hide the Icon
If you have Always show all icons in the notification area off (you see an arrow), then we can easily hide the icon from view.
Just click and hold the icon and drag it to the arrow. You can use this method to hide any icon you don't want to see.
2: Taskbar Settings
Right-click on a blank area of your Taskbar and click Taskbar settings. Scroll down and click on Select which icons appear on the taskbar.
Under Windows Explorer - Toggle on Safely Remove Hardware and Eject Media. You will need a USB device plugged in.
If you don't see it there, click back and look under Turn system icons on or off.
Greyed Out Turn System Icons on or Off
Before we move to step 2, you might see some items greyed out. There are two well-documented steps to solve this problem.
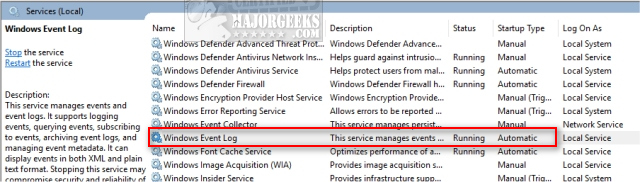
Press the Windows Key + S, type in and click on Administrative Tools. Find the Windows Event Log. The service needs to be Running and Automatic. If not, double-click Windows Event Log and click on Start and change the Startup type to Automatic. Next, open the Command Prompt or PowerShell and type in sfc /scannow.
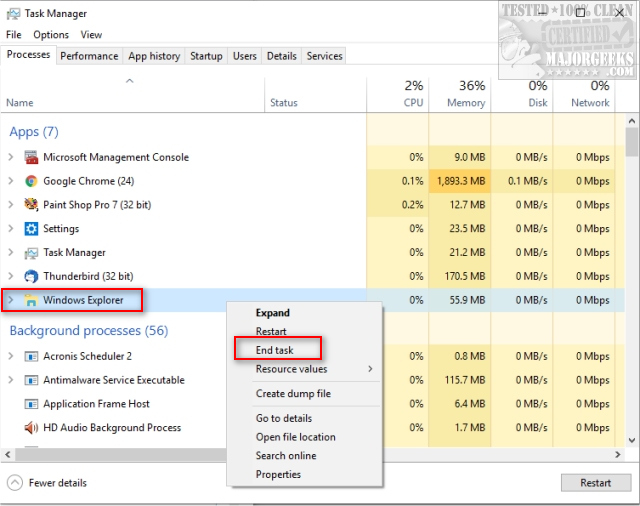
Microsoft has also suggested you kill any Windows Explorer processes and restart them. Press the Windows Key + X and click Task Manager. Right-click on any Windows Explorer processes and click End Task.
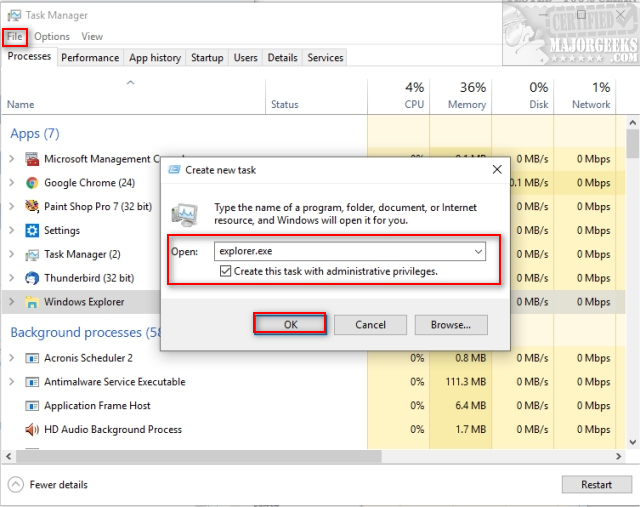
If your taskbar disappears, press the Windows key on your keyboard or continue to the next step.
Now click File, New task and type in explorer.exe. Check the box next to Create this task with administrative privileges and click OK.
comments powered by Disqus
1: Hide the Icon
If you have Always show all icons in the notification area off (you see an arrow), then we can easily hide the icon from view.
Just click and hold the icon and drag it to the arrow. You can use this method to hide any icon you don't want to see.
2: Taskbar Settings
Right-click on a blank area of your Taskbar and click Taskbar settings. Scroll down and click on Select which icons appear on the taskbar.
Under Windows Explorer - Toggle on Safely Remove Hardware and Eject Media. You will need a USB device plugged in.
If you don't see it there, click back and look under Turn system icons on or off.
Greyed Out Turn System Icons on or Off
Before we move to step 2, you might see some items greyed out. There are two well-documented steps to solve this problem.
Press the Windows Key + S, type in and click on Administrative Tools. Find the Windows Event Log. The service needs to be Running and Automatic. If not, double-click Windows Event Log and click on Start and change the Startup type to Automatic. Next, open the Command Prompt or PowerShell and type in sfc /scannow.
Microsoft has also suggested you kill any Windows Explorer processes and restart them. Press the Windows Key + X and click Task Manager. Right-click on any Windows Explorer processes and click End Task.
If your taskbar disappears, press the Windows key on your keyboard or continue to the next step.
Now click File, New task and type in explorer.exe. Check the box next to Create this task with administrative privileges and click OK.
comments powered by Disqus
