


How to Take Screenshots in Windows 10 and 11
By Timothy Tibbettson 06/19/2023 |
Windows has long supported taking screenshots with the Print SCRN button as well as some combinations of Print SCRN and other keys, but Windows 10 and 11 give you more options than ever before to take a screenshot however you want or need. Here are all of your screenshot options using Windows 10 or Windows 11.
Press the Print SCRN Key
The easiest way to take a screenshot is to take a screenshot of the entire screen by pressing the Print Screen (PrtSc) key once on your keyboard. (usually next to your F12 Key) This will copy the entire contents of your screen and save it into memory (clipboard).
You'll need to paste that data someplace. Windows includes Paint which is the most common way for people to adjust their screenshots, but you can use any graphics program. You can open it under Start, Windows Accessories, and select Paint. Once the program is open and either right-click in the screen area and select Paste or hit CTRL+V on your keyboard. If you take a lot of screenshots, you can right-click on Paint and "Pin to Start" to access it quickly later. Here are your choices to take a screenshot of the entire screen.
Note: Depending on your keyboard, there's a Print SCRN, prt scr, prnt scrn, or prt sc button.
Press the Windows Key + PRTSCN
The Windows Key + Print SCRN button will automatically save a screenshot for you in the Pictures folder. A folder called Screenshots will be added to your Pictures folder if it doesn't exist.
Press the START + VOLUME DOWN Buttons
On devices like the Surface, pressing the START + Volume Down will save a screenshot for you in the Pictures folder. A folder called Screenshots will be added to your Pictures folder if it doesn't exist.
Use the Snipping App
Microsoft includes a screenshot app called Snipping Tool. It will allow you to select a full desktop screen shot or define any area you like. You can find it under Start, Windows Accessories, Snipping Tool or press the Windows Key + S and type Snip and click on Snipping Tool. Click on New, and your screen will blur slightly. Next, click on the arrow next to Mode and select one of the following:
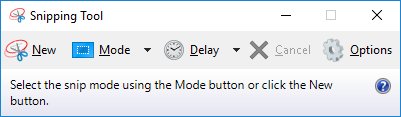
- Free-form Snip will draw a free-form shape around an object.
- Rectangular Snip lets you drag the cursor around an object to form a rectangle.
- Window Snip enables you to select any active Window you want to capture.
- Full-screen Snip captures the entire screen, the same as PRINT SCRN.
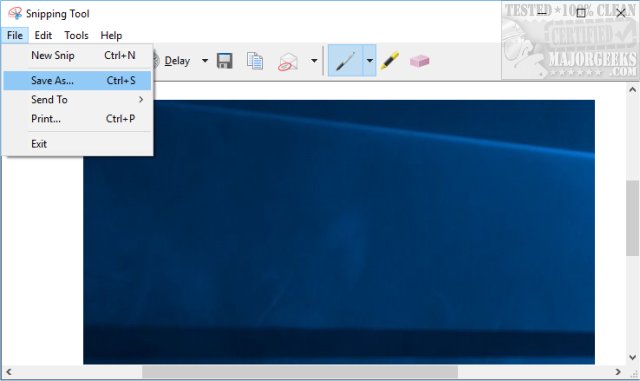
You'll notice a few other options, including Delay, Cancel, and Options. One advantage to the Snipping Tool is the ability to automatically save your screenshot as a JPG, PNG, GIF, or HTML. You can even use the eraser, highlighter, and pen to make minor changes as well as email the screenshot directly.
Press the ALT + PRINT SCRN Keys
If you press ALT + PRINT SCRN while on any active Window, it will capture that Window to the clipboard. this make a nice, clean, exact copy of the window you are in. Now, paste it into Paint or your favorite graphics app. This is the most frequent way we take the screenshots seen here on MajorGeeks, including the Snipping App screenshot above.
Use a Third-Party App
If Microsoft makes something, you can bet someone will try and do it better. Screen capturing utilities became so popular; we had to add a Screen Capture category just for them. There are probably sixty different apps to choose from, most free, depending on your needs. The previous link lists all the apps by popularity, or you can browse them by top rated.
comments powered by Disqus
Press the Print SCRN Key
The easiest way to take a screenshot is to take a screenshot of the entire screen by pressing the Print Screen (PrtSc) key once on your keyboard. (usually next to your F12 Key) This will copy the entire contents of your screen and save it into memory (clipboard).
You'll need to paste that data someplace. Windows includes Paint which is the most common way for people to adjust their screenshots, but you can use any graphics program. You can open it under Start, Windows Accessories, and select Paint. Once the program is open and either right-click in the screen area and select Paste or hit CTRL+V on your keyboard. If you take a lot of screenshots, you can right-click on Paint and "Pin to Start" to access it quickly later. Here are your choices to take a screenshot of the entire screen.
Note: Depending on your keyboard, there's a Print SCRN, prt scr, prnt scrn, or prt sc button.
Press the Windows Key + PRTSCN
The Windows Key + Print SCRN button will automatically save a screenshot for you in the Pictures folder. A folder called Screenshots will be added to your Pictures folder if it doesn't exist.
Press the START + VOLUME DOWN Buttons
On devices like the Surface, pressing the START + Volume Down will save a screenshot for you in the Pictures folder. A folder called Screenshots will be added to your Pictures folder if it doesn't exist.
Use the Snipping App
Microsoft includes a screenshot app called Snipping Tool. It will allow you to select a full desktop screen shot or define any area you like. You can find it under Start, Windows Accessories, Snipping Tool or press the Windows Key + S and type Snip and click on Snipping Tool. Click on New, and your screen will blur slightly. Next, click on the arrow next to Mode and select one of the following:
- Free-form Snip will draw a free-form shape around an object.
- Rectangular Snip lets you drag the cursor around an object to form a rectangle.
- Window Snip enables you to select any active Window you want to capture.
- Full-screen Snip captures the entire screen, the same as PRINT SCRN.
You'll notice a few other options, including Delay, Cancel, and Options. One advantage to the Snipping Tool is the ability to automatically save your screenshot as a JPG, PNG, GIF, or HTML. You can even use the eraser, highlighter, and pen to make minor changes as well as email the screenshot directly.
Press the ALT + PRINT SCRN Keys
If you press ALT + PRINT SCRN while on any active Window, it will capture that Window to the clipboard. this make a nice, clean, exact copy of the window you are in. Now, paste it into Paint or your favorite graphics app. This is the most frequent way we take the screenshots seen here on MajorGeeks, including the Snipping App screenshot above.
Use a Third-Party App
If Microsoft makes something, you can bet someone will try and do it better. Screen capturing utilities became so popular; we had to add a Screen Capture category just for them. There are probably sixty different apps to choose from, most free, depending on your needs. The previous link lists all the apps by popularity, or you can browse them by top rated.
comments powered by Disqus
