


How To Use VLC Media Player to Trim Video Clips
By Corporal Punishmenton 05/26/2025 |
Hey Geeks, do you have a video that is too long or has some parts that you don't want to keep? Maybe you want to make shorter clips for your social media reels or save some storage space.
VLC Media Player is a free and open-source program that can play, edit, and convert almost any video format. You can also trim video with it, and it's easy to do... Though admittedly could have been more intuitive. Here's how.
1. Open VLC media player and go to the Media menu. Select Open File and choose the video that you want to trim.
2. Move the slider to where you want to start and hit play to start the video. Go to the Playback menu and click on Record. This tells VLC Media Player that you want to start recording the video from the current position.
3. Use the slider or arrow keys to move to the video part you want to cut out. Click on Record again to stop 'recording'. The trimmed video will be saved in your Videos folder by default.
4. Repeat steps 2 and 3 for any other video parts you want to trim.
5. When you are done, go to your Videos folder. You will find the trimmed video files there with names like VLC-record-YYYY-MM-DD-hhmmss-filename.extension. You can rename them or move them to another location as you wish.
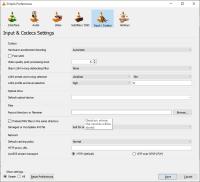
Now if you do not like saving to the default video folder, you can change that to any place you like by going to Tools>> Preferences>>Input/Codecs and then looking for Record Directory or File Name and changing it to wherever you like. That save location will take effect the next time you restart the program.
That's it! A simple, quick, and free way to trim and edit your videos clips without any hassle using VLC Media Player. I hope you found this helpful and easy to follow. If you have any questions or feedback, feel free to comment below. Thanks for reading!
comments powered by Disqus
VLC Media Player is a free and open-source program that can play, edit, and convert almost any video format. You can also trim video with it, and it's easy to do... Though admittedly could have been more intuitive. Here's how.
1. Open VLC media player and go to the Media menu. Select Open File and choose the video that you want to trim.
2. Move the slider to where you want to start and hit play to start the video. Go to the Playback menu and click on Record. This tells VLC Media Player that you want to start recording the video from the current position.
3. Use the slider or arrow keys to move to the video part you want to cut out. Click on Record again to stop 'recording'. The trimmed video will be saved in your Videos folder by default.
4. Repeat steps 2 and 3 for any other video parts you want to trim.
5. When you are done, go to your Videos folder. You will find the trimmed video files there with names like VLC-record-YYYY-MM-DD-hhmmss-filename.extension. You can rename them or move them to another location as you wish.
▶
Now if you do not like saving to the default video folder, you can change that to any place you like by going to Tools>> Preferences>>Input/Codecs and then looking for Record Directory or File Name and changing it to wherever you like. That save location will take effect the next time you restart the program.
That's it! A simple, quick, and free way to trim and edit your videos clips without any hassle using VLC Media Player. I hope you found this helpful and easy to follow. If you have any questions or feedback, feel free to comment below. Thanks for reading!
comments powered by Disqus
