


Must Have Tool for Creality Ender 3 Users
By Corporal Punishmenton 12/30/2023 |
Hey Geeks!
I know there are a ton of you 3D printing enthusiasts out there. Count me as one as well. If you are into it, you know that 3D Printing is not an exact science, and failures happen. During my learning curve, I have stuck, wrecked, replaced, and sometimes destroyed several models of printers.
My current printer is a Creality Ender 3 Pro S1, which I purchased because of its Sprite direct extruder's replaceable printed heads, which have some advantages over a Bowdon extruder. Without getting too deep into it
Direct extruders: These have the cold end (the motor and the extruder) fixed on the hot end (the heat sink, fan, and nozzle), and the filament is directly pushed into the hot end. This type of print head can control the extrusion of the material very well and is suitable for flexible filaments. However, it is heavier and can cause more vibrations and inertia during Printing.
Bowden extruders: These have the cold end separated from the hot end by a tube, and the filament is fed through the tube to the hot end. This type of print head is lighter and can print faster and more accurately. However, the tube has more friction and resistance, which can cause under-extrusion or oozing. It is also less compatible with flexible filaments.
The other advantage of the Creality Ender 3 Pro S1 is it offers a metal print bed that is detachable and flexible, making part removal far more manageable. HOWEVER -- I have found getting the part to stick a challenge.
If your part fails to stick to the bed, your printer cannot know this and will keep extruding filament until the print is done or the printer fails. Here is a photo from the forums about what this can look like. It's not pretty. If this happens to you, I highly recommend getting a wood-burning kit and surgically removing the hardened filament. Heat guns help, too.
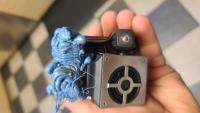
This is what happened to me the other day.
The extruder assembly was fine after removing the gunked-up plastic. However, the heat block sensor wire (the thinnest damn copper I have ever seen) was broken, and the pointer will not run if it cannot sense the extrusion template. So, no big deal - I ordered a new one for less than $35 from Amazon.
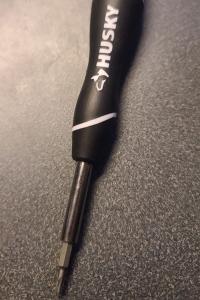
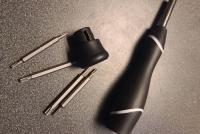
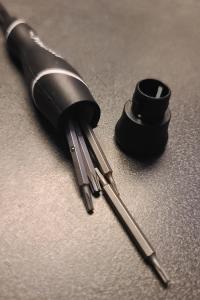
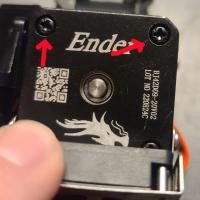
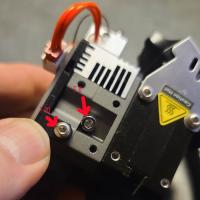
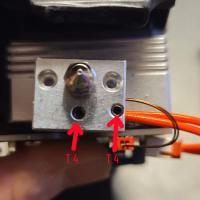
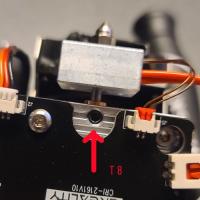
This was when the annoyance kicked in. While trying to replace the block, I need no less than four precision screw head types. Seriously 4 ??!! (see below) And to make it worse, I had 3 of the 4! After digging through my Allen wrench bucket, I finally gave up and found this little beauty, the Husky 1000! (I got it at Home Depot, but here's an Amazon link) This little beauty is an inclusive 8-in-1-star precision screwdriver set. It has T4, T5, T6, T7, T8, T9, T10, and T15, all on four interchangeable bits. The bit is stored neatly in a screw top swivel handle, but best of all, they fit all the needed precision screws on the Ender 3! Trust me, this is a must-have if you tinker, and if the makers of Creailty products read this -- you should add a tool like to the purchase package.
Ok, I realize this is an editorial about melting plastic, breaking sensors, and getting hyper-jacked up over the coolness of a screwdriver - but if anyone can get why I'm so stoked, You Geeks get why I am so stoked... So, I had to share; hopefully, it helps someone out.
Also --
1) No they won't work on the Philips head. That photo was to demo the strangeness of so many types in a small area.
2) As pointed out by super geek Sujit Liddle, the screws are actually hex, not torx. Torx can work with hex - hex does not work with torx. Some people may take offense to this, but it's fine unless you are really cranking on it - which, in this case, there is no need. I have still been unable to find a hex bit to fit the block screws -- which is why this tool is awesome.
Do you have a horror story about 3D Printing or a pic of something you have made? A Gadget you can't live without? Drop in below in the comments. We would love to see them.
Creality Ender 3 Pro Sprite Extruder Screws
comments powered by Disqus
I know there are a ton of you 3D printing enthusiasts out there. Count me as one as well. If you are into it, you know that 3D Printing is not an exact science, and failures happen. During my learning curve, I have stuck, wrecked, replaced, and sometimes destroyed several models of printers.
My current printer is a Creality Ender 3 Pro S1, which I purchased because of its Sprite direct extruder's replaceable printed heads, which have some advantages over a Bowdon extruder. Without getting too deep into it
Direct extruders: These have the cold end (the motor and the extruder) fixed on the hot end (the heat sink, fan, and nozzle), and the filament is directly pushed into the hot end. This type of print head can control the extrusion of the material very well and is suitable for flexible filaments. However, it is heavier and can cause more vibrations and inertia during Printing.
Bowden extruders: These have the cold end separated from the hot end by a tube, and the filament is fed through the tube to the hot end. This type of print head is lighter and can print faster and more accurately. However, the tube has more friction and resistance, which can cause under-extrusion or oozing. It is also less compatible with flexible filaments.
The other advantage of the Creality Ender 3 Pro S1 is it offers a metal print bed that is detachable and flexible, making part removal far more manageable. HOWEVER -- I have found getting the part to stick a challenge.
If your part fails to stick to the bed, your printer cannot know this and will keep extruding filament until the print is done or the printer fails. Here is a photo from the forums about what this can look like. It's not pretty. If this happens to you, I highly recommend getting a wood-burning kit and surgically removing the hardened filament. Heat guns help, too.
This is what happened to me the other day.
The extruder assembly was fine after removing the gunked-up plastic. However, the heat block sensor wire (the thinnest damn copper I have ever seen) was broken, and the pointer will not run if it cannot sense the extrusion template. So, no big deal - I ordered a new one for less than $35 from Amazon.
This was when the annoyance kicked in. While trying to replace the block, I need no less than four precision screw head types. Seriously 4 ??!! (see below) And to make it worse, I had 3 of the 4! After digging through my Allen wrench bucket, I finally gave up and found this little beauty, the Husky 1000! (I got it at Home Depot, but here's an Amazon link) This little beauty is an inclusive 8-in-1-star precision screwdriver set. It has T4, T5, T6, T7, T8, T9, T10, and T15, all on four interchangeable bits. The bit is stored neatly in a screw top swivel handle, but best of all, they fit all the needed precision screws on the Ender 3! Trust me, this is a must-have if you tinker, and if the makers of Creailty products read this -- you should add a tool like to the purchase package.
Ok, I realize this is an editorial about melting plastic, breaking sensors, and getting hyper-jacked up over the coolness of a screwdriver - but if anyone can get why I'm so stoked, You Geeks get why I am so stoked... So, I had to share; hopefully, it helps someone out.
Also --
1) No they won't work on the Philips head. That photo was to demo the strangeness of so many types in a small area.
2) As pointed out by super geek Sujit Liddle, the screws are actually hex, not torx. Torx can work with hex - hex does not work with torx. Some people may take offense to this, but it's fine unless you are really cranking on it - which, in this case, there is no need. I have still been unable to find a hex bit to fit the block screws -- which is why this tool is awesome.
Do you have a horror story about 3D Printing or a pic of something you have made? A Gadget you can't live without? Drop in below in the comments. We would love to see them.
Creality Ender 3 Pro Sprite Extruder Screws
comments powered by Disqus
