


What is Whitelisting an Application and When to Use It?
By Corporal Punishmenton 07/20/2024 |
 Has your antivirus software ever flagged a perfectly safe application as a threat, prompting a WTH moment? It's called a false positive, and it can be pretty frustrating not only because you know the file is good, but now you can't get the program to run or download due to the flag. The good news is you can solve this issue by whitelisting the program. Let's take a look into what whitelisting is in the context of antivirus software, why you might need it, and how to do it.
What is Whitelisting?
In antivirus software, whitelisting means adding a program to an approved list so the antivirus won't flag it as a threat again. This is particularly useful when a safe program is mistakenly identified as malicious – a false positive. The term "whitelisting" originates from the practice of creating a list (a whitelist) of entities that are considered trustworthy and allowed to perform specific actions or access certain resources. It contrasts with "blacklisting," where only the entities on the list are blocked or denied access.
Whitelisting isn't just used in antivirus software. It's a concept widely used in network security, email filtering, and even social media platforms. For instance, companies often whitelist certain IP addresses to allow access to internal networks, ensuring that only authorized devices can connect. Or, they may whitelist a domain to always accept email from it. The same concept applies here.
Why Whitelisting is Important?
False positives can be more than just a minor inconvenience. When a legitimate program is flagged, it can disrupt your workflow, cost you time, or even ruin your gaming session (gasp!) --- causing unnecessary frustration. Whitelisting an application tells the antivirus app to trust it, so you can then use it without further interference from your antivirus. This is especially useful when using open-source or niche software, which often gets flagged for a number of reasons.
It also makes your system more efficient by reducing the number of unnecessary scans and alerts, allowing the antivirus to focus on actual threats. Constantly dealing with false positives can erode trust in your antivirus software. You may start questioning whether it's accurately protecting you or just getting in the way, making some users disable the antivirus altogether—which is no bueno. Whitelisting helps maintain a balance, ensuring security without compromising usability.
When to Use Whitelisting
Whitelisting should be used when you encounter a false positive – an instance where your antivirus flags a program you know is safe. This typically happens with lesser-known applications or custom software that the antivirus hasn't encountered before. It's important to be certain that the program isn't malware before whitelisting it. If you have doubts, read our guide on how to tell if a flag is a false positive. If the software is critical to your work or personal use, whitelisting it will help you avoid interruptions and maintain smooth operation.
How to Whitelist a Program
Every program is a little different on handling whitelisting a program or folder. Since Windows Defender is the most popular antivirus out there right now, we will walk you through that process - thankfully, it is straightforward. Here's a step-by-step guide:
1. Open Windows Security: Click on the Start menu, type "Windows Security," and press Enter. This will open the Windows Security dashboard.
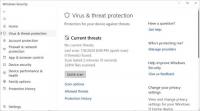
2. Go to Virus & Threat Protection: In the Windows Security window, click on "Virus & Threat Protection." This section handles all things related to antivirus and threat management.
3. Manage Settings: Under "Virus & threat protection settings," click on "Manage settings." Here, you'll find options to adjust how Windows Defender scans and protects your system.
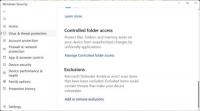
4. Add an Exclusion: Scroll down to "Exclusions" and click on "Add or remove exclusions." Here, you can specify files, folders, file types, or processes that Windows Defender should ignore.
5. Choose Exclusion Type: Click on "Add an exclusion," and select the type of exclusion you want to add – File, Folder, File type, or Process. Typically, you'll be adding a file or folder. For most false positives, selecting "File" will suffice.
6. Select the Program: Browse to the program's executable file you want to whitelist. Select the file and click "Open." This adds the file to the list of exclusions.
7. Confirm the Exclusion: The file will now appear in the list of exclusions, meaning Windows Defender will no longer block or scan it. You can always remove it from the exclusion list if needed.
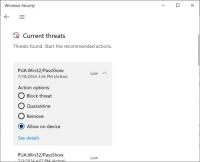
8. Prior Detection: If the application you want has a prior edition, it's even easier. Just click the arrow down next to the detection, choose to allow on the device, and apply.

In Conclusion:
Antivirus companies shoulder a huge responsibility and dance a fine line to help keep you protected. Dealing with false positives can be annoying, but it's better than the alternative. Whitelisting provides a straightforward solution to this balance, making it a great tool for enhancing your computer's security, ensuring that the programs you trust are allowed to run, and avoiding unnecessary interruptions.
So there you have it. If you have any questions, please ask in the comments below or in the forums, where the uber-geeks will gladly help.
comments powered by Disqus
