Windows Image Acquisition Causing High CPU and Disk Usage
By Timothy Tibbettson 06/15/2023 |
Windows Image Acquisition (WIA) is a service that provides image acquisition for scanner and cameras. This service has been known to cause high CPU or hard drive usage when running. Following these steps, we can eliminate this problem.
1: Restart the Windows Image Acquisition Service
Press the Windows Key + R and type in services.msc and press enter.
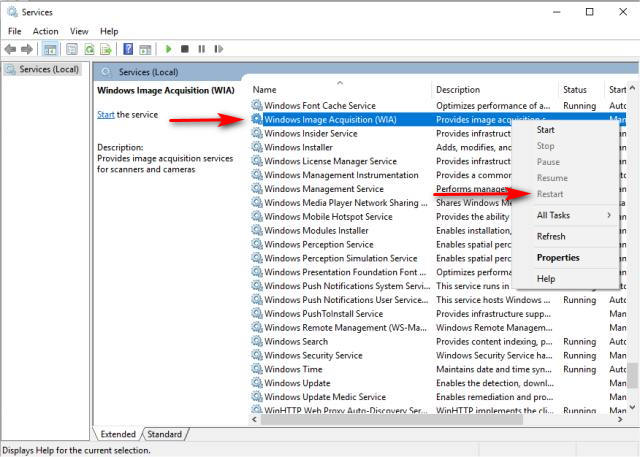
Scroll down to Windows Image Acquisition (WIA), right-click and choose Restart.

If the Windows Image Acquisition service is not running, a reboot is worth a try now.
2: Disconnect Any Imaging Hardware
A quick way to diagnose hardware problems is to disconnect anything that might start and stall the Windows Image Acquisition service. Smartphones, camera, printers, or scanners are the most likely culprit. If the problem stops, you can plug them in one at a time to find the culprit. You may need to replace that hardware or update the drivers.
3: Update Drivers
As mentioned above, drivers can easily be the cause. Check for an updated driver for your hardware. You might also want to update your motherboard drivers since they all work together. We use Driver Booster.
If your hardware is older than your operating system and there are no updated drivers available, you might need to replace your hardware with something compatible. A good example would be a 5-year-old printer on Windows 10 that hasn't seen a driver update since Windows 8.
4: Run System File Checker
Microsoft System File Checker is a useful, built-in utility that can scan for, and restore, corrupted files in Windows. It is often used and recommended by techs and advanced users, however, it's relatively simple to use. Here's all you need to know to use System File Checker or Sfc /Scannow in text and video format.
Windows 10, Windows 8.1 or Windows 8 users will need to first run the Deployment Image Servicing and Management (DISM) tool before running the System File Checker. DISM will use Windows Update to provide any files that are needed to fix corruptions. If you skip this step, System File Checker might not work. Windows 7 and Vista users can skip this step.
You will need to first open the Command Prompt or PowerShell as administrator.
Type in DISM.exe /Online /Cleanup-image /Restorehealth and press enter. This may take a few minutes.
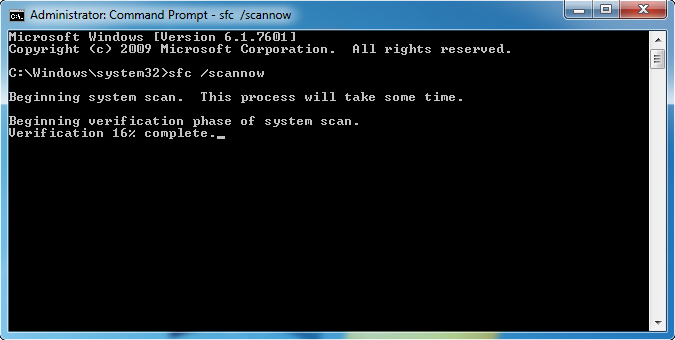
Next, type in sfc /scannow followed by pressing the Enter key.

System File Checker will now scan for and replace files from the Windows cache, typically located at C:\Windows\System32\dllcache.
Once completed, you should see one of four possible results:
Windows Resource Protection did not find any integrity violations - You should be good to go as no issues were found.
Windows Resource Protection could not perform the requested operation - Run SFC from safe mode and also verify PendingDeletes, and PendingRenames folders exist under C:\WinSxS\Temp
Windows Resource Protection found corrupt files and successfully repaired them - Problems were found and fixed. Microsoft has a page here to show you how to view details.
Windows Resource Protection found corrupt files but was unable to fix some of them - Odds are the file couldn't be replaced, and you'll need to do so manually. Scroll back up to see how to view the log file to locate the file in question.
A reboot will be required, and you're done.
comments powered by Disqus
1: Restart the Windows Image Acquisition Service
Press the Windows Key + R and type in services.msc and press enter.
Scroll down to Windows Image Acquisition (WIA), right-click and choose Restart.

If the Windows Image Acquisition service is not running, a reboot is worth a try now.
2: Disconnect Any Imaging Hardware
A quick way to diagnose hardware problems is to disconnect anything that might start and stall the Windows Image Acquisition service. Smartphones, camera, printers, or scanners are the most likely culprit. If the problem stops, you can plug them in one at a time to find the culprit. You may need to replace that hardware or update the drivers.
3: Update Drivers
As mentioned above, drivers can easily be the cause. Check for an updated driver for your hardware. You might also want to update your motherboard drivers since they all work together. We use Driver Booster.
If your hardware is older than your operating system and there are no updated drivers available, you might need to replace your hardware with something compatible. A good example would be a 5-year-old printer on Windows 10 that hasn't seen a driver update since Windows 8.
4: Run System File Checker
Microsoft System File Checker is a useful, built-in utility that can scan for, and restore, corrupted files in Windows. It is often used and recommended by techs and advanced users, however, it's relatively simple to use. Here's all you need to know to use System File Checker or Sfc /Scannow in text and video format.
Windows 10, Windows 8.1 or Windows 8 users will need to first run the Deployment Image Servicing and Management (DISM) tool before running the System File Checker. DISM will use Windows Update to provide any files that are needed to fix corruptions. If you skip this step, System File Checker might not work. Windows 7 and Vista users can skip this step.
You will need to first open the Command Prompt or PowerShell as administrator.
Type in DISM.exe /Online /Cleanup-image /Restorehealth and press enter. This may take a few minutes.
Next, type in sfc /scannow followed by pressing the Enter key.

System File Checker will now scan for and replace files from the Windows cache, typically located at C:\Windows\System32\dllcache.
Once completed, you should see one of four possible results:
A reboot will be required, and you're done.
comments powered by Disqus


