


Boost Your PC Speed with ReadyBoost: How a Thumb Drive Can Enhance Your System's Performance
By Corporal Punishmenton 09/21/2025 |
 ReadyBoost is a feature Microsoft introduced back with Vista 2007. This feature was designed to help improve system performance for computers with slower hard disk access times by using flash memory on a USB drive as an additional cache, which promises to boost your system's performance using something as simple as a thumb drive. The classic use of ReadyBoost would be with a laptop that may have maxed out on RAM but is still in great shape. Lately, ReadyBoost has been coming up in topics, likely because we are in that cycle of PC upgrades where the use may start to make sense again. But how effective is it really, and is it still useful?? Here, we will look at how to use it, the pros and cons of implementing this feature, and if using ReadyBoost could help you.
What is ReadyBoost?
ReadyBoost is a Windows feature that allows you to use the storage space on a USB flash drive or an SD card as an additional memory cache, acting as a hard drive buffer to improve system speed. Since the cache provides a local copy of frequently accessed data, it reduces the time it takes for the processor to fetch data. This results in quicker task execution and smoother system performance.
It's especially beneficial for systems with lower RAM, leveraging the flash memory on the external device to speed up access to frequently used files and applications. In this case, ReadyBoost can be a handy tool when you need a quick boost in performance without upgrading your physical RAM.
Further, moving some of the memory caches off the hard disk and onto the ReadyBoost Drive can significantly boost performance for systems with older, slower hard disks.
While great for cheap storage, traditional hard drives (HDDs) generally offer read and write speeds ranging only from 80 to 160 MB/s. Internal SSD drives range from around 200MB/s to 550MB/s.
Top-performing NVMe drives exceed 3,000 megabytes per second (MB/s), and some newer models can reach up to 7,500 MB/s. If you are running an SSD or NVMe setup, you can stop reading here unless you have capacity issues or are curious.
USB thumb drives can vary widely in performance. USB 2.0 drives have a maximum theoretical speed of about 60 MB/s, but actual speeds often hover around 20-30 MB/s. They are a lousy choice as a ReadyBoost option. The more advanced USB 3.0 drives significantly enhance this, offering realistic speeds between 100-200 MB/s due to a higher theoretical limit of 5 about 625 MB/s). The latest USB 3.1 and 3.2 drives push this boundary even further, capable of speeds up to about 1250 MB/s.
To sum up those numbers, modern USB 3.0 and above thumb drives can offer significantly faster data transfer speeds than traditional HDDs, particularly in terms of read speed. This is one of the reasons why USB drives are useful for tasks like ReadyBoost, where quick read speeds can help improve system performance. Granted, adding a high-quality solid-state drive will outperform a USB thumb drive, especially in terms of continuous read/write, reliability, and capacity. But the convenience of dropping in a thumb drive and using it for a ready boost is still appealing even in that case.
SSD Cards also vary widely. If you would like to know more about that to compare for your setup, read The Differences in microSD Cards and How to Choose One for Your Device
How to Use ReadyBoost
Using ReadyBoost is one of the most straightforward tweaks you can do on your PC. It requires one left click, three right clicks and a thumb drive.
- Insert a USB Thumb Drive or SSD drive.
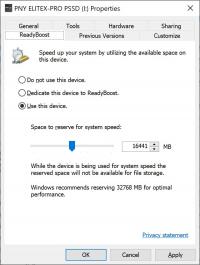
- On this PC, right-click on the USB drive, select "Properties", and navigate to the "ReadyBoost" tab. Here, you can dedicate all or part of the USB drive's storage to ReadyBoost.
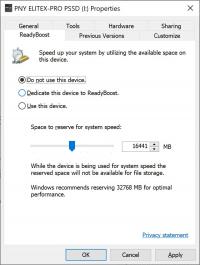
- Configure the use option by selecting either "Dedicate this device", which will use all of the USD drives, or "Use this Device," where you can select a set amount of space for the additional cache. Your optimal results will vary. Still, you can start with as much space as possible for ReadyBoost, though the benefits tend to plateau after a certain point.
- Click apply, and you are done. You do not need to reboot your computer for ReadyBoost to start working.
NOTE: Disable ReadyBoost when you are done using it. Most people will set ReadyBoost up and an old box and forget about it; however, if you want to pull out that thumb drive, remember there is live cached data on that thing. So, you need to disable ReadyBoost before taking out the USB device. To do this, follow the same steps as above and choose 'Do Not Use This Device.' Then click apply. That will close out the cache and let you remove the device safely.
Is ReadyBoost working for me?
You can look at a few system tools to see if Readyboost is working and helping your system, but sadly, no one tool can say yes or no. Here are some things to look at to help.
ReadyBoost Cache Monitoring:
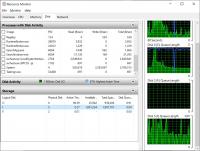
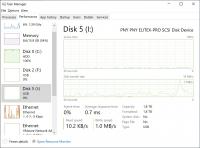
- Press Ctrl + Shift + Esc to open Task Manager.
- Go to the Performance tab.
- Select your USB drive from the left panel (typically labeled as "Removable" or "USB Drive").
- Look for "Active Time" and "Disk Transfer Rate" to observe activity indicating ReadyBoost is in use.
Monitor Disk Activity:
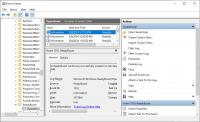
- Press Win + R, type 'resmon', and press Enter to open Resource Monitor.
- Go to the Disk tab.
- In the "Disk " tab, look down at the Storage section for the drive letter you are using for ReadyBoost. There, you can tell how much of the partition is being used by your system and adjust it higher or lower for your needs.
ReadyBoost Operational Log:
- Press Win + S and type Event Viewer, then open it.
- Navigate to Applications and Services Logs > Microsoft > Windows > ReadyBoost > Operational.
- Look for recent events that confirm ReadyBoost is caching data and operational.
Overall System Performance:
Monitor whether your computer feels faster or more responsive with ReadyBoost enabled, particularly when launching applications or switching between tasks. ReadyBoost is most noticeable on systems with limited RAM. It really shines when you open and close programs often or use lots of programs at the same time.
Benchmark Test:
Measure system performance with and without ReadyBoost by disabling/enabling it and using benchmarking software to observe changes in application load times and system responsiveness. We have a ton of Benchmark tools listed that you can have some fun with.
Pros of Using ReadyBoost
- Cost-Effective: Using an existing USB drive for ReadyBoost is cheaper than buying new RAM.
- Easy to Set Up and Reversible: It's simple to start using ReadyBoost and can be disabled just as easily without any risk to the system.
- Performance Boost: ReadyBoost leverages relatively inexpensive USB drives or SD cards to provide a quickspeed boost.
- Boosting Older Systems: Older PCs that can't be upgraded to newer RAM modules may significantly improve performance.
- Enhancing Gaming Performance: Gamers likely can reduce load times and improve performance in resource-intensive games on older machines.
- Improving Software Launch Speeds: Programs that frequently access the hard disk for data can benefit from ReadyBoost, making them quicker to launch and use
- Portable: You can use the same ReadyBoost-enabled USB drive to speed up other Windows PCs.
Cons of Using ReadyBoost
- Limited Benefit on Systems with Adequate RAM: Computers with sufficient RAM might not significantly improve.
- Flash Drive Wear and Tear: Frequent writing and rewriting to the USB drive can reduce its lifespan. But they are cheap.
- Not a Substitute for RAM Upgrade: ReadyBoost provides a temporary boost but is not a complete replacement for upgrading your RAM.
- Speed Dependent on Device Quality: Not all USB drives are suitable for ReadyBoost. If the drive is too slow, ReadyBoost won't work effectively.
- Possible Delays When Removing USB Drive: Removing the ReadyBoost USB drive without safely ejecting it can cause system delays and errors.
- Incompatibility with Some Devices: ReadyBoost only works with specific devices and file systems, such as FAT32 or NTFS. Drives formatted in exFAT might not be supported.
Conclusion
While ReadyBoost is not a magical fix for all performance issues, it can effectively improve system response time on older or lower-spec computers. This feature allows you to enhance your computer's performance without a hefty investment. The tool is hands-down handy as heck. I have an old Office machine with 16 Gig of RAM that ReadyBoost helps make quite usable allowing me to put off an upgrade. Still, it should be considered a temporary fix for older Windows 10 machines that are still perfectly functional but aren't worth putting a lot of money into.
Further, the ReadyBoost feature in Windows 11 is disabled if you have an SSD drive or removed altogether, depending on your version of of Windows 11. If you have a Windows 11 machine and need the ReadyBoost option, you can do this via the Go Back feature in Windows settings and return to 21H2 if it is still available. Otherwise, you are looking at a clean install. Honestly, at that point, get some RAM it would be less hassle.
comments powered by Disqus
