


How To Change the Display Refresh Rate in Windows 11
By selma čitakovićon 05/22/2026 |
![{$insert['content_title']](/content/file/6033_image3.png
)
Sometimes Windows defaults your display to a lower refresh rate than what it actually supports. This will impact your gaming, browsing, and scrolling. So, if you are gaming with a decently high framerate but with a lower refresh rate, your FPS will be limited by it. For example, at 60Hz, your performance is capped at 60 FPS, even though it can produce more frames.
If this also happened to you (...or you forgot to change it after getting a new monitor), we've got you covered. Here's how to change your display refresh rate in just a few steps.
Via Settings
You'll have to navigate all the way to Advanced Display Settings:
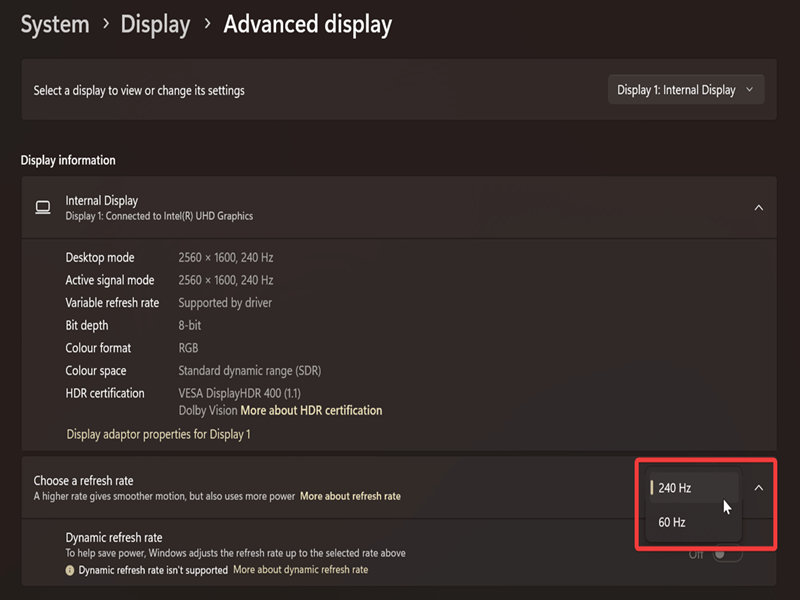
- Go to Settings > System > Display.
- Select Advanced Display under Related settings.
- If you have multiple screens, choose the one you want in the drop-down menu at the top. Otherwise, skip this step.
- Click the drop-down menu next to Choose a refresh rate, then select the value.
- You'll be asked to confirm your decision. Click on Keep changes.
Via Display adapter properties
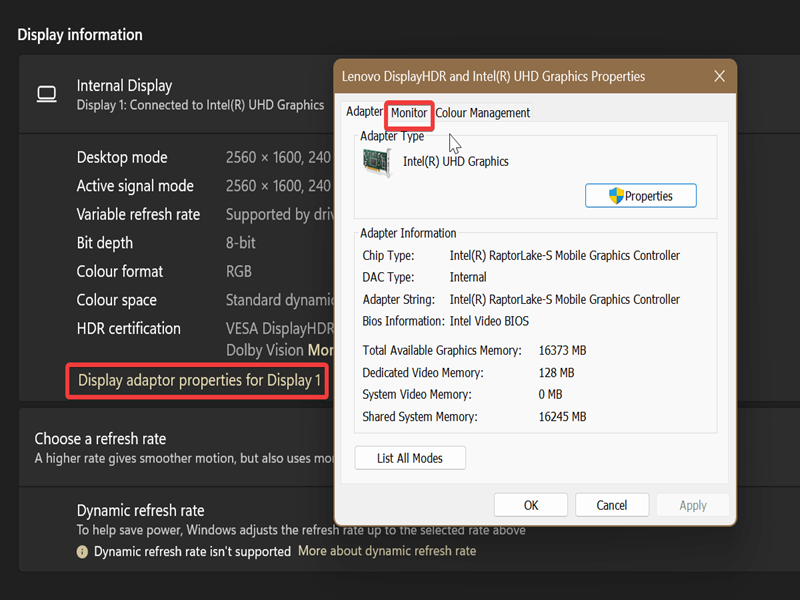
Alternatively, in the same Settings section, you can access your display adapter properties. Follow the steps 1-3 from the previous method, and then proceed like this:
- Click the Display adapter properties for Display X link under the selected display's information.
- This will open a new Properties window. Click the Monitor tab.
- Choose a Screen refresh rate from the menu, and click OK.
- You'll be asked to confirm your decision. Select Keep changes.
Via NVIDIA Control Panel
Both previous methods were universal and available to everyone, because they don't depend on your GPU. But if you have an NVIDIA graphics card and drivers, you can also try this:
- Right-click an empty spot on your desktop and select Show more options > NVIDIA Control Panel.
- Select Change resolution under Display on the left. (This will only show up if your monitor is actually using your NVIDIA GPU. A laptop with a hybrid setup, for example, is configured to use your integrated graphics card for everyday tasks and scrolling, and switch to your dedicated GPU for more intense activities. So, if your display is currently relying on your iGPU, this option will be unavailable in the NVIDIA panel.)
- Choose the display you want to configure, and then the refresh rate from the drop menu under it.
- Click Apply.
- A confirmation window will pop up. Click Yes to keep the changes.
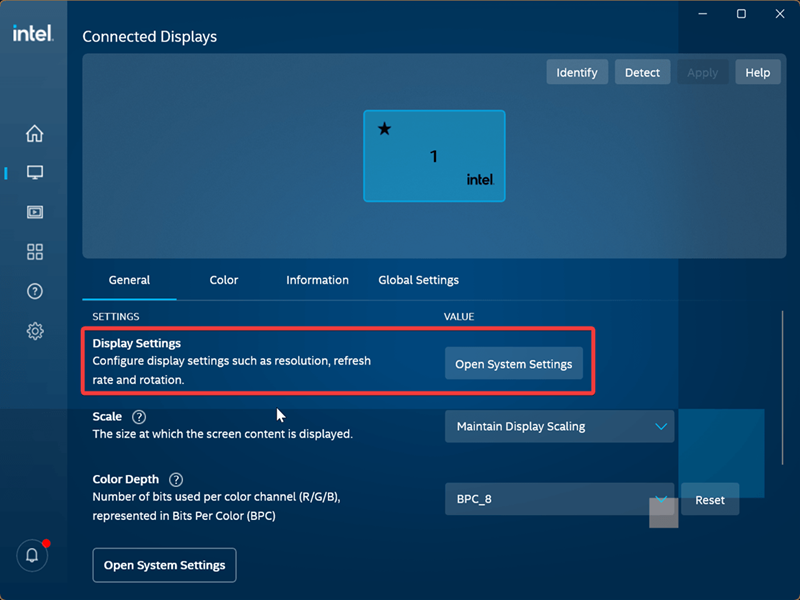
Additionally, you could previously use Intel Graphics Control Panel, but it's been largely replaced by Intel Graphics Command Center. This new iteration doesn't have the same settings that let you adjust your refresh rate.
For example, if you open the app and go to Display > General, you'll only see a shortcut to the Windows display settings. Meh.
Still, you should have no problems adjusting your refresh rate with just these settings. You can also check out our older guide for Windows 10.

|
selma citakovic
Selma is a gamer, geek and gremlin hunter with a passion for cyber security and smashing Windows bugs before they bite. She’s IBM-certified, loves real freeware, despises bloatware, and powers most of her troubleshooting with an unhealthy amount of coffee. |
comments powered by Disqus
