


How to Disable Clipboard History in Windows 10
By Timothy Tibbettson 10/03/2022 |
Windows 10 includes a clipboard history feature that can store your clipboard history, which you can see at any time using the Windows Key + V. Also, you can sync your clipboard history across devices. Here's how to disable this feature.
We can disable the clipboard history in Settings, Group Policy Editor, or the Registry.
1: Disable in Settings
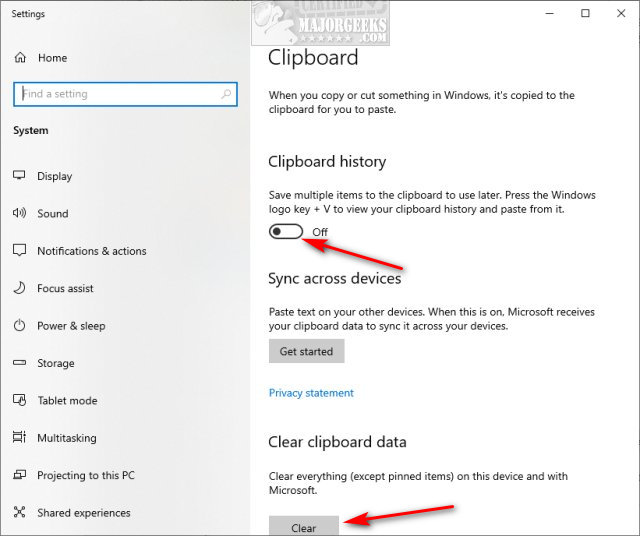
Go to Start > Settings > System > Clipboard.
Uncheck the box under Clipboard History.
Click on Clear under Clear clipboard data.
2: Disable in Registry
We have exported the registry file for you and made that available for download - Disable Clipboard History in Windows 10. Just right-click one of the included files to enable or disable the clipboard history. Double-click on Disable Clipboard History.reg or Enable Clipboard History.reg and click Yes for the User Account Control prompt and again when warned about editing the registry. Reboot your computer.
Open the Registry Editor and copy and paste HKEY_LOCAL_MACHINE\SOFTWARE\Policies\Microsoft\Windows\System in the search bar.
Click on the right side and click New > DWORD (32-bit Value).

Name the new DWORD AllowClipboardHistory. Use 0 to disable and 1 to enable the clipboard history. Reboot.
3: Disable in Group Policy Editor
Windows 10 Home users will need to Enable Group Policy Editor (gpedit.msc). It's really easy to do.
Expand to Computer Configuration > Administrative Templates > System > OS Policies. On the right window, double-click on Allow Clipboard History.
Click on Disabled then OK. Reboot.
That's it!
You should always be able to turn your clipboard history back on by pressing the Windows Key + V and click on Turn on.

comments powered by Disqus
We can disable the clipboard history in Settings, Group Policy Editor, or the Registry.
1: Disable in Settings
Go to Start > Settings > System > Clipboard.
Uncheck the box under Clipboard History.
Click on Clear under Clear clipboard data.
2: Disable in Registry
We have exported the registry file for you and made that available for download - Disable Clipboard History in Windows 10. Just right-click one of the included files to enable or disable the clipboard history. Double-click on Disable Clipboard History.reg or Enable Clipboard History.reg and click Yes for the User Account Control prompt and again when warned about editing the registry. Reboot your computer.
Open the Registry Editor and copy and paste HKEY_LOCAL_MACHINE\SOFTWARE\Policies\Microsoft\Windows\System in the search bar.
Click on the right side and click New > DWORD (32-bit Value).
Name the new DWORD AllowClipboardHistory. Use 0 to disable and 1 to enable the clipboard history. Reboot.
3: Disable in Group Policy Editor
Windows 10 Home users will need to Enable Group Policy Editor (gpedit.msc). It's really easy to do.
Expand to Computer Configuration > Administrative Templates > System > OS Policies. On the right window, double-click on Allow Clipboard History.
Click on Disabled then OK. Reboot.
That's it!
You should always be able to turn your clipboard history back on by pressing the Windows Key + V and click on Turn on.
comments powered by Disqus
