


How to Fix Diskpart Failed to Clear Disk Attributes Error
By Timothy Tibbettson 06/15/2023 |
The Diskpart tool is a command-line tool to manage partitions in Windows 10. A known error can appear when making changes to your partitions that states "Diskpart failed to clear disk attributes." In this guide, we look into possible reasons and solutions for this error.
1: Run Microsoft System File Checker
Microsoft System File Checker is a useful, built-in utility that can scan for, and restore, corrupted files in Windows. It is often used and recommended by techs and advanced users, however, it's relatively simple to use. Here's all you need to know to use System File Checker or Sfc /Scannow in text and video format.
1: Getting Started
Windows 10, Windows 8.1 or Windows 8 users will need to first run the Deployment Image Servicing and Management (DISM) tool before running the System File Checker. DISM will use Windows Update to provide any files that are needed to fix corruptions. If you skip this step, System File Checker might not work. Windows 7 and Vista users can skip this step.
You will need to first open the Command Prompt or PowerShell as administrator.
Type in DISM.exe /Online /Cleanup-image /Restorehealth and press enter. This may take a few minutes.
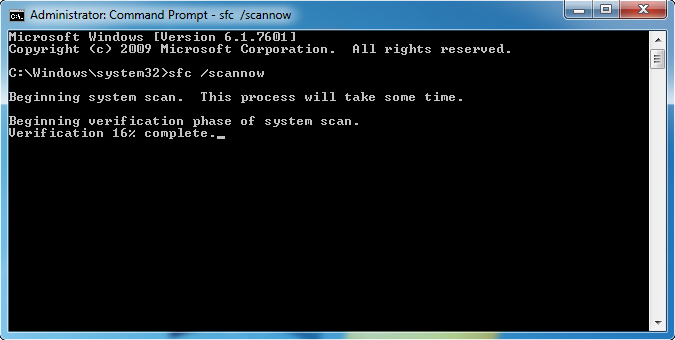
All you need to do is type in sfc /scannow followed by Enter.
System File Checker will now scan for and replace files from the Windows cache, typically located at C:WindowsSystem32dllcache.
2: Check Write Protection in the Registry
Press the Windows Key + R, enter regedit and press the Enter kry. Now copy and paste HKEY_LOCAL_MACHINESYSTEMCurrentControlSetControlStorageDevicePolicies in the search bar. In the right pane, double-click on WriteProtect. The Value Data should be 0, if not, change it.
Windows 10 will most likely not have this key at all, and we couldn't find it anywhere leading us to assume that it's been removed. You could try and create this key, but we don't know if it will work. Right-click, select New >Dword (32-Bit Value) and name the key WriteProtect. Double-click and confirm the value is 0.
Editing the registry requires a reboot for the changes to apply.
3: Check for a Physical Write-Protection Switch on External Drives
Some external drives have a physical switch to keep the drive from being modified, similar to how old floppy disks used to work. If your issue is an external drive, be sure the switch is off.
4: Change RAW Format to FAT or NTFS on External Drives
We saved the last two suggestions for last because they both affect external drives and or could cause problems if you modify your operating system drive. For this fix, you will wipe the contents of your drive.
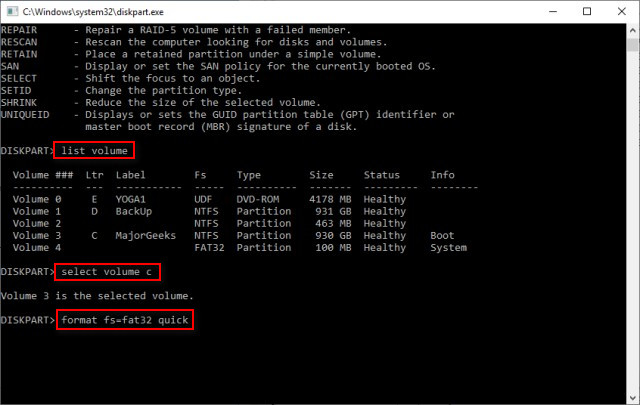
Press the Windows Key + R and type in diskpart. Type the following lines, one at a time, in order.
list volume
select volume x (replace x with the drive you want to format)
format fs=fat32 quick (your drive and all data will be deleted)
exit
Did we mention, this will delete everything on the drive? Good.
comments powered by Disqus
1: Run Microsoft System File Checker
Microsoft System File Checker is a useful, built-in utility that can scan for, and restore, corrupted files in Windows. It is often used and recommended by techs and advanced users, however, it's relatively simple to use. Here's all you need to know to use System File Checker or Sfc /Scannow in text and video format.
1: Getting Started
Windows 10, Windows 8.1 or Windows 8 users will need to first run the Deployment Image Servicing and Management (DISM) tool before running the System File Checker. DISM will use Windows Update to provide any files that are needed to fix corruptions. If you skip this step, System File Checker might not work. Windows 7 and Vista users can skip this step.
You will need to first open the Command Prompt or PowerShell as administrator.
Type in DISM.exe /Online /Cleanup-image /Restorehealth and press enter. This may take a few minutes.
All you need to do is type in sfc /scannow followed by Enter.
System File Checker will now scan for and replace files from the Windows cache, typically located at C:WindowsSystem32dllcache.
2: Check Write Protection in the Registry
Press the Windows Key + R, enter regedit and press the Enter kry. Now copy and paste HKEY_LOCAL_MACHINESYSTEMCurrentControlSetControlStorageDevicePolicies in the search bar. In the right pane, double-click on WriteProtect. The Value Data should be 0, if not, change it.
Windows 10 will most likely not have this key at all, and we couldn't find it anywhere leading us to assume that it's been removed. You could try and create this key, but we don't know if it will work. Right-click, select New >Dword (32-Bit Value) and name the key WriteProtect. Double-click and confirm the value is 0.
Editing the registry requires a reboot for the changes to apply.
3: Check for a Physical Write-Protection Switch on External Drives
Some external drives have a physical switch to keep the drive from being modified, similar to how old floppy disks used to work. If your issue is an external drive, be sure the switch is off.
4: Change RAW Format to FAT or NTFS on External Drives
We saved the last two suggestions for last because they both affect external drives and or could cause problems if you modify your operating system drive. For this fix, you will wipe the contents of your drive.
Press the Windows Key + R and type in diskpart. Type the following lines, one at a time, in order.
list volume
select volume x (replace x with the drive you want to format)
format fs=fat32 quick (your drive and all data will be deleted)
exit
Did we mention, this will delete everything on the drive? Good.
comments powered by Disqus
