


How to Fix Windows Install Error 0xC1900101
By Corporal Punishmenton 10/08/2025 |
 Windows is great at many things, but installing upgrades on itself isn’t always one of them. One of the frustrating problems users run into is the infamous 0xC1900101 error code. If you’ve ever tried to upgrade or clean install Windows and were greeted with this code, you’ve already learned the hard way that Microsoft’s “something went wrong” or “we are undoing changes” messages don’t tell you much. But don’t panic, MajorGeeks has your back.
This error is typically a driver or compatibility-related issue, usually seen with big version jumps, such as from Windows 10 to 11 or between feature updates like 23H2 to 24H2. This occurs when Windows Setup hits something it doesn’t like during installation or upgrade, as during these jumps, Microsoft tends to be more strict on the requirements. The good news? With a few steps, a little patience, and some coffee, it’s completely fixable.
Understanding the Problem
Quite often, error 0xC1900101 means a driver is throwing a wrench into the setup process. Drivers are the small pieces of software that let Windows communicate with your hardware, like your graphics card, network adapter, storage controller, and more. If one of them isn’t up-to-date, corrupt, or simply incompatible with the latest version of Windows, the installation halts, rolls back, and drops this code.
It’s also been known to appear if your system drive doesn’t have enough free space, if certain background apps are interfering, or if something in the BIOS or boot configuration confuses the installer. The trick is to isolate what’s wrong and clear the path for Windows to complete the setup.
Start with the Basics
Before diving into the rabbit hole of fixes, let’s start simple. Make sure you have plenty of space on your C: drive. Microsoft recommends at least 40GB free to upgrade from 23H2 to 24H2, but our research shows 60-70 GB is more likely. Remember, Windows temporarily creates and extracts large install files during the process. If there is no room for the file. It will fail with code 0xC1900101, revert, and you are back to square one. If you have very little space to start. That was likely the cause of the failure.
Next, disconnect everything that isn’t necessary. Unplug USB drives, external storage, webcams, printers, and even secondary monitors. The fewer devices connected, the fewer chances there are for a problematic driver to get loaded. Plus it’s a good excuse to untangle those 400 USB cables that you don't need anymore.
If you use third-party antivirus software, VPNs, or other security software, uninstall them before the upgrade. These tools hook deep into the system and can block or interfere with files Windows needs to install properly. You can reinstall them later once everything is running smoothly.
Finally, make sure your system is fully updated. Run Windows Update and let it pull every patch, including optional driver updates. Often, installation issues are caused by outdated system components that can be resolved by keeping up with updates.
Cleaning Up the Startup Environment
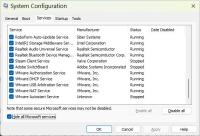
Some upgrade issues come from software running in the background. If you suspect this is the problem, you can disable unnecessary items or perform a clean boot before trying again. Type msconfig in the Start menu, open System Configuration, and under the Services tab, check “Hide all Microsoft services” and uncheck items that could be an issue. In this case, we suspected VMware's virtual service could cause a problem. You can also click “Disable all.” Then open Task Manager and disable all startup items. Reboot, and your PC will start with just the essentials running. Just make a screenshot or good notes on what you want to turn back on later.
This helps ensure that nothing, especially older utilities or monitoring tools, is injected into the setup process, foiling your attempt. Once your upgrade or install succeeds, you can turn these services back on.
Checking and Repairing System Files
Sometimes Windows itself is the culprit. Corrupted or missing system files can interfere with setup. To fix this, open Command Prompt as an administrator and run:
sfc /scannow
This command scans and repairs corrupted system files. Once that’s done, follow it up with the Deployment Image Servicing and Management tool:
DISM /Online /Cleanup-Image /RestoreHealth
DISM checks the system image that Windows uses to repair itself. It can restore damaged components that SFC can’t fix alone. For extra measure, you can also run a disk check to ensure your drive isn’t failing:
chkdsk C: /f /r
Doing these will take some time, but it’s worth it to make sure you are dealing with a clean system that has no bad sectors or drive errors that could easily stop an installation dead in its tracks.
Dealing with Drivers and Firmware
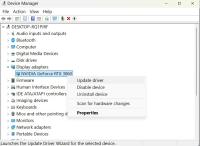
Ok, now that the basics are done. Drivers and firmware are a very common cause of 0xC1900101 errors. Start by updating your hardware drivers, especially those for your graphics card, chipset, storage controllers, and network adapters. You can right-click on your Windows icon and go to Device Manager. Look for anything with a yellow exclamation point. That would be your problem. If you don't see anything, you can right-click on each device and update the driver from properties, visit your motherboard or laptop manufacturer’s website, and grab the latest versions directly. Or grab Driver Booster or Snappy Driver Installer to do it for you.
TIP:f you’ve recently updated a driver and that’s when the problem started, try rolling it back. Occasionally, the “new” driver is the one that’s incompatible.
Firmware also plays a big role. Updating your BIOS or UEFI firmware can solve mysterious compatibility problems that even fresh drivers can’t. Check your manufacturer’s support page for updates. Be cautious—follow their instructions exactly. A BIOS update gone wrong can cause more trouble than it fixes.
Finally, make sure your Secure Boot and TPM settings are configured correctly in BIOS. Windows 11 in particular expects these to be enabled. Users have reported that enabling Secure Boot allowed setup to complete where it previously failed.
Using Logs to Find the Culprit
If you’ve tried everything above and the install still fails you can dig through the logs manually in the following location:
C:\$WINDOWS.~BT\Sources\Panther\
Open setuperr.log and setupact.log to see more details. Search for the words Error or Fail to spot the exact component that’s causing trouble.
Alternate Install Methods
If Windows Update keeps failing, try bypassing it. Back up your data, create a bootable USB using the Media Creation Tool, and install Windows fresh. It’s drastic, but it guarantees a clean start.
The Bottom Line
Error 0xC1900101 isn’t an indication that you have major system trouble. It’s just Windows being overly cautious with its setup criteria. Something in your system environment is out of alignment with what the installer expects, and it’s rolling back to keep you safe from an improper install.
Start with freeing up space and unplugging hardware. Clean boot to eliminate interference. Then move on to checking drivers, firmware, and system integrity. If you’re still stuck, the logs can point you straight to the problem.
Patience pays off here. Once you clear the blockage, Windows will usually install smoothly. And when it does, reward yourself by installing something fun from MajorGeeks.com—you’ve earned it.
comments powered by Disqus
