


Add or Remove Network Icon on Lock and Sign-in Screen
By Timothy Tibbettson 06/15/2023 |
When you see the network icon at the lock or sign-in screen on Windows 10, you can use the Network icon to connect or disconnect from the network. You can remove the network icon if you prefer.
We can make the changes using Group Policy Editor or the Registry Editor.
Windows 10 Home users will need to enable Group Policy Editor.
Open Group Policy Editor.
Navigate to Computer Configuration > Administrative Templates > System > Logon
Double-click Do not display network selection UI on the right.
Click on Enabled to hide the network icon.
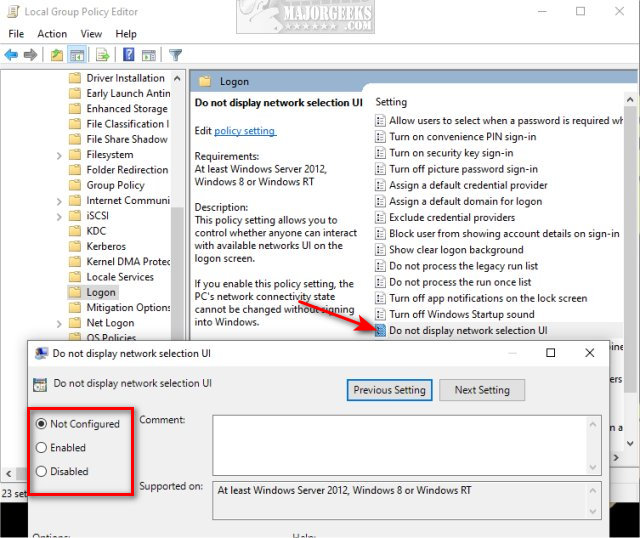
Click on OK.
Click on Not configured (Default) or Disabled to restore the Network icon.
Advanced users can also edit the registry.
Create a New > DWORD 32-Bit Value named DontDisplayNetworkSelectionUI in HKEY_LOCAL_MACHINE\SOFTWARE\Policies\Microsoft\Windows\System with a Value_data of 1 to hide the Network icon.
You can change the Value_data to 0 to enable the network icon or delete the DontDisplayNetworkSelectionUI DWORD.
comments powered by Disqus
We can make the changes using Group Policy Editor or the Registry Editor.
Windows 10 Home users will need to enable Group Policy Editor.
Open Group Policy Editor.
Navigate to Computer Configuration > Administrative Templates > System > Logon
Double-click Do not display network selection UI on the right.
Click on Enabled to hide the network icon.
Click on OK.
Click on Not configured (Default) or Disabled to restore the Network icon.
Advanced users can also edit the registry.
Create a New > DWORD 32-Bit Value named DontDisplayNetworkSelectionUI in HKEY_LOCAL_MACHINE\SOFTWARE\Policies\Microsoft\Windows\System with a Value_data of 1 to hide the Network icon.
You can change the Value_data to 0 to enable the network icon or delete the DontDisplayNetworkSelectionUI DWORD.
comments powered by Disqus
