


Please Insert a Disk Into Removable Disk Error
By Timothy Tibbettson 06/15/2023 |
If you're getting the error, "Please insert a disk into Removable Disk," and you've already tried removing and inserting the USB drive including trying other USB ports then here are some other solutions.
Our first two steps are designed to solve the problem without losing data hopefully. The remaining two steps will wipe your drive, and all data will be lost.
1: Change the Drive Letter
Changing the drive letter is a possibility if you tried multiple USB ports on your computer and the error continued, and you tried your thumb drive in another computer, and the error didn't repeat, then we can change the drive letter to solve the problem. Open File Explorer, right-click on This PC and select Manage. Click on Disk Management and locate your USB drive. Take note here of all the drive letters being used; you'll need to know that so you can choose an available letter in a moment.
Right-click and select Change Drive Letters and Paths.
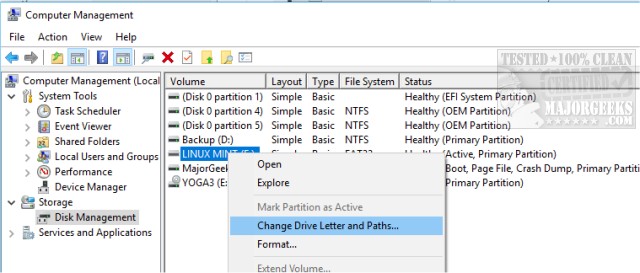
Click on Change, and you will see a drop-down box with every available letter in the alphabet. Select an unassigned drive letter and click on OK. Restart your computer and see if that solved the error.
2: Run Hardware and Devices Troubleshooter
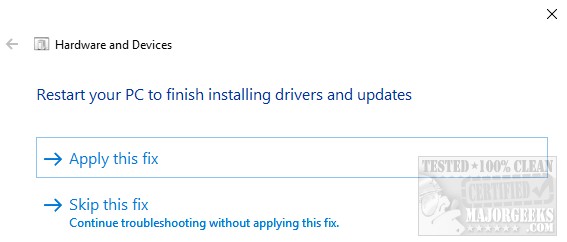
Windows 10 users can go to the Control Panel > Updates & Security > Troubleshoot and click on Hardware and Devices to start the Hardware and Devices troubleshooter. Troubleshooters will automatically run without any user intervention and report back if any problems were found. If Apply this fix is available, click on that and reboot.
Before we continue, remember that the following two steps could delete your data, especially step 4. If you can get another PC to read the drive, please back up before proceeding. Also, remember that thumb drives are much slower than hard drives so the following two steps can also take a long time.
3: Run ChkDsk From Command Prompt or PowerShell
Press the Windows Key + X and open the Command Prompt or PowerShell as admin. Now, type in chkdsk /f G: replacing G: with the drive letter of your USB drive. The /f switch allows ChkDsk to automatically repair file system errors.
Once completed, see if you can now access your drive.
4: Format the Drive
Finally, if all else has failed and ChkDsk reports the drive is fine, then we have no choice but to format the drive wiping out everything.
Like Step 1, we need to open File Explorer, right-click on This PC and select Manage. Click on Disk Management and locate your USB drive. Right-click and choose Format. A warning will popup. Click on Yes.
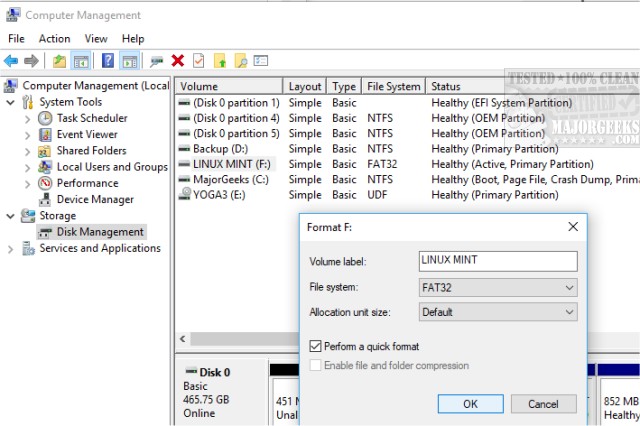
You can change the Volume Label (drive name), File System, and Allocation size but let's leave everything alone and click on OK to do the faster, default, quick format which usually works. If you still get the error then uncheck Perform a quick format allowing Windows to do a full, slower format. It's a Hail Mary, but if you made it this far, we're running out of options.
comments powered by Disqus
Our first two steps are designed to solve the problem without losing data hopefully. The remaining two steps will wipe your drive, and all data will be lost.
1: Change the Drive Letter
Changing the drive letter is a possibility if you tried multiple USB ports on your computer and the error continued, and you tried your thumb drive in another computer, and the error didn't repeat, then we can change the drive letter to solve the problem. Open File Explorer, right-click on This PC and select Manage. Click on Disk Management and locate your USB drive. Take note here of all the drive letters being used; you'll need to know that so you can choose an available letter in a moment.
Right-click and select Change Drive Letters and Paths.
Click on Change, and you will see a drop-down box with every available letter in the alphabet. Select an unassigned drive letter and click on OK. Restart your computer and see if that solved the error.
2: Run Hardware and Devices Troubleshooter
Windows 10 users can go to the Control Panel > Updates & Security > Troubleshoot and click on Hardware and Devices to start the Hardware and Devices troubleshooter. Troubleshooters will automatically run without any user intervention and report back if any problems were found. If Apply this fix is available, click on that and reboot.
Before we continue, remember that the following two steps could delete your data, especially step 4. If you can get another PC to read the drive, please back up before proceeding. Also, remember that thumb drives are much slower than hard drives so the following two steps can also take a long time.
3: Run ChkDsk From Command Prompt or PowerShell
Press the Windows Key + X and open the Command Prompt or PowerShell as admin. Now, type in chkdsk /f G: replacing G: with the drive letter of your USB drive. The /f switch allows ChkDsk to automatically repair file system errors.
Once completed, see if you can now access your drive.
4: Format the Drive
Finally, if all else has failed and ChkDsk reports the drive is fine, then we have no choice but to format the drive wiping out everything.
Like Step 1, we need to open File Explorer, right-click on This PC and select Manage. Click on Disk Management and locate your USB drive. Right-click and choose Format. A warning will popup. Click on Yes.
You can change the Volume Label (drive name), File System, and Allocation size but let's leave everything alone and click on OK to do the faster, default, quick format which usually works. If you still get the error then uncheck Perform a quick format allowing Windows to do a full, slower format. It's a Hail Mary, but if you made it this far, we're running out of options.
comments powered by Disqus
