


How to Restore the Windows 10 Start Menu With Live Tiles in Windows 11
By Timothy Tibbettson 04/22/2025 |
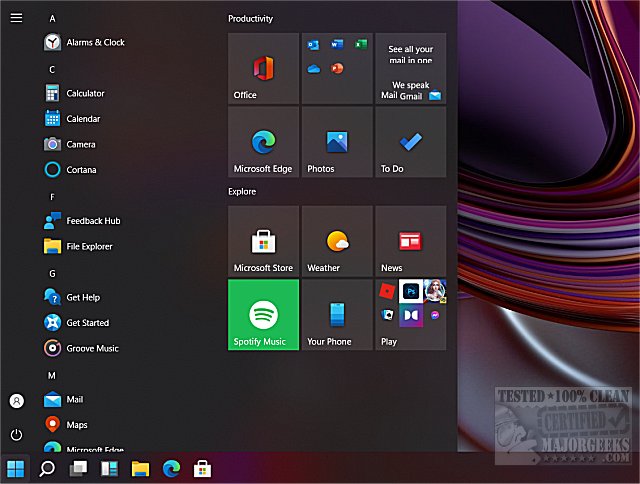
Windows 11 has introduced a new Start Menu that removes Live Tiles. However, if you prefer the old Start Menu with Live Tiles, it's easy to do in the registry.
This method has been removed. The page remains in case the option returns later.
We can accomplish this by editing the registry or using our registry files.
Video tutorial:

How to Restore the Windows 10 Start Menu With Live Tiles in Windows 11 - Registry Files
Download Restore the Windows 10 Start Menu in Windows 11 and extract the two files.
Double-click 'Classic Windows 10 Start Menu in Windows 11- Enable.reg' or 'Classic Windows 10 Start Menu in Windows 11 - Default.reg' (Default).
Click Yes when prompted by User Account Control.
Click Yes when prompted by Registry Editor.
Click OK when prompted by the Registry Editor.
Restart Explorer to see the changes.
This tweak is included as part of MajorGeeks Windows Tweaks.
How to Restore the Windows 10 Start Menu With Live Tiles in Windows 11 - Registry Edit
Open the Registry Editor and navigate to:
HKEY_CURRENT_USER\Software\Microsoft\Windows\CurrentVersion\Explorer\Advanced\StartMode
Right-click on the right window and click on New > DWORD (32-bit Value).
Name that DWORD Start_ShowClassicMode.
Double-click on Start_ShowClassicMode and change the Value data to 1.
Restart Explorer to see the changes.
Delete Start_ShowClassicMode to restore the default Windows 11 Start Menu.
Similar:
Windows 11 First Look
Get Windows 11 Sounds Now
Get Windows 11 Wallpapers Now
Get Microsoft Windows PC Health Check Now
This PC Can't Run Windows 11
Why Windows 10 Isn't the Last Version of Windows
comments powered by Disqus
This method has been removed. The page remains in case the option returns later.
We can accomplish this by editing the registry or using our registry files.
▶
How to Restore the Windows 10 Start Menu With Live Tiles in Windows 11 - Registry Files
Download Restore the Windows 10 Start Menu in Windows 11 and extract the two files.
Double-click 'Classic Windows 10 Start Menu in Windows 11- Enable.reg' or 'Classic Windows 10 Start Menu in Windows 11 - Default.reg' (Default).
Click Yes when prompted by User Account Control.
Click Yes when prompted by Registry Editor.
Click OK when prompted by the Registry Editor.
Restart Explorer to see the changes.
This tweak is included as part of MajorGeeks Windows Tweaks.
How to Restore the Windows 10 Start Menu With Live Tiles in Windows 11 - Registry Edit
Open the Registry Editor and navigate to:
HKEY_CURRENT_USER\Software\Microsoft\Windows\CurrentVersion\Explorer\Advanced\StartMode
Right-click on the right window and click on New > DWORD (32-bit Value).
Name that DWORD Start_ShowClassicMode.
Double-click on Start_ShowClassicMode and change the Value data to 1.
Restart Explorer to see the changes.
Delete Start_ShowClassicMode to restore the default Windows 11 Start Menu.
Similar:
comments powered by Disqus
