


Solved: The Application Has Failed to Start Because Its Side-By-Side Configuration Is Incorrect Error
By Timothy Tibbettson 04/17/2025 |
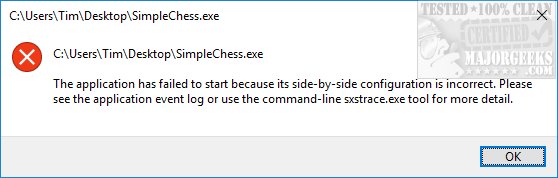
Today we're looking at the error known as "The application has failed to start because its side-by-side configuration is incorrect." It concludes with "Please see the application event log or use the command-line sxstrace.exe tool for more details." This is a problematic error that can occur in many games and apps and even Microsoft Office, but it's an easy fix.
Odds are you're missing the Visual C++ runtime package required, or there's a registry error. Visual C++ is a programming language, and most of the time, you have this installed by default. The only tricky part about the Visual C++ installers is that there are many versions.
Here are a couple of fixes for you; however, further down, we show you how to get more details to find out precisely what version you need for the geek in you. Updated. People are having success running System File Checker. We have added that below.
For those who prefer a video version:
1: Check for a Known Registry Problem
Verifying your registry entry is faster than the other steps and easy enough to check, so let's do that first.
Navigate to:
HKEY_LOCAL_MACHINE > SOFTWARE > Microsoft > Windows > CurrentVersion > SideBySide > Winners > x86_policy.9.0.microsoft.vc90.crt_1fc8b3b9a1e18e3b_none_02d0010672fd8219 > 9.0
That second to last long entry could vary from computer to computer, but it is the only key with 9.0 and crt in the string.
Look to the right for Default and compare it with the keys below. The default Data version should match the highest number under Name. I know, a tad confusing.
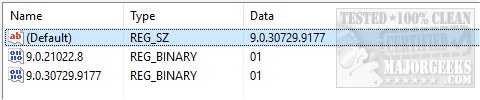
So, here you can see my Default Data number is 9.0.30729.9177. By looking below, you see, we have two entries, and 9.0.30729.9177 is our highest number, and they match. In this case, this isn't your problem.
If your highest version number isn't the default key, we want to modify it to match. For example, let's say your highest version number is 9.0.30729.9199. Right-click on the Default key and select Modify. Under Value Data, enter the highest number, which, again, just as an example, we entered 9.0.30729.9199. Now that your Default key matches the highest version, reboot, and your problem should be solved.
2: Install the Visual C++ Runtimes
First, try and install the official Microsoft Visual C++ Redistributable Package and see if the error is gone.
If not, a third-party app, including Visual C++ Runtime Installer (All-In-One) may also install older versions of Visual C++. Our experience is that this error is often because of an older version of Visual C++ missing.
3: Track Down What Version of Visual C++ Runtime You're Missing
If you'd prefer only to install the correct, missing pack, we need to find out which one you're missing.
Press the Windows KEY + S and type in event viewer until you see Event Viewer and click on that. Find Summary of Administrative Events and expand the Error subcategory and look for SideBySide.
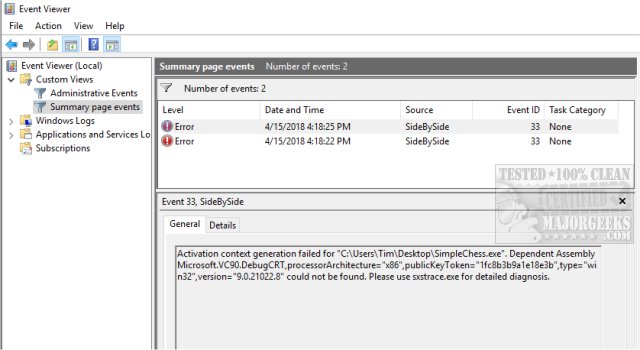
Double-click SideBySide, and you will see a list of all events. If you see more than one, select the one with the date and time you got the error.
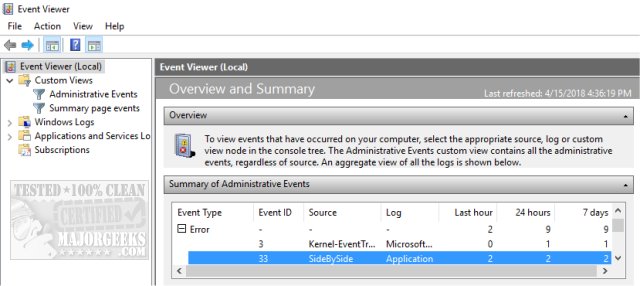
In this case, while a tad hard to figure out, you can see Microsoft.VC90, which refers to Microsoft Visual C++. Below that, you'll see the missing version number, in this case, 9.0.21022.8. If you Google that version, you will find that you need Microsoft Visual Studio 2008 (VC++ 9.0) SP1. Other versions include:
Microsoft Visual C++ 2015 Redistributable 14.0.23026.0
Microsoft Visual C++ 2013 Redistributable for Visual Studio 12.0.30501.0
Microsoft Visual C++ 2012 Redistributable for Visual Studio 11.0.61030.0
Microsoft Visual C++ 2010 Redistributable 10.0.40219.1
Always install both the 32-Bit and 64-Bit versions of the Visual C++ Runtime that you're missing and reboot to ensure your application sees the correct runtimes.
4: Run System File Checker
Windows 10, Windows 8.1, or Windows 8 users will need to first run the Deployment Image Servicing and Management (DISM) tool before running the System File Checker. DISM will use Windows Update to provide any files that are needed to fix corruption. If you skip this step, System File Checker might not work. Windows 7 and Vista users can skip this step.
You will need to first open the Command Prompt or PowerShell as administrator.
Type in DISM.exe /Online /Cleanup-image /Restorehealth and press enter. This may take a few minutes.
2: Running System File Checker
All you need to do is type in sfc /scannow and press the Enter key.
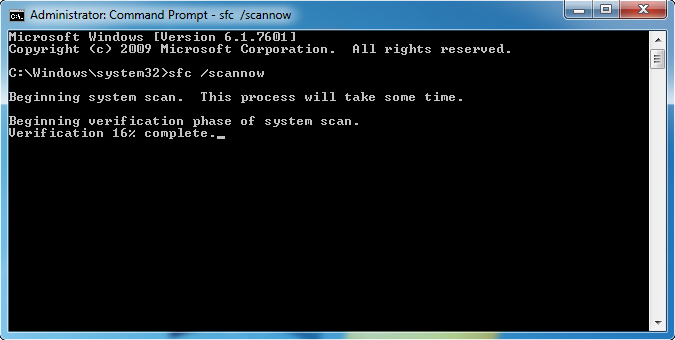
System File Checker will now scan for and replace files from the Windows cache, typically located at C:\Windows\System32\dllcache.
Once completed, you should see one of four possible results:
Windows Resource Protection did not find any integrity violations - You should be good to go as no issues were found.
Windows Resource Protection could not perform the requested operation - Run SFC from safe mode and also verify PendingDeletes, and PendingRenames folders exist under C:WinSxSTemp
Windows Resource Protection found corrupt files and successfully repaired them - Problems were found and fixed. Microsoft has a page here to show you how to view details.
Windows Resource Protection found corrupt files but could not fix some of them - Odds are the file couldn't be replaced, and you'll need to do so manually. Scroll back up to see how to view the log file to locate the file in question.
A reboot will be required, and you're done.
comments powered by Disqus
Odds are you're missing the Visual C++ runtime package required, or there's a registry error. Visual C++ is a programming language, and most of the time, you have this installed by default. The only tricky part about the Visual C++ installers is that there are many versions.
Here are a couple of fixes for you; however, further down, we show you how to get more details to find out precisely what version you need for the geek in you. Updated. People are having success running System File Checker. We have added that below.
For those who prefer a video version:
▶
1: Check for a Known Registry Problem
Verifying your registry entry is faster than the other steps and easy enough to check, so let's do that first.
Navigate to:
HKEY_LOCAL_MACHINE > SOFTWARE > Microsoft > Windows > CurrentVersion > SideBySide > Winners > x86_policy.9.0.microsoft.vc90.crt_1fc8b3b9a1e18e3b_none_02d0010672fd8219 > 9.0
That second to last long entry could vary from computer to computer, but it is the only key with 9.0 and crt in the string.
Look to the right for Default and compare it with the keys below. The default Data version should match the highest number under Name. I know, a tad confusing.
So, here you can see my Default Data number is 9.0.30729.9177. By looking below, you see, we have two entries, and 9.0.30729.9177 is our highest number, and they match. In this case, this isn't your problem.
If your highest version number isn't the default key, we want to modify it to match. For example, let's say your highest version number is 9.0.30729.9199. Right-click on the Default key and select Modify. Under Value Data, enter the highest number, which, again, just as an example, we entered 9.0.30729.9199. Now that your Default key matches the highest version, reboot, and your problem should be solved.
2: Install the Visual C++ Runtimes
First, try and install the official Microsoft Visual C++ Redistributable Package and see if the error is gone.
If not, a third-party app, including Visual C++ Runtime Installer (All-In-One) may also install older versions of Visual C++. Our experience is that this error is often because of an older version of Visual C++ missing.
3: Track Down What Version of Visual C++ Runtime You're Missing
If you'd prefer only to install the correct, missing pack, we need to find out which one you're missing.
Press the Windows KEY + S and type in event viewer until you see Event Viewer and click on that. Find Summary of Administrative Events and expand the Error subcategory and look for SideBySide.
Double-click SideBySide, and you will see a list of all events. If you see more than one, select the one with the date and time you got the error.
In this case, while a tad hard to figure out, you can see Microsoft.VC90, which refers to Microsoft Visual C++. Below that, you'll see the missing version number, in this case, 9.0.21022.8. If you Google that version, you will find that you need Microsoft Visual Studio 2008 (VC++ 9.0) SP1. Other versions include:
Microsoft Visual C++ 2015 Redistributable 14.0.23026.0
Microsoft Visual C++ 2013 Redistributable for Visual Studio 12.0.30501.0
Microsoft Visual C++ 2012 Redistributable for Visual Studio 11.0.61030.0
Microsoft Visual C++ 2010 Redistributable 10.0.40219.1
Always install both the 32-Bit and 64-Bit versions of the Visual C++ Runtime that you're missing and reboot to ensure your application sees the correct runtimes.
4: Run System File Checker
Windows 10, Windows 8.1, or Windows 8 users will need to first run the Deployment Image Servicing and Management (DISM) tool before running the System File Checker. DISM will use Windows Update to provide any files that are needed to fix corruption. If you skip this step, System File Checker might not work. Windows 7 and Vista users can skip this step.
You will need to first open the Command Prompt or PowerShell as administrator.
▶
Type in DISM.exe /Online /Cleanup-image /Restorehealth and press enter. This may take a few minutes.
2: Running System File Checker
All you need to do is type in sfc /scannow and press the Enter key.
System File Checker will now scan for and replace files from the Windows cache, typically located at C:\Windows\System32\dllcache.
Once completed, you should see one of four possible results:
A reboot will be required, and you're done.
comments powered by Disqus
