


Troubleshooting Missing UEFI Firmware Settings in Windows
By Corporal Punishmenton 01/05/2024 |
 Ever stare at your computer screen only to be met with the cryptic message "UEFI Firmware Settings Missing"? Don't Panic! Missing UEFI settings might sound scary, but a little knowledge can go a long way to taking the fear out of this one.
First of all UEFI settings, short for Unified Extensible Firmware Interface settings. These configuration options for the low-level software initialize your computer hardware before the operating system starts. Think of it as the bridge between your hardware and your operating system, where you can fine-tune how they interact. It's like the old BIOS (Basic Input Output System) only newer. UEFI offers faster boot times, larger hard drive support, security features, and a graphical user interface with more options and mouse enabled.
If you are getting the error UEFI Firmware Settings Missing, we need a little reconnaissance to narrow down the issue:
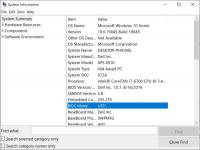
Is your machine built for UEFI? For this, we need to check out the System Information. Hit the WIN KEY + R to bring up your Run Dialog Box. In the box, enter 'msinfo32' and hit enter. Under the System Summary Tab, look for BIOS Mode. If that says UEFI, your motherboard is capable of UEFI. If it says 'Legacy,' your motherboard is not capable of UEFI OR Windows was installed in legacy mode -- more on that in a minute.
Fast Startup might be the culprit. This handy feature can sometimes hide your firmware settings, causing the error. Disable it by navigating to Control Panel>>Power Options >> Choose what the power buttons do >> Change settings... > Uncheck "Turn on fast startup (recommended)" and restart. This option may very well fix the issue, but it will take your computer longer to boot.

Create a shortcut to the firmware. Right-click on your Desktop, create a new shortcut and paste shutdown.exe /r /fw /t 00 in the location field. Name it "Boot to Firmware" and save. This command means to run the executable shutdown.exe, reboot the system (/r) to the firmware (/fw), and wait 00 seconds (/t 00).
Now, right-click the shortcut you just made and select properties. Click the Advanced button and choose 'Run as Administrator'. Click Apply.

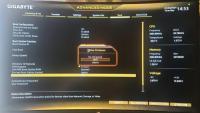
If you double-click that shortcut, you should boot right to your UFEI settings and make sure you are set to UEFI under your boot options. If you do not see a UEFI / Legacy option, you likely have an ancient PC (pre-2011???), and it's time to give up and get a new box.
If the BOOT option is set to Legacy, this may be the problem. But don't change that option just yet. We will need to fix that issue. So boot back into Windows and read on.
If you want to be super geeky (and who doesn't?) Here's how you can add Boot to UEFI to your context menu using our MajorGeeks Windows Tweaks. Also, on a more evil note, it could be wicked fun to make that shortcut on a buddy's PC and name it "never click this".... and wait. >
For clarity, formatting as GPT or MBR is not the same as formatting in FAT / NTFS or others. One is for booting, and the other is how to handle files. (#overlySimplified). You can read more about the difference between GPT and MBR here:
https://www.majorgeeks.com/content/page/gpt_(guid_partition_table)_or_mbr_(master_boot_record)_when_partitioning_a_drive.html
If you installed/upgraded your operating system with the legacy setting, your drive is likely formatted as MBR. MBR disks don't play well with UEFI. To fix this, you need to convert your disk to GPT from MBR. The first thing we need to do is verify the disk format.
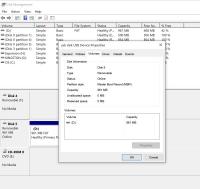
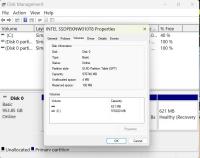
Open your Disk Management tool by right-clicking on your Windows Start Icon and choosing Disk Management. Right-click on the drive you are interested in (Usually Drive 0) and select 'Properties.' It will either say GPT or MBR. It likely says MBR, and we have a few options. (If it is GPT and the above has yet to work, skip below.)
I need to repeat this.
Warning: Back up your data before attempting!
The instructions below can/will delete data; you may need to reload your Operating System programs. So, no whining if you didn't back up your DATA! We have a HUGE collection of backup software, or you can buy the one I use, iDrive, for something like $3 for the first year. Frankly, if anything that is written here is remotely confusing to you -- seek out a qualified repair shop.
If this were me at this point, I would buy a new hard drive from Amazon. Then pull the old drive out and put the new drive in the machine, format the new drive GPT and install Windows. Then put the old drive back in the box and copy over my data. But I am sure not everyone would like to spend $100 on a new drive, so.....
Option 1 Using MBR2GPT.exe
MBR2GPT was added to Windows 10 because of these sorts of legacy issues. In a nutshell, it takes a section of the working MBR drive, jams in the code for GPT, and some more code to ignore MBR and POOF - you are working with no data loss. "Hopefully". So, pop quiz: What do we do before using MBR2GPT? If you said, "BACK UP YOUR DATA! "You were right; give yourself 20 Geek Points.
MBR2GPT is located in the /windows/system32 directory; you run it from a command prompt. Once you navigate to the file, the first thing you do is run MGR2GPT /validate" to ensure everything is fine. If the drive passes the checks, run "MGR2GPT /convert," and you should be ready. Checking the drive now in disk management should show the drive as GPT with Windows and your data. (Hopefully!)
Here is a fantastic video from Microsoft that tells how to do this far better than I could.
Option 2 Use Disk Manager if MBR2GPT fails.
If you want to make this next part a lot easier, check out Easus Disk Partition
- Find the offending MBR disk.
- Delete all volumes and partitions from the MBR disk by right-clicking the volume or partition and selecting 'delete'.
- Once that is done right, click the MBR disk and select "Convert to GPT."
- Format your volumes
- Reinstall Windows
- Boom -- Done. And you also just lost all your photos and documents if you didn't read or believe the part about backing up your data.
If this is a protected disk, you will have to use diskpart
- Press the Windows + R and type CMD in the box then click OK.
- Type 'diskpart' and hit Enter.
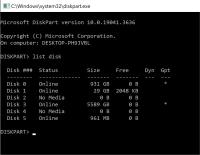
- Type 'list disk' and hit Enter. This will show you all available disks
- Type select disk # (where # is the number of the disk you want)
- Type 'clean' and hit Enter. This will erase all the data, remove all the volumes and all the partitions of the disk you selected. So you had best be very certain of your choice and have a damn good backup of your data. (can I be more clear about how I feel about backups?)
- Type 'convert gpt' and hit Enter.
- Format your volumes
- Reinstall Windows
Still no dice? Is the drive still not showing as UEFI? Fear not! Here are some final options you can try.
Check for updates: Both BIOS and Windows updates. If you don't know how to check your BIOS Version - Look Here. It is possible that the manufacturer has released a bug fix or an update that enables UEFI
Temporarily turn off Secure Boot: This security feature might be blocking access. Try disabling it in BIOS to see if it's the culprit.
Seek manufacturer support: Consult your computer or motherboard manufacturer if all else fails. They might have specific solutions for your device.
There you go! I hope this helps. If you know of other options, please drop them in the comments. I would also like to thank @Reboget for posing this question in the YouTube comments.
comments powered by Disqus
