


E (or Another) Drive Appears After the Windows 10 April Update
By Timothy Tibbettson 06/15/2023 |
We're hearing about people suddenly seeing a drive E after updating from the Windows April update. This is your normally hidden recovery partition. You can ignore it, or we can hide it again. Here's how.
It's not too hard to hide that recovery partition again using PowerShell.
Consider creating a restore point before you begin.
Open an administrative command prompt or PowerShell.
1: Type in diskpart followed by enter
2: Type in list volume followed by enter
3: Now identify the drive that you want to hide. You can spot it in one of two ways.
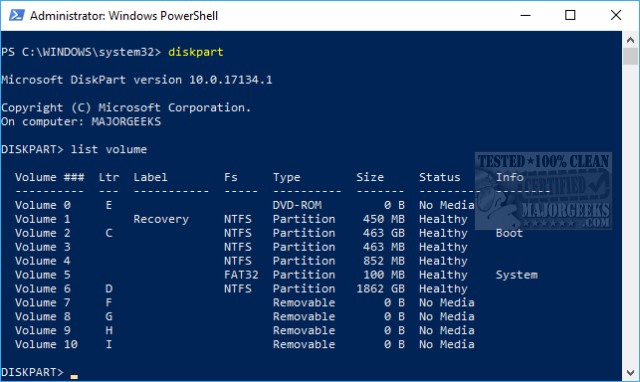
1: Under the LTR column, look for the drive letter that you want to hide and take note of the Volume # to the left of that drive. For example, if the drive is Volume 1, we'll need 1 later. In case you want to restore this drive later, remember the LTR (letter) assigned to the drive.
2: Under Label, look for the drive names Recovery and take note of the Volume # to the left of that drive. For example, if the drive is Volume 1, we'll need 1 later. In case you want to restore this drive later, remember the LTR (letter) assigned to the drive.
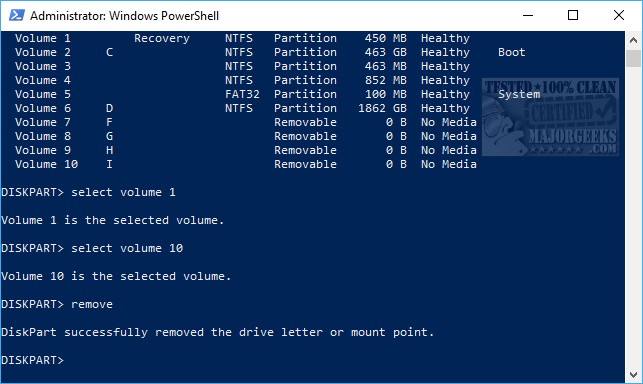
Type in select volume X and replace X with the number we discussed above. Finally, type in remove.
The drive is now hidden again. You can confirm this by typing in list volume and note there's a * next to any hidden partitions.
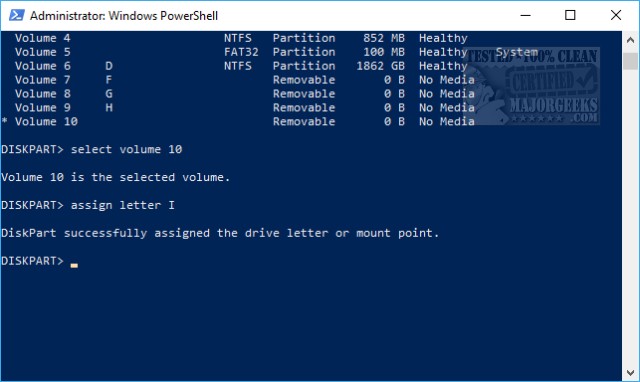
If you made a mistake, you could unhide the drive as you found it. Hopefully, you took our advice and remembered both the drive letter (LTR) and the drive number it's assigned to.
If so simply type in select volume X followed by enter and then assign letter X replacing X with the drive number and letter. The drive is now visible again just as you originally found it.
If all else fails, you can always restore from system restore.
comments powered by Disqus
It's not too hard to hide that recovery partition again using PowerShell.
Consider creating a restore point before you begin.
Open an administrative command prompt or PowerShell.
1: Type in diskpart followed by enter
2: Type in list volume followed by enter
3: Now identify the drive that you want to hide. You can spot it in one of two ways.
Type in select volume X and replace X with the number we discussed above. Finally, type in remove.
The drive is now hidden again. You can confirm this by typing in list volume and note there's a * next to any hidden partitions.
If you made a mistake, you could unhide the drive as you found it. Hopefully, you took our advice and remembered both the drive letter (LTR) and the drive number it's assigned to.
If so simply type in select volume X followed by enter and then assign letter X replacing X with the drive number and letter. The drive is now visible again just as you originally found it.
If all else fails, you can always restore from system restore.
comments powered by Disqus
