


Windows 10 Setup Has Failed to Validate the Product Key
By Timothy Tibbettson 06/15/2023 |
Installing, updating or upgrading Windows 10 sometimes gives a known error that reads "Setup has failed to validate the product key." Many of these errors come from a clean install from an ISO or using the Windows Media Creation Tool. While frustrating, there are a few things you can check to resolve this error.
If the Windows installation is stuck, you might need first to force a reboot to complete some steps. We'd try each step in order and see if the problem is resolved. Some steps may not apply to everyone and are explained as needed.
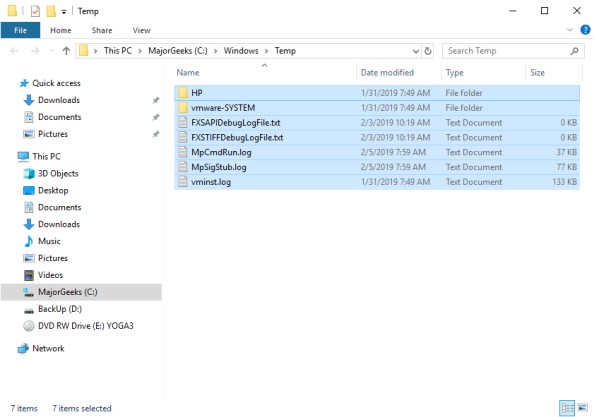
1: Delete Temporary Files
We might be able to fix the problem by emptying the Windows > Temp folder. You can use File Explorer or press the Windows Key + R and type in temp and press enter. Press Ctrl + A to highlight all the files in the Windows Temp folder and click on Delete.
2: Run the Microsoft System File Checker
Run the Microsoft System File Checker.
Microsoft System File Checker is a useful, built-in utility that can scan for, and restore, corrupted files in Windows.
3: Check for Windows Updates
It should go without saying that Windows Updates is notorious for breaking things, so be sure your up to date. We do know from experience that even without a key or activation, Windows Updates will work.
4: Run Setup With Your Product Key
If you were using the Media Creation Tool and purchased a retail key, there's an ESD folder on your C: drive. Open a Command-Prompt as Admin and browse to the ESD folder and type in the following replacing the x with your product key:
setup /pkey xxxxx-xxxxx-xxxxx-xxxxx-xxxxx
5: Remove Computer From Domain
Domain-joined systems might have success by removing yourself from the domain. To do this, follow these steps:
1: Log on to a Domain Controller using an authorized administrator account.
2: Open the Active Directory Users and Computers tool.
3: Select Computers. A list of computer objects will appear in the right-hand pane.
4: Right-click on the computer to be removed and select Delete from the menu to remove the computer from the domain.
6: Add a Config file to the ISO
We hope you didn't make it this far, but if you did, you're probably considering starting from scratch. If so, this step has had much success with our readers but again, requires a clean install.
You'll need your Windows 10 ISO and a program to extract it to a folder. We recommend 7-Zip, PeaZip, or WinRar if you have it.
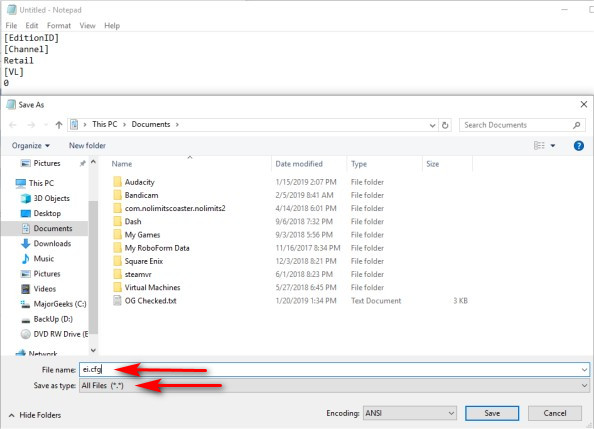
Extract the ISO to a folder. Open Notepad and type in the following:
[EditionID]
[Channel]
Retail
[VL]
0
Save this as ei.cfg in the Sources folder where you extracted the ISO. Be sure to select all files under Save as type.
You can now run Setup directly or save the files to a thumb drive. You could also save the folders you extracted as a new ISO, which you might want for next time.
Similar:
Retrieve Your Windows and Office Product Keys with These Free Apps
How-To Retrieve an Embedded Windows Key
How-to Transfer Your Windows 10 License to Another Computer
Will Windows 10 Receive Windows Updates if It's Not Activated?
Your Windows License Will Expire Soon
How to Reactivate Windows 10
Can I Have Multiple Windows 10 or Microsoft Office Keys One One Account?
comments powered by Disqus
If the Windows installation is stuck, you might need first to force a reboot to complete some steps. We'd try each step in order and see if the problem is resolved. Some steps may not apply to everyone and are explained as needed.
1: Delete Temporary Files
We might be able to fix the problem by emptying the Windows > Temp folder. You can use File Explorer or press the Windows Key + R and type in temp and press enter. Press Ctrl + A to highlight all the files in the Windows Temp folder and click on Delete.
2: Run the Microsoft System File Checker
Run the Microsoft System File Checker.
Microsoft System File Checker is a useful, built-in utility that can scan for, and restore, corrupted files in Windows.
3: Check for Windows Updates
It should go without saying that Windows Updates is notorious for breaking things, so be sure your up to date. We do know from experience that even without a key or activation, Windows Updates will work.
4: Run Setup With Your Product Key
If you were using the Media Creation Tool and purchased a retail key, there's an ESD folder on your C: drive. Open a Command-Prompt as Admin and browse to the ESD folder and type in the following replacing the x with your product key:
setup /pkey xxxxx-xxxxx-xxxxx-xxxxx-xxxxx
5: Remove Computer From Domain
Domain-joined systems might have success by removing yourself from the domain. To do this, follow these steps:
1: Log on to a Domain Controller using an authorized administrator account.
2: Open the Active Directory Users and Computers tool.
3: Select Computers. A list of computer objects will appear in the right-hand pane.
4: Right-click on the computer to be removed and select Delete from the menu to remove the computer from the domain.
6: Add a Config file to the ISO
We hope you didn't make it this far, but if you did, you're probably considering starting from scratch. If so, this step has had much success with our readers but again, requires a clean install.
You'll need your Windows 10 ISO and a program to extract it to a folder. We recommend 7-Zip, PeaZip, or WinRar if you have it.
Extract the ISO to a folder. Open Notepad and type in the following:
[EditionID]
[Channel]
Retail
[VL]
0
Save this as ei.cfg in the Sources folder where you extracted the ISO. Be sure to select all files under Save as type.
You can now run Setup directly or save the files to a thumb drive. You could also save the folders you extracted as a new ISO, which you might want for next time.
Similar:
Retrieve Your Windows and Office Product Keys with These Free Apps
How-To Retrieve an Embedded Windows Key
How-to Transfer Your Windows 10 License to Another Computer
Will Windows 10 Receive Windows Updates if It's Not Activated?
Your Windows License Will Expire Soon
How to Reactivate Windows 10
Can I Have Multiple Windows 10 or Microsoft Office Keys One One Account?
comments powered by Disqus
