


How to Change or Disable Hard Disk After Idle in Windows
By Timothy Tibbettson 06/28/2023 |
Having your hard drive's power down can save energy and usually extend the life of your drives and computer. In this tutorial, we look at how to modify the power downtime or disable it altogether.
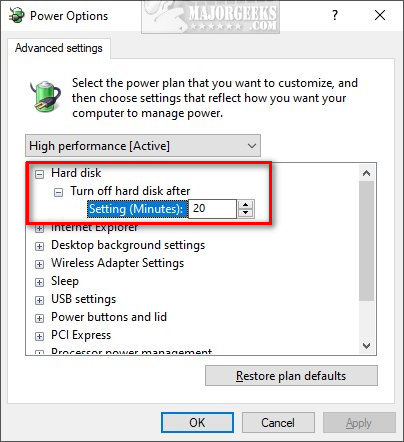
Change or Disable Hard Disk After Idle in Power Options
In Power Options, select your Power plan and click on Change plan settings > Change advanced power settings.
Expand Hard disk and click on Settings (Minutes). Use the arrows, or clear and type in the time in minutes.
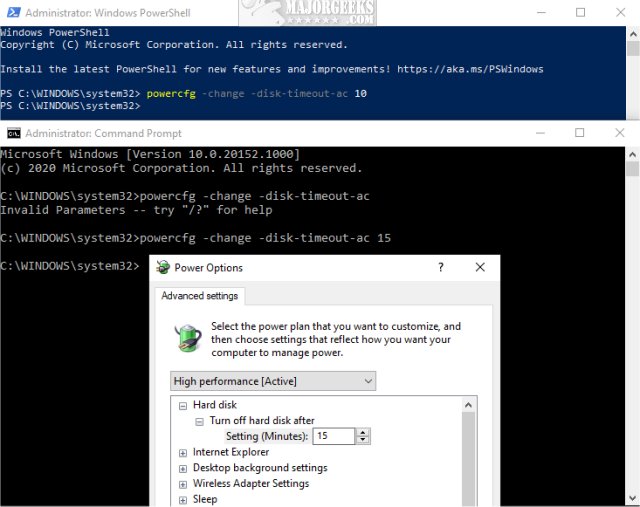
Change or Disable Hard Disk After Idle in Command Prompt or PowerShell
Open the Command Prompt or PowerShell and use the following commands:
Plugged in: powercfg -change -disk-timeout-ac
On Battery: powercfg -change -disk-timeout-dc
Similar:
How to Change Power Plan Settings in Windows 10
How to Turn on the Windows 10 Ultimate Performance Power Plan
How to Add or Remove 'Turn off hard disk after' from Power Options
How to Add or Remove Sleep in Windows 10 Power Menu
Sleep, Hibernate or Shut Down Your PC?
comments powered by Disqus
Change or Disable Hard Disk After Idle in Power Options
In Power Options, select your Power plan and click on Change plan settings > Change advanced power settings.
Expand Hard disk and click on Settings (Minutes). Use the arrows, or clear and type in the time in minutes.
Change or Disable Hard Disk After Idle in Command Prompt or PowerShell
Open the Command Prompt or PowerShell and use the following commands:
Plugged in: powercfg -change -disk-timeout-ac
On Battery: powercfg -change -disk-timeout-dc
Similar:
comments powered by Disqus
