


How to Disable or Modify User Account Control (UAC) in Windows 10 & 11
By Timothy Tibbettson 06/15/2023 |
Whenever you run an app in Windows, you are prompted by User Account Control or UAC to confirm you want to allow that app to make changes to your device. If you find this annoying, you can disable UAC in a few different ways.
User Account Control can also be modified using four different security levels, as explained here. Using this tutorial allows you to altogether disable or enable UAC from Settings (Control Panel), Group Policy Editor, the registry, or by using our registry files.
Video tutorial:
How to Disable User Account Control (UAC) in Windows 10 & 11 - Registry Files
Our registry files simplify the process.
Download Disable User Account Control (UAC) in Windows 10 & 11 and extract the two files.
Double-click on User Account Control Windows 10 - 11 Disable.reg or User Account Control Windows 10 - 11 Enable.reg (Default).
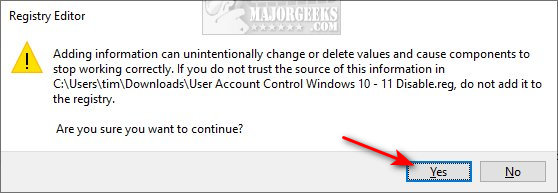
Click Yes when prompted by User Account Control.
Click Yes when prompted by Registry Editor.
 in windows 10 & 11 4.jpg)
Click OK when prompted by the Registry Editor. Reboot.
This tweak is included as part of MajorGeeks Windows Tweaks, and donations to the project and MajorGeeks are accepted here.
How to Disable User Account Control (UAC) in Windows 10 & 11 - Registry
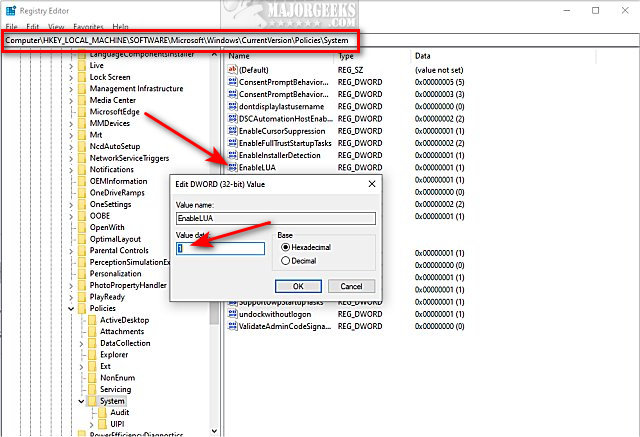
Advanced users can use the Registry Editor and navigate to HKEY_LOCAL_MACHINE\SOFTWARE\Microsoft\Windows\CurrentVersion\Policies\System.
Double-click on EnableLUA and change the Value_data to 0 to disable or 1 to enable.
 in windows 10 & 11 2.jpg)
Reboot.
How to Disable User Account Control (UAC) in Windows 10 & 11 - Settings
Settings allow you to open the Control Panel to access UAC settings.
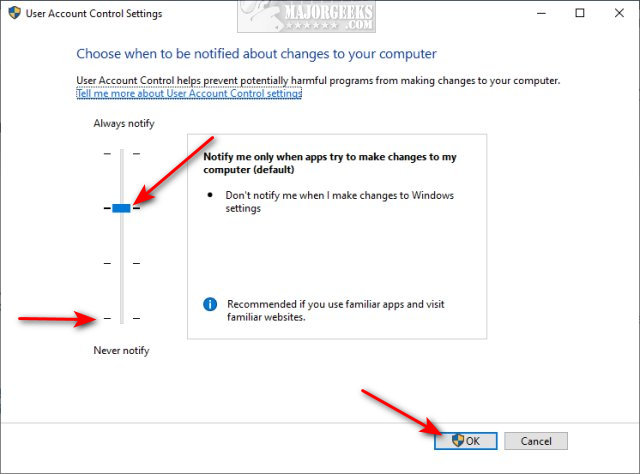
Begin typing User Account Control in search and click on Change user account control settings.
Click on the slider and move it to the bottom to Never notify.
 in windows 10 & 11 1.jpg)
You can also choose from one of the four available options here as well.
Click on OK.
Reboot.
How to Disable User Account Control (UAC) in Windows 10 & 11 - Group Policy Editor
Windows 10 users will need to enable Group Policy Editor.
Open Group Policy Editor.
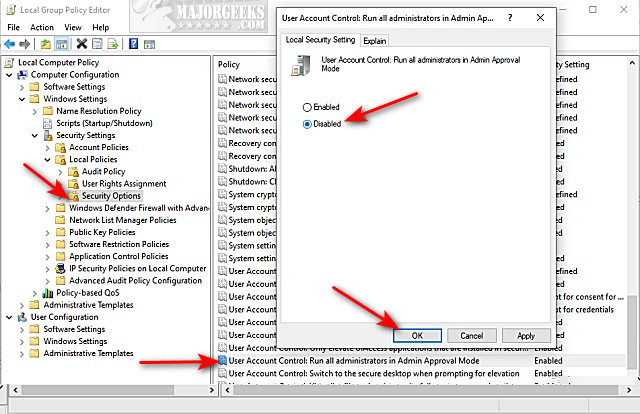
Navigate to Computer Configuration > Windows Settings > Security Settings > Local Policies > Security Options.
Double-click User Account Control: Run all administrators in Admin Approval Mode. on the right.
Click on Disabled.
 in windows 10 & 11 3.jpg)
Click on OK.
Similar:
Browse MajorGeeks Windows Tweaks
comments powered by Disqus
User Account Control can also be modified using four different security levels, as explained here. Using this tutorial allows you to altogether disable or enable UAC from Settings (Control Panel), Group Policy Editor, the registry, or by using our registry files.
How to Disable User Account Control (UAC) in Windows 10 & 11 - Registry Files
Our registry files simplify the process.
Download Disable User Account Control (UAC) in Windows 10 & 11 and extract the two files.
Double-click on User Account Control Windows 10 - 11 Disable.reg or User Account Control Windows 10 - 11 Enable.reg (Default).
Click Yes when prompted by User Account Control.
Click Yes when prompted by Registry Editor.
Click OK when prompted by the Registry Editor. Reboot.
This tweak is included as part of MajorGeeks Windows Tweaks, and donations to the project and MajorGeeks are accepted here.
How to Disable User Account Control (UAC) in Windows 10 & 11 - Registry
Advanced users can use the Registry Editor and navigate to HKEY_LOCAL_MACHINE\SOFTWARE\Microsoft\Windows\CurrentVersion\Policies\System.
Double-click on EnableLUA and change the Value_data to 0 to disable or 1 to enable.
Reboot.
How to Disable User Account Control (UAC) in Windows 10 & 11 - Settings
Settings allow you to open the Control Panel to access UAC settings.
Begin typing User Account Control in search and click on Change user account control settings.
Click on the slider and move it to the bottom to Never notify.
You can also choose from one of the four available options here as well.
Click on OK.
Reboot.
How to Disable User Account Control (UAC) in Windows 10 & 11 - Group Policy Editor
Windows 10 users will need to enable Group Policy Editor.
Open Group Policy Editor.
Navigate to Computer Configuration > Windows Settings > Security Settings > Local Policies > Security Options.
Double-click User Account Control: Run all administrators in Admin Approval Mode. on the right.
Click on Disabled.
Click on OK.
Similar:
comments powered by Disqus
