


How To Allow or Deny Apps Access to the Camera
By selma čitakovićon 05/30/2026 |
![{$insert['content_title']](/content/file/6045_image2.png
)
You have complete control over which apps and services can use your camera in Windows. If you're worried about unknown or suspicious apps, you can simply deny them access. The only exception is Windows Hello, the built-in sign-in feature. If Windows Hello facial recognition is turned on, it will always use your camera to sign you in.
Here's how to deny or allow access to your camera or webcam - without having to put tape over it.
Via Settings
Windows 11 makes it fairly easy to adjust the camera settings to your liking. Let me show you how:
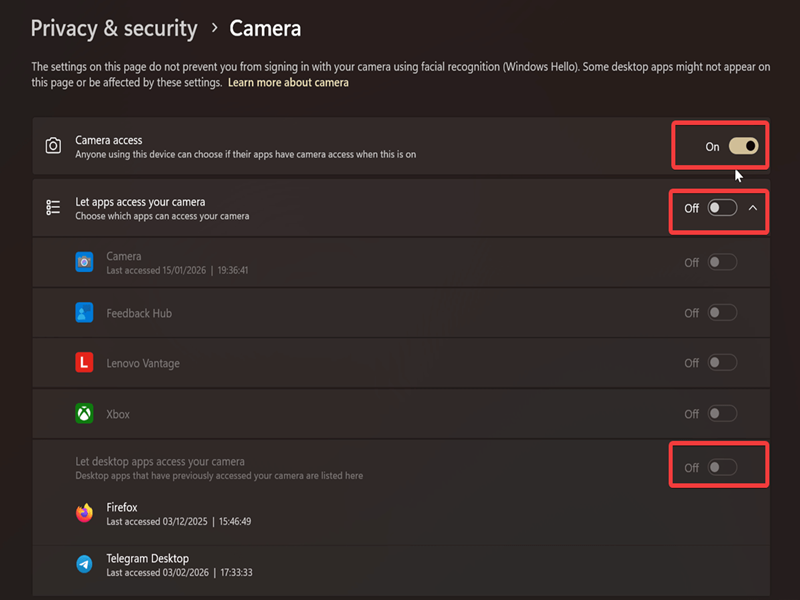
- Go to Settings > Privacy & security > Camera.
- Simply toggle on or off Camera access.
This is a general setting that applies to all users with access to the device. So, you'll have to sign in as an administrator to be able to change it. If you toggle it off, every option under it will be grayed out.
But if you keep Camera access on, you can then choose which apps are allowed to use it.
Click on Let apps access your camera to expand it, and toggle it on. You can then go through a list of apps, turn on the ones you want, and do the same for desktop apps right under it. All of these options apply to the current user.
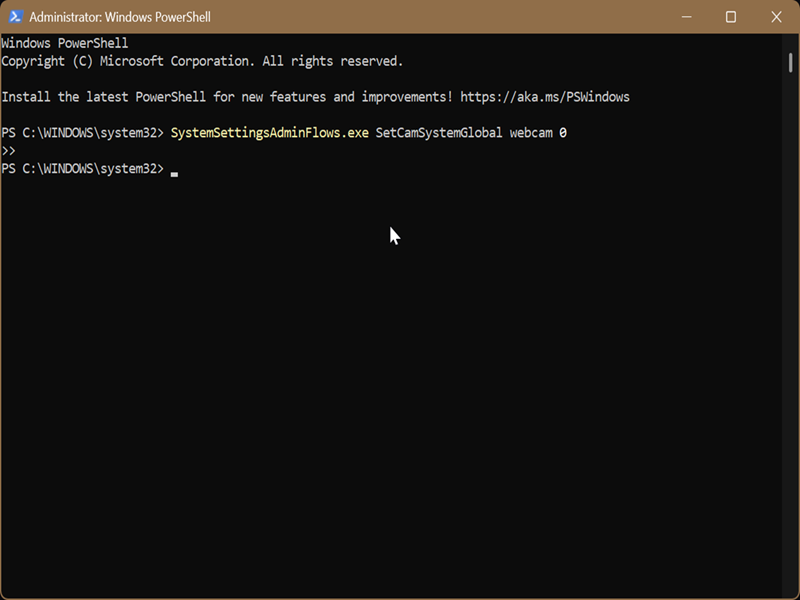
Via command
Or, you can use a command to enable or disable camera access in general. This works exactly like the first option in the Settings method.
So, make sure you've signed in as an administrator and do the following:
- Press Win + X, select Terminal (Admin), and open either Command Prompt or PowerShell.
- To turn on camera access, type the following command and press Enter: SystemSettingsAdminFlows.exe SetCamSystemGlobal webcam 1
- To turn off camera access instead, try this: SystemSettingsAdminFlows.exe SetCamSystemGlobal webcam 0
Via Local Group Policy Editor
Alternatively, you can change a policy setting to fully enable or disable camera access. This will override all previous methods, and you won't be able to use them unless you reset the policy to its default.
Additionally, only some Windows editions support the Local Group Policy Editor. This includes Pro, Enterprise, and Education editions.
Here's how to use it:
- Press Win + R, type gpedit.msc, and press Enter.
- Navigate to Computer Configuration > Administrative Templates > Windows Components > App Privacy on the left side.
- Double-click Let Windows apps access the camera on the right.
- To always enable camera access for all users: Select Enabled, then Force Allow in the menu next to Default for all apps. Click OK.
- To disable camera access for all users: Select Enabled, then Force Deny in the menu next to Default for all apps. Click OK.

The default setting for this policy is Not Configured, in case you want to undo the changes.
And that's all! You'll be notified if any apps are requesting access to your camera. You can also check the Recent activity history in Settings > Privacy & security > Camera and keep track of all the requests.

|
selma citakovic
Selma is a gamer, geek and gremlin hunter with a passion for cyber security and smashing Windows bugs before they bite. She’s IBM-certified, loves real freeware, despises bloatware, and powers most of her troubleshooting with an unhealthy amount of coffee. |
comments powered by Disqus
