


How to Change DPI Scaling Level in Windows 10 & 11
By Timothy Tibbettson 06/15/2023 |
This tutorial looks at what DPI Scaling is, what the numbers mean, and how you can customize it exactly as you want.
While I may fall asleep writing the next paragraph, we have to explain the DPI Scaling numbers. You might need this information later in this tutorial. We also recommend downloading Restore Default DPI in Windows 10.reg, as described in Step 3.
Dots per inch (DPI) is the physical measurement of the number of pixels in a linear inch of a display and, therefore, a function of display resolution and size. A higher resolution means a smaller size and higher DPI, while a lower resolution means a larger size or lower DPI. If you're familiar with Desktop size, you know that a 1024x768 Desktop will appear larger (because everything is bigger) than 1280X1024 Desktop.
Your default DPI is 100% or 96 DPI (You might need this later)
Video tutorial:
1: Change DPI Scaling Level for One Monitor in Settings
Windows Settings is one of the easiest ways, although you're limited in your choices depending on your monitor and graphic card.
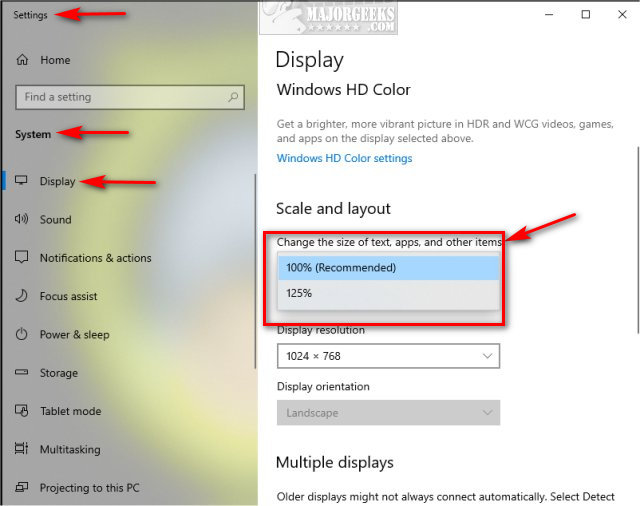
Right-click on your Desktop and click on Display settings.
If you have multiple monitors, you will need to choose one.
Click under Scale and layout and select one of the sizes. You might see 100%, 125%, 150%, 175%.
2: Change DPI Scaling Level for All Monitors in Settings
As mentioned in Step 1, the Change DPI Scaling Level in Windows 10 are the ones that should work without problems. However, we can specify any number you like, but some apps or programs might be unreadable.
Right-click on your Desktop and click on Display settings.
Below Change DPI Scaling Level in Windows 10 click on Advanced scaling settings.
Enter a number between 100 and 500 and click OK. If you're not sure, try a low number and work your way up until you are happy and your apps and programs display correctly. You might need to find that balance.
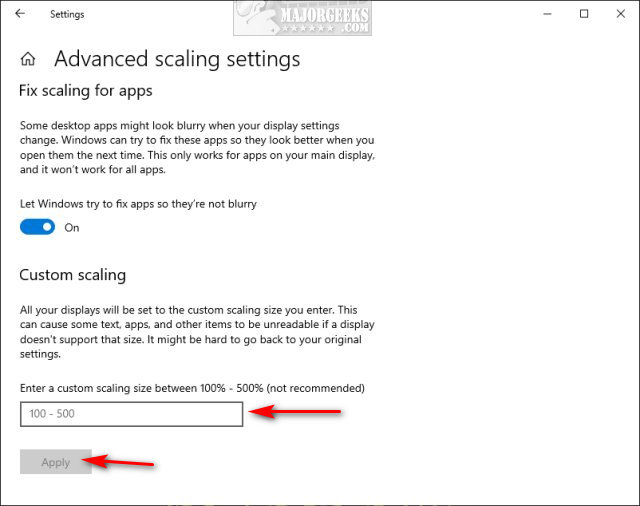
Let Windows try to fix apps so they're not blurry should be on.
3: Restore Default Settings
We'd recommend you download and keep Restore Default DPI in Windows 10, so if you can in trouble, double-clicking that registry file will restore your default settings in a pinch.
Double-click Restore Default DPI in Windows 10.reg to restore the default DPI.
Click Yes when prompted by User Account Control.
Click Yes when prompted by Registry Editor.
Click OK when prompted by the Registry Editor.
This tweak is included as part of MajorGeeks Registry Tweaks.
It is possible to make these changes in the registry, but it's pointless now since Microsoft added the option discussed in Step 2.
Similar:
How to Fix Screen Flickering on Windows 10
How to Clear the Display Cache in Windows 10
How to Find and Repair Stuck or Dead Pixels on an LCD Monitor
comments powered by Disqus
While I may fall asleep writing the next paragraph, we have to explain the DPI Scaling numbers. You might need this information later in this tutorial. We also recommend downloading Restore Default DPI in Windows 10.reg, as described in Step 3.
Dots per inch (DPI) is the physical measurement of the number of pixels in a linear inch of a display and, therefore, a function of display resolution and size. A higher resolution means a smaller size and higher DPI, while a lower resolution means a larger size or lower DPI. If you're familiar with Desktop size, you know that a 1024x768 Desktop will appear larger (because everything is bigger) than 1280X1024 Desktop.
Your default DPI is 100% or 96 DPI (You might need this later)
1: Change DPI Scaling Level for One Monitor in Settings
Windows Settings is one of the easiest ways, although you're limited in your choices depending on your monitor and graphic card.
Right-click on your Desktop and click on Display settings.
If you have multiple monitors, you will need to choose one.
Click under Scale and layout and select one of the sizes. You might see 100%, 125%, 150%, 175%.
2: Change DPI Scaling Level for All Monitors in Settings
As mentioned in Step 1, the Change DPI Scaling Level in Windows 10 are the ones that should work without problems. However, we can specify any number you like, but some apps or programs might be unreadable.
Right-click on your Desktop and click on Display settings.
Below Change DPI Scaling Level in Windows 10 click on Advanced scaling settings.
Enter a number between 100 and 500 and click OK. If you're not sure, try a low number and work your way up until you are happy and your apps and programs display correctly. You might need to find that balance.
Let Windows try to fix apps so they're not blurry should be on.
3: Restore Default Settings
We'd recommend you download and keep Restore Default DPI in Windows 10, so if you can in trouble, double-clicking that registry file will restore your default settings in a pinch.
Double-click Restore Default DPI in Windows 10.reg to restore the default DPI.
Click Yes when prompted by User Account Control.
Click Yes when prompted by Registry Editor.
Click OK when prompted by the Registry Editor.
This tweak is included as part of MajorGeeks Registry Tweaks.
It is possible to make these changes in the registry, but it's pointless now since Microsoft added the option discussed in Step 2.
Similar:
comments powered by Disqus
