


How to Change Screen and Sleep Settings on Windows 10
By Timothy Tibbettson 07/21/2023 |
Windows 10 offers options to change when your Screen turns off as well as when your computer goes to Sleep. Both settings allow you to save Power and even extend the life of your hardware. Here is what you need to know, so your computer turns off your monitor and puts your computer to sleep, so it suits your needs.
Because your monitor draws a lot of power, Windows will turn off your monitor first, then move to put the computer into Sleep Mode shortly afterward. In Sleep Mode, your computer will often take longer to power up and will be quiet because the fans aren't running.
Click on Start > Settings > System > Power & sleep.
Windows 10 has made changing the Screen and Sleep settings simple. You should see a dropdown box for Screen and Sleep.
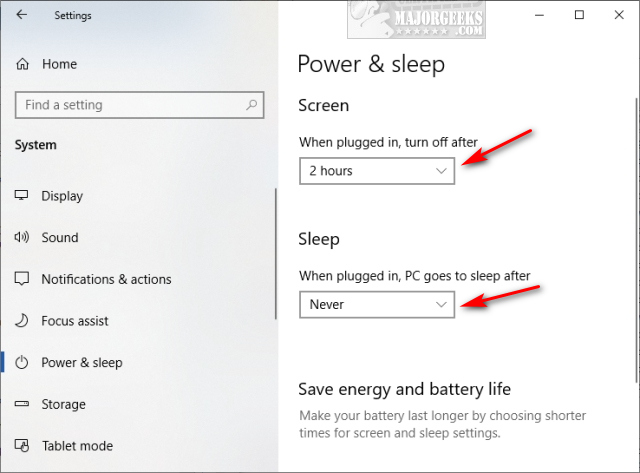
Click on the box next to either Screen and Sleep, and you can choose anything from one minute to never. That was easy!
Laptop users will also see additional options so you can set shorter times when running on battery power.
For most users, these settings are easy to find and change, but as always, Windows 10 has many more options for specific needs or advanced users.
Scroll down and click on Additional power settings.
Find the plan that is being used (checked) and click on Change plan settings.
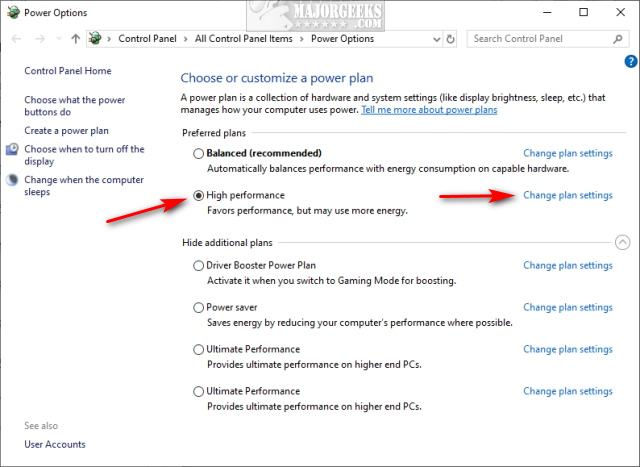
While you will see the same two options as previously discussed, you will also see Change advanced power settings and Restore default settings for this plan.
Click on Change advanced power settings. You will notice that many of the settings we've already changed can be modified here as well. What we like about this section is the ability to make tweaks to USB, wireless adapters, and more.
Line your mouse over any setting, and a balloon tip should appear explaining what each one does.
One of the more frequent reason people use Advanced power settings is when the user wants to be sure their network card or USB devices wake up when needed and are the most frequently used settings here.
Similar:
How to Turn on the Windows 10 Ultimate Performance Power Plan
The Ultimate List of Every Known Powercfg Command
Sleep, Hibernate or Shut Down Your PC?
How to Add or Remove Sleep, Hibernate or Lock to the Start Menu in Windows 10.
Windows 10 Computer Won’t Boot After Power Outage
comments powered by Disqus
Because your monitor draws a lot of power, Windows will turn off your monitor first, then move to put the computer into Sleep Mode shortly afterward. In Sleep Mode, your computer will often take longer to power up and will be quiet because the fans aren't running.
Click on Start > Settings > System > Power & sleep.
Windows 10 has made changing the Screen and Sleep settings simple. You should see a dropdown box for Screen and Sleep.
Click on the box next to either Screen and Sleep, and you can choose anything from one minute to never. That was easy!
Laptop users will also see additional options so you can set shorter times when running on battery power.
For most users, these settings are easy to find and change, but as always, Windows 10 has many more options for specific needs or advanced users.
Scroll down and click on Additional power settings.
Find the plan that is being used (checked) and click on Change plan settings.
While you will see the same two options as previously discussed, you will also see Change advanced power settings and Restore default settings for this plan.
Click on Change advanced power settings. You will notice that many of the settings we've already changed can be modified here as well. What we like about this section is the ability to make tweaks to USB, wireless adapters, and more.
Line your mouse over any setting, and a balloon tip should appear explaining what each one does.
One of the more frequent reason people use Advanced power settings is when the user wants to be sure their network card or USB devices wake up when needed and are the most frequently used settings here.
Similar:
comments powered by Disqus
