


How to Clean Up the WinSxS folder (Component Store) in Windows 10 & 11
By Timothy Tibbettson 06/30/2023 |
In the Windows folder, you might have noticed a WinSxS folder taking up a lot of space, often over 7GB. Here's all you need to know about the WinSxS folder.
The WinSxS folder stores files that might be needed to recover Windows 10. Examples included Windows Updates, system recovery, Windows features, and more.
Windows 10 & 11 will automatically clean up the WinSxS folder by removing packages that have been replaced. You can manually clean up the folder, but it takes a long time (an hour or two even on a fast computer), and since the folder is automatically pruned, we don't see the point. If you need to free up some drive space, see our Similar links at the bottom of this tutorial. We found approximately 1GB was cleaned from the 7GB in our folder in our tests.
Clean With PowerShell and DISM
Running clean-up with PowerShell is simple for anyone and, in our experience, the fastest way.
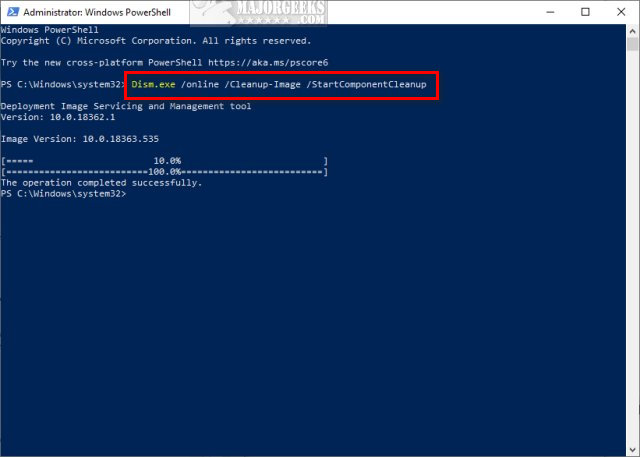
Open PowerShell as admin.
Type in Dism.exe /online /Cleanup-Image /StartComponentCleanup
 in windows 10 2.jpg)
Once you see The operation completed successfully, you can close PowerShell
Clean With Task Manager
Open Task Scheduler by pressing the Windows Key + R, type in taskschd.msc, and press Enter.
Expand Task Scheduler Library > Microsoft > Windows > Servicing.
In the middle Window, right-click on StartComponentCleanup, and click on Run. You can also click Run on the right window.
 in windows 10 1.jpg)
If you change your mind, right-click and click on End.
Similar:
What Is the $Windows.~Bt Folder and Can I Delete It?
What Is the $SysReset Folder and Can I Delete It in Windows 10?
What Are the $GetCurrent and $WINDOWS.~BT Folders and How to Delete Them
How to Use Storage Sense to Delete Junk Files in Windows 10 Automatically
comments powered by Disqus
The WinSxS folder stores files that might be needed to recover Windows 10. Examples included Windows Updates, system recovery, Windows features, and more.
Windows 10 & 11 will automatically clean up the WinSxS folder by removing packages that have been replaced. You can manually clean up the folder, but it takes a long time (an hour or two even on a fast computer), and since the folder is automatically pruned, we don't see the point. If you need to free up some drive space, see our Similar links at the bottom of this tutorial. We found approximately 1GB was cleaned from the 7GB in our folder in our tests.
Clean With PowerShell and DISM
Running clean-up with PowerShell is simple for anyone and, in our experience, the fastest way.
Open PowerShell as admin.
Type in Dism.exe /online /Cleanup-Image /StartComponentCleanup
Once you see The operation completed successfully, you can close PowerShell
Clean With Task Manager
Open Task Scheduler by pressing the Windows Key + R, type in taskschd.msc, and press Enter.
Expand Task Scheduler Library > Microsoft > Windows > Servicing.
In the middle Window, right-click on StartComponentCleanup, and click on Run. You can also click Run on the right window.
If you change your mind, right-click and click on End.
Similar:
comments powered by Disqus
