


How to Diagnose RAM Issues with Windows Memory Diagnostic Tool: A Step-by-Step Guide
By Corporal Punishmenton 02/22/2024 |
 Is your computer experiencing random crashes, freezes, or unexpected blue screens? Don't panic! Before tossing your machine out the window (figuratively), consider your RAM (Random Access Memory).
 A bad bit of RAM is like that one unreliable friend in a group project. Everyone else is pulling their weight, contributing their parts flawlessly, but this one friend needs to remember their task, mixing up details, or just randomly dropping out of the conversation. The result? A project (or computer operation) that's unexpectedly quirky, sometimes hilariously so, but mostly just frustratingly unpredictable.
Luckily, Windows has a built-in tool that can help you diagnose memory problems. It's called Windows Memory Diagnostic, a helpful utility that helps identify and troubleshoot problems with your computer's memory (RAM)
When to Use the Windows Memory Diagnostic Tool
Before diving into the memory diagnostic tool, it's important to recognize the signs indicating memory-related issues to avoid wasting your time chasing non-problems. Here are a few key symptoms:
How to Access the Windows Memory Diagnostic Tool:
You can access the Windows Memory Diagnostic tool by clicking on the Start menu and typing Windows Memory Diagnostic into the search bar. Alternatively, you can press the Windows key + R to open the Run dialog, type mdsched.exe, and press Enter. Or, it the Windows key + S, type "Windows Memory Diagnostic," and choose that.
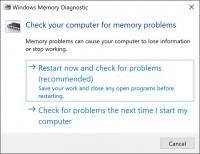
How to Run the Windows Memory Diagnostic Tool:
Upon launching the tool, you'll be presented with two options: "Restart now and check for problems (recommended)" and "Check for problems the next time I start my computer." If you choose "restart now", save your work and close all programs before proceeding. Either way, be prepared. The test will take at least 10-15 minutes. Here are your options:
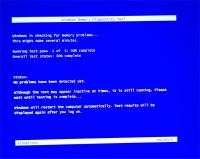
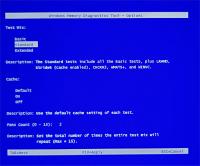
Once the computer restarts, it automatical loads the Windows Memory Diagnostic environment. It has a lovely blue and gray interface that should remind you of every DOS game ever. The tool defaults to a standard set of tests to check your RAM for errors, but you can choose from some other options if you like.
Test mix: You can choose the type of test you want to run (Basic, Standard, or Extended). The Basic test is quicker but less thorough; the Standard test is a good balance between speed and thoroughness, and the Extended test is the most comprehensive but takes the longest time to complete. Whatever you choose will take a while -- so get a coffee and fire up Netflix.
Cache: You can select the cache setting (Default, On, or Off) for the tests. In the context of the Windows Memory Diagnostic Tool, "cache memory" refers to a temporary layer of storage that the processor typically uses to access frequently used data from RAM (main memory) more quickly. When deciding whether to access data from the cache or directly from RAM during the memory test, you have three options:
1) Default: This is the recommended option as it automatically determines whether to access the cache memory based on the test being run. This ensures a good balance between test speed and accuracy.
2) On: By choosing "On", you instruct the test to access data in the cache. This might make the test faster, but it could also impact its accuracy because the test won't directly verify the integrity of the cached data itself. This might be helpful if you suspect problems related to specific cached data, but keep in mind it might miss other potential errors.
3) Off: This option bypasses the cache entirely and forces the test to access data in RAM directly. This provides the most thorough and accurate assessment of your RAM's health but will also be the slowest test option.
Pass Count: This allows you to set how many times the entire test set is repeated. More passes increase the chances of detecting intermittent problems but also increase the total testing time.
Once you choose your options, hit F10 to apply and start the test. Grab a coffee -- sit back.
Viewing Results
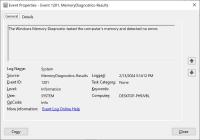
The computer will automatically reboot back into Windows once the tests are complete. If the tool finds any errors, it will report them the next time you log on. Suppose you miss the notification or want to check the results later. In that case, you can find them in the Event Viewer under "Windows Logs"> "System" with the source listed as "MemoryDiagnostics-Results."
Interpreting Results:
If the diagnostic tool finds errors, it indicates a problem with your RAM. The immediate step is to try reseating or replacing the faulty memory modules. We have a decent article on how to figure out what type of RAM you have. If you're uncomfortable doing this yourself, seek assistance from a professional.
No errors suggest that your RAM is not the source of your computer's issues. In this case, consider other diagnostic tools to check for hard drive health, update drivers, or scan for malware, as these could also cause similar symptoms.
Conclusion:
Whether you're a casual user or Uber-Geek, knowing how to leverage free tools like the Windows Memory Diagnostic is handy to help keep your PC running tip-top. The Windows Memory Diagnostic tool is a straightforward way to test your computer's memory for errors. Remember, while RAM issues are a common cause of system instability, they're not the only possibility. Creating a comprehensive plan covering updates, cleaning, cooling, and maintenance of all hardware and software aspects of your system is essential for a healthy PC.
comments powered by Disqus
