


How To Easily Enable or Disable Hyper-V
By selma čitakovićon 03/13/2026 |

Ever heard of Hyper-V? It's a Microsoft-made hypervisor technology that lets you create, manage, and run virtual machines directly on your hardware. Basically, you can run a virtual computer on your physical computer in an isolated environment, with its own OS and apps.
If you're already dabbling with virtualization, this is all old news for you, but plenty of users are unfamiliar with the feature. With it enabled, you can use the Hyper-V Manager to manage virtual machines. However, you may want to disable it to run third-party virtualization apps like VMware Workstation and VirtualBox. That's because they all use the same hardware virtualization extensions, and can't share them.
Moreover, disabling it might improve your performance, but I've only seen anecdotal Reddit evidence for this, which we should take with a grain of salt anyway. Still, it can't hurt to try - it's easy to turn it off and back on again, and it won't mess up anything.
Let me show you how!
Check the prerequisites
To enable and use Hyper-V, your system first has to fit the requirements:
- Windows 10/11 Pro or Enterprise
- At least 4GB of RAM, more is better
- A 64-bit processor with second-level address translation (SLAT)
- Hardware-assisted virtualization enabled in BIOS/UEFI (depending on your CPU, either Intel VT/VT-x or AMD-V technology)
- Hardware Enforced Data Execution Prevention enabled in BIOS/UEFI ("Data Execution Prevention," "XD," "Execute Disable," or "NX").
So, if you're following this guide and notice any greyed-out options, you can find the reason(s) here. For example, if you were previously tinkering in your BIOS and you disabled CPU virtualization, you won't be able to turn on Hyper-V immediately.
Luckily, you can check if you fulfill all the requirements:
- Type CMD in Windows Search and open Command Prompt.
- Type the following command and press Enter: Systeminfo.exe
- Scroll down to the Hyper-V requirements and verify that all the values are Yes. If any items are listed as No, you're currently not fulfilling all the prerequisites.
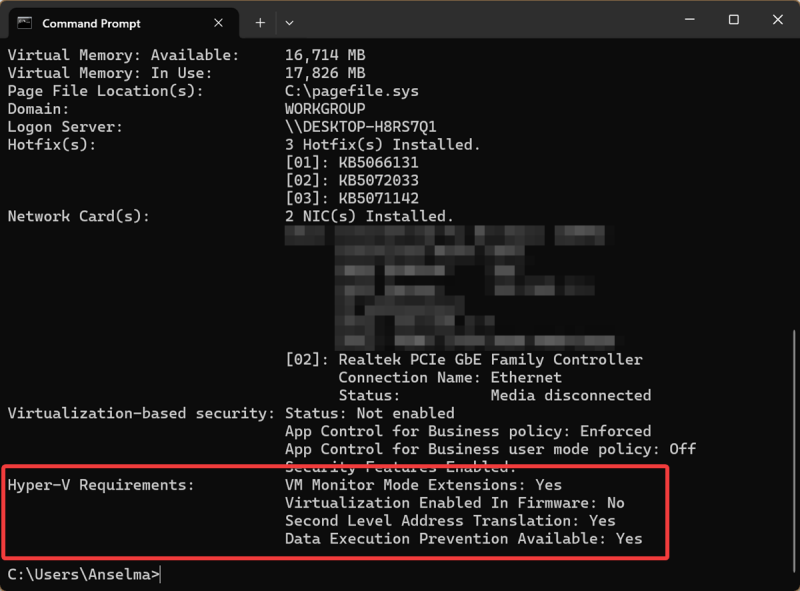
As you can see here, since I've previously disabled some virtualization features in the BIOS, there's a "No" next to it.
Before we move on to the next steps, make sure you're signed in as an administrator. You'll need elevated privileges to make the following changes.
Enable/disable Hyper-V via Settings
This option is only available to specific Windows 11 builds: 26100.7309 (24H2) and 26200.7309 (25H2). So, I wasn't able to find it (or screenshot it) on my PC, but here are the steps for those of you who can access it:
- Open Settings and go to System > Advanced > Virtual Workspaces.
- Under Hyper-V settings, toggle on/off everything: Hyper-V GUI Management Tools, Hyper-V Module for Windows PowerShell, Hyper-V Hypervisor, and Hyper-V Services.
- Click the Restart now button at the top. If you were working on something, make sure you save before pressing it.
Enable/disable Hyper-V via Windows Features
If you couldn't follow the previous method, just use Windows Features instead. You can find this section in the Control Panel. Here's how:
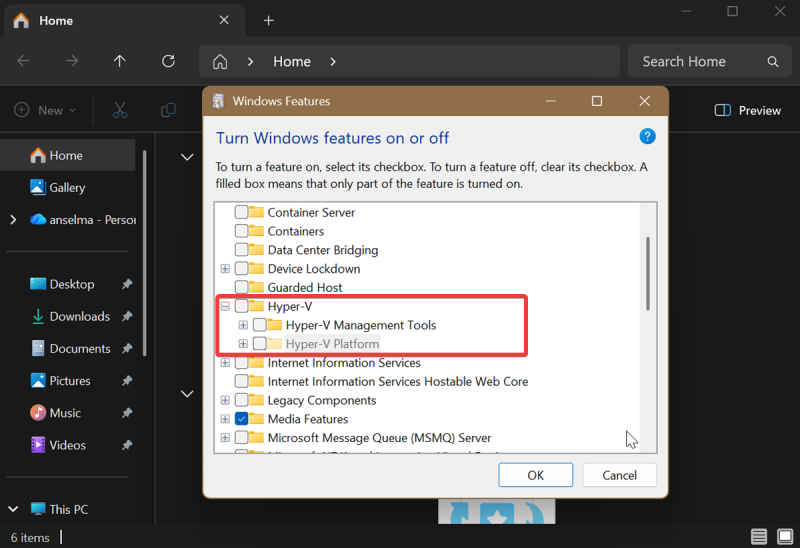
- Type Windows Features in Search, and open Turn Windows features on or off when it shows up.
- Check or uncheck everything under Hyper-V, including Hyper-V Management Tools and Hyper-V Platform.
- Click on OK.
- Select Restart now in the window that pops up to finish installing the changes.
Enable/disable Hyper-V via Command Prompt
If you prefer using commands, check out this method:
- Type CMD in Windows Search, and select Run as Administrator. You'll need elevated rights for this.
- To enable Hyper-V, type the following command and press Enter: DISM /Online /Enable-Feature /FeatureName:"Microsoft-Hyper-V" -All
- To disable it: DISM /Online /Disable-Feature /FeatureName:"Microsoft-Hyper-V"
- Once the process completes, you'll be prompted to restart. Press Y.
Enable/disable Hyper-V via PowerShell
Alternatively, you can use PowerShell for the same effect:
- Type PowerShell in Windows Search, and select Run as Administrator.
- To enable Hyper-V, type the following command and press Enter: Enable-WindowsOptionalFeature -Online -FeatureName "Microsoft-Hyper-V" -All
- To disable it: Disable-WindowsOptionalFeature -Online -FeatureName "Microsoft-Hyper-V"
- Again, you'll be prompted to restart. Press Y when you're ready.
If you tried all the steps and still can't seem to get rid of Hyper-V, you might need to disable memory integrity as well. These two are connected, since memory integrity is a virtualization-based security feature.
The only slightly annoying thing about turning Hyper-V on and off is that it always requires a restart. Still, it's a simple procedure, and you shouldn't have any trouble with it.

|
selma citakovic
Selma is a gamer, geek and gremlin hunter with a passion for cyber security and smashing Windows bugs before they bite. She’s IBM-certified, loves real freeware, despises bloatware, and powers most of her troubleshooting with an unhealthy amount of coffee. |
comments powered by Disqus
