


How to Turn Core Isolation Memory Integrity On or Off in Windows 10 & 11
By Timothy Tibbettson 06/15/2023 |
Core isolation Memory Integrity is a security feature of Microsoft Windows 10 & 11 that protects important core processes of Windows from malicious software by isolating them in memory. It does this by running those core processes in a virtualized environment.
Core Isolation Memory Integrity should be on in Windows 10 & 11 by default, and you want it enabled if possible. However, if it is disabled and you can't enable it, that means you have an incompatible driver. You should see a list of any incompatible drivers in this situation. Try to locate the newest driver from your computer manufacturer or use a freeware driver updater if no problems are shown.
You can enable or disable Core isolation Memory Integrity in settings or with our registry files. Turning Core isolation Memory Integrity on or off requires a reboot each time.
How to Enable or Disable Core Isolation Memory Integrity in Windows 10 & 11 - Settings
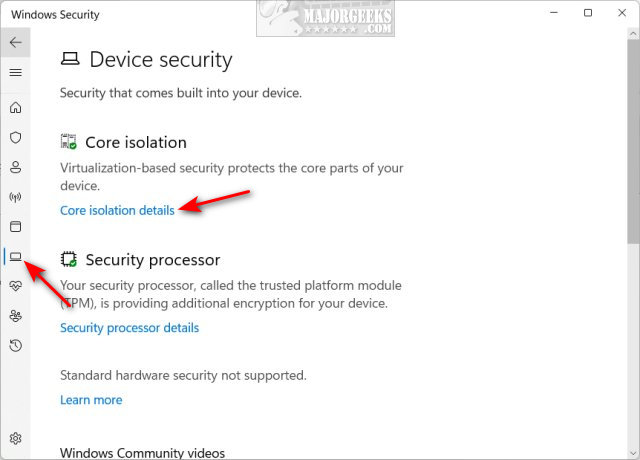
Open Windows Security by clicking the shield in the lower-right corner.
Click on Device security on the left.
Click on Core isolation details on the left.
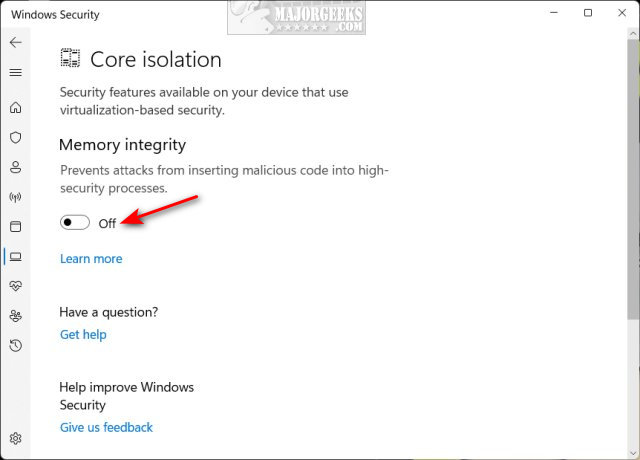
Under Memory integrity click On or Off.
How to Enable or Disable Core Isolation Memory Integrity in Windows 10 & 11 - Registry Files
Our registry files can save you a few steps.
Download Enable or Disable Core Isolation Memory Integrity in Windows 10 & 11 from MajorGeeks, and extract the files.
Double-click on Core Isolation Memory Integrity - On.reg or Core Isolation Memory Integrity - Off.reg.
Click Yes when prompted by User Account Control.
Click Yes when prompted by Registry Editor.
Click OK when prompted by the Registry Editor.
This tweak is included as part of MajorGeeks Windows Tweaks, and donations to the project and MajorGeeks are accepted here.
Similar:
How to Download the Latest Drivers for Windows
How to Download Drivers in Windows Update
How to Manage Driver Problems in Device Manager
What Are Windows DCH Drivers?
What is Windows Hardware Quality Labs or WHQL?
comments powered by Disqus
Core Isolation Memory Integrity should be on in Windows 10 & 11 by default, and you want it enabled if possible. However, if it is disabled and you can't enable it, that means you have an incompatible driver. You should see a list of any incompatible drivers in this situation. Try to locate the newest driver from your computer manufacturer or use a freeware driver updater if no problems are shown.
You can enable or disable Core isolation Memory Integrity in settings or with our registry files. Turning Core isolation Memory Integrity on or off requires a reboot each time.
How to Enable or Disable Core Isolation Memory Integrity in Windows 10 & 11 - Settings
Open Windows Security by clicking the shield in the lower-right corner.
Click on Device security on the left.
Click on Core isolation details on the left.
Under Memory integrity click On or Off.
How to Enable or Disable Core Isolation Memory Integrity in Windows 10 & 11 - Registry Files
Our registry files can save you a few steps.
Download Enable or Disable Core Isolation Memory Integrity in Windows 10 & 11 from MajorGeeks, and extract the files.
Double-click on Core Isolation Memory Integrity - On.reg or Core Isolation Memory Integrity - Off.reg.
Click Yes when prompted by User Account Control.
Click Yes when prompted by Registry Editor.
Click OK when prompted by the Registry Editor.
This tweak is included as part of MajorGeeks Windows Tweaks, and donations to the project and MajorGeeks are accepted here.
Similar:
comments powered by Disqus
