


How To Fix "Network Discovery Is Turned Off" on Windows 11
By selma čitakovićon 12/23/2025 |
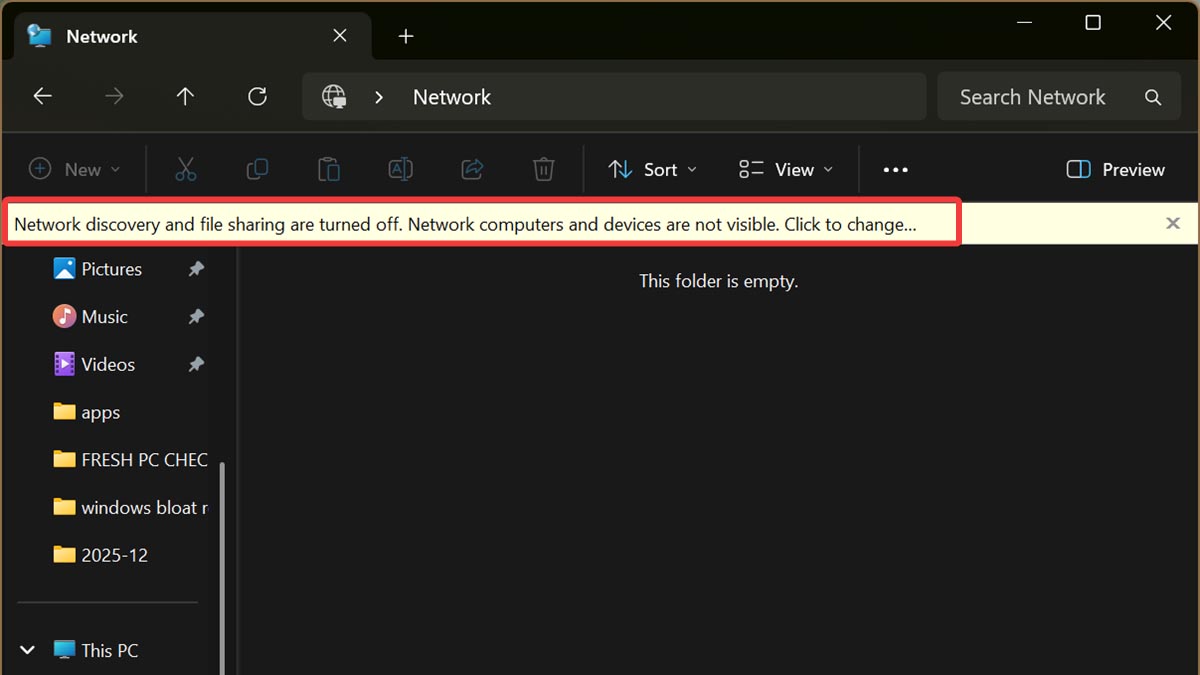
Is network discovery giving you trouble? You may see a message saying "Network discovery and file sharing are turned off. Network computers and devices are not visible." That sounds easy enough to fix - you just need to enable network discovery.
But here's the problem: You turn it on, and then Windows somehow reverts the changes. This usually happens due to inactive dependency services, Windows Firewall being too restrictive, or your firewall rules being corrupted.
Whatever the reason, let's resolve it together.
Manually enable network discovery
Let's eliminate the obvious first: maybe you've accidentally manually disabled network discovery. In that case, let's just try turning it back on again.
If you've already tried this, feel free to jump to the next step.
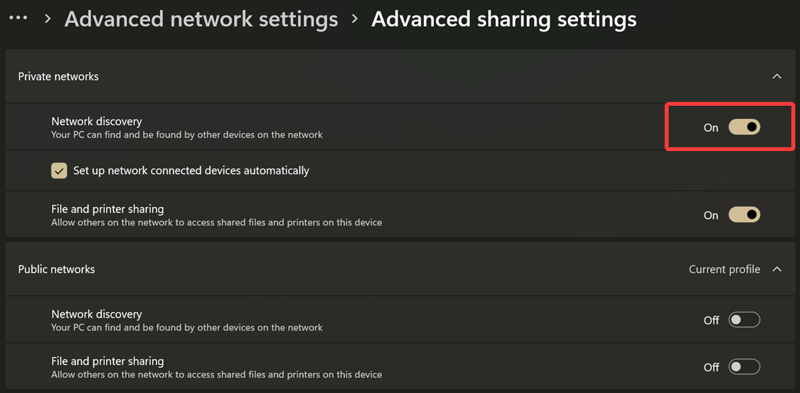
- Right-click the Start button and go to Settings > Network & internet > Advanced network settings > Advanced sharing settings.
- Expand the menus for Private and Public networks. Windows keeps separate profiles for each.
- Enable Network discovery for Private networks. Also, tick the options for Set up network connected devices automatically and File and printer sharing.
- Network discovery for Public networks should stay disabled for safety reasons.
Check network profile type
If you've followed the first step, ensure that your current network is actually private. Otherwise, the changes you've made won't apply. Here's how:
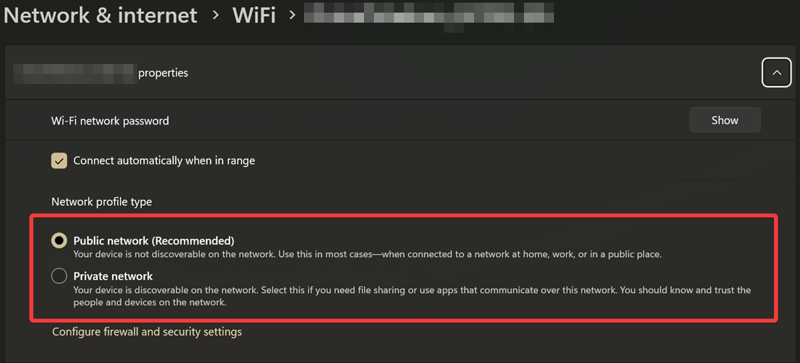
- Open Settings and go to Network & internet.
- You'll see your current network at the top of the screen, with Properties and Data usage sections. You should be able to see whether it's private or public right there, under Properties.
- If it's private, that's exactly what you want. If it's public, click on Properties.
- Expand the menu (if minimized) and select Private network under Network profile type.

See if you continue getting the same error message.
Enable dependency services
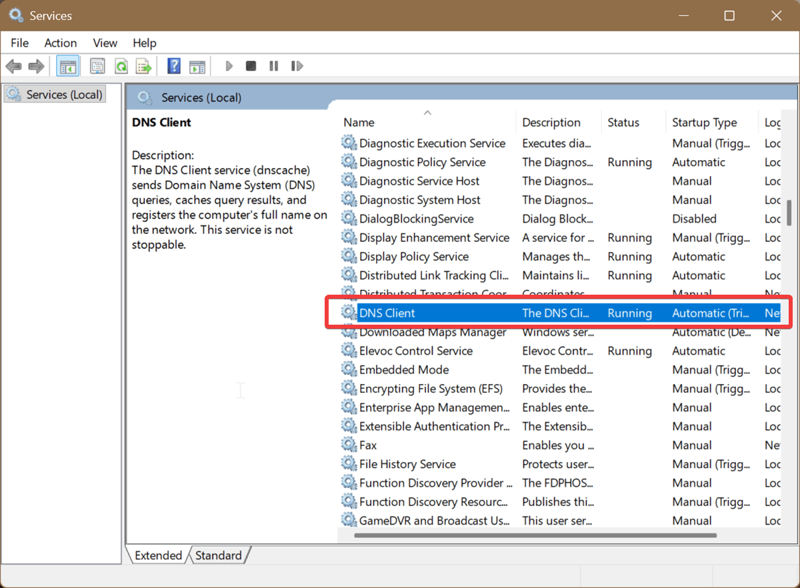
Network discovery needs the following services to be active and running to work:
- DNS Client
- Function Discovery Resource Publication
- SSDP Discovery
- UPnP Device Host.
So, let's check them out one by one:
- Type Services in Windows Search and open them.
- Go through the list and locate each of the services I mentioned. Their Status has to be Running, and the Startup type should be set to Automatic.
- If that's not the case, double-click the service. In the window that opens, select Automatic as Startup type and press the Start button under Service status.
- Click on OK to confirm and repeat the process for other services.
Allow network discovery on Windows Firewall
Maybe Windows Firewall is acting up and blocking the feature. To whitelist network discovery:
- Type Control Panel in Windows Search and open it.
- Go to System and Security > Windows Defender Firewall.
- On the left side panel, select Allow an app or feature through Windows Defender Firewall.
- Click the Change settings button.
- Scroll down until you find Network discovery. Tick the box for Private and click OK.
Reset the firewall
If the previous step didn't work, maybe your Windows Defender Firewall rules got corrupted. In that case, the only solution is to reset them. However, keep in mind that this will delete all your rules. So, if you have many custom ones you don't feel like setting up again after the reset, you should back them up first.
Here's how:
- Type Windows Security in Search and open it.
- Go to Firewall & network protection > Advanced settings.
- Select Windows Defender Firewall with Advanced Security on Local Computer on the left pane. This should be the default option anyway.
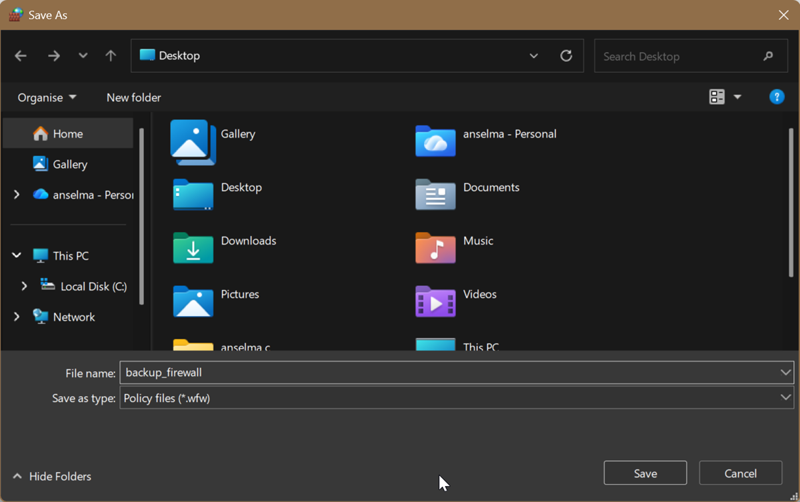
- On the right pane, select Export policy.
- Choose a location for the backup .wfw file, name it something memorable, and save it.
You'll see a message saying "Policy successfully exported."
Now, to reset your rules:
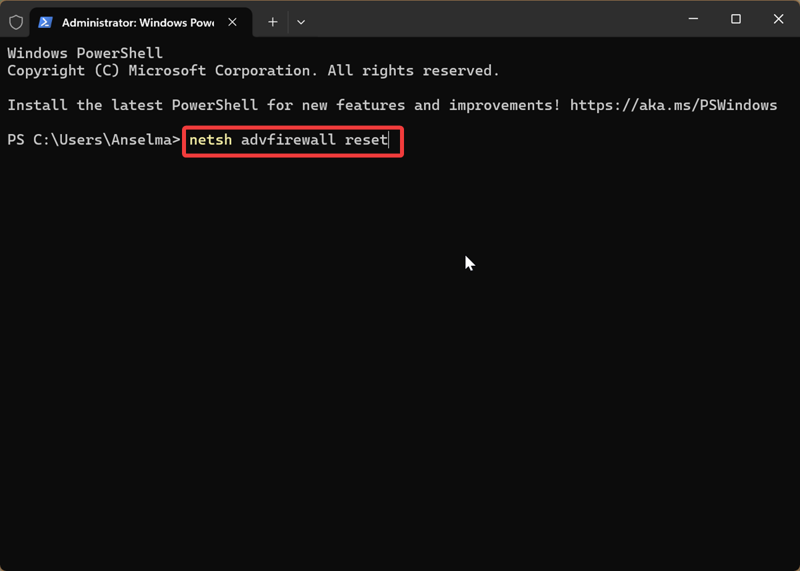
- Right-click the Windows Start button and click on Terminal (Admin) to bring up elevated PowerShell.
- Type the following command: netsh advfirewall reset. Press Enter.
Try enabling network discovery now. It should work!
Additionally, if you want to restore your backed-up rules, follow these steps:
- Open Windows Security and go to Firewall & network protection > Advanced settings.
- On the right pane, select Import policy.
- Find your backup .wfw file and click Open, then OK to confirm.
And that should take care of the issue. Network-related problems are never fun, but this one isn't that bad. With network discovery enabled again, you can share files and interact with other devices on your network.

|
selma citakovic
Selma is a gamer, geek and gremlin hunter with a passion for cyber security and smashing Windows bugs before they bite. She’s IBM-certified, loves real freeware, despises bloatware, and powers most of her troubleshooting with an unhealthy amount of coffee. |
comments powered by Disqus
