


How to Fix Oops! We Couldn’t Save That One Error
By Timothy Tibbettson 07/21/2023 |
One error you might come across with the Windows 10 Photos app when saving or overwriting an existing file reads "Oops! We couldn’t save that one." In this guide, we look at a few possible solutions to this problem.
1: Run the Microsoft Store apps Troubleshooter
Click on Start > Settings > Update & Security > Troubleshoot. Scroll down and click on Windows Store Apps, then Run the troubleshooter.

You will be notified if problems were found and fixed.
2: Reset or Repair the Microsoft Photos app
Click on Start> Settings > Apps, and you'll be at the Apps & Features settings. Scroll down, find and click on Microsoft Photos. Click on Advanced options. Scroll down and find Repair and Reset and try both to see if the problem is solved. If not, you might want to uninstall Microsoft Photos and find a third-party app.
MajorGeeks has many excellent freeware apps including Viewers, Photo Editing, Modifying & Organizing, and All-In-One Suites.
3: Check Folder Permissions
We saved folder permissions for last because it's less likely unless you or a recently installed app, changed the permissions.
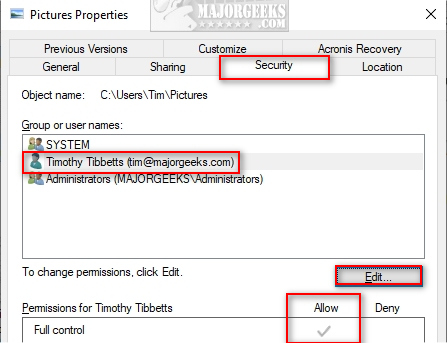
Open File Explorer from your Taskbar, right-click on the folder you are saving your photos in and select Properties. Click on the Security tab.
Under Group or user names click on the name of the account having this problem. Check under Permissions for and verify Full Control is set to Allow.
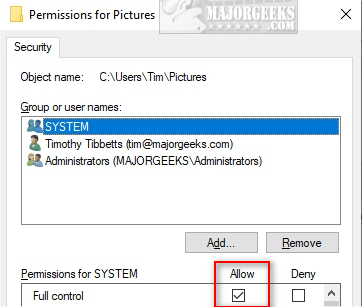
If not, click on Edit and under Permissions for SYSTEM, check the box under Allow.
Similar:
Restore the Windows Photo Viewer on Windows 10
How-to Edit Your Videos With the Microsoft Photo App
How to Take Screenshots in Windows 10
comments powered by Disqus
1: Run the Microsoft Store apps Troubleshooter
Click on Start > Settings > Update & Security > Troubleshoot. Scroll down and click on Windows Store Apps, then Run the troubleshooter.
You will be notified if problems were found and fixed.
2: Reset or Repair the Microsoft Photos app
Click on Start> Settings > Apps, and you'll be at the Apps & Features settings. Scroll down, find and click on Microsoft Photos. Click on Advanced options. Scroll down and find Repair and Reset and try both to see if the problem is solved. If not, you might want to uninstall Microsoft Photos and find a third-party app.
MajorGeeks has many excellent freeware apps including Viewers, Photo Editing, Modifying & Organizing, and All-In-One Suites.
3: Check Folder Permissions
We saved folder permissions for last because it's less likely unless you or a recently installed app, changed the permissions.
Open File Explorer from your Taskbar, right-click on the folder you are saving your photos in and select Properties. Click on the Security tab.
Under Group or user names click on the name of the account having this problem. Check under Permissions for and verify Full Control is set to Allow.
If not, click on Edit and under Permissions for SYSTEM, check the box under Allow.
Similar:
Restore the Windows Photo Viewer on Windows 10
How-to Edit Your Videos With the Microsoft Photo App
How to Take Screenshots in Windows 10
comments powered by Disqus
