


How To Remove the Windows 11 Updated Start Menu
By selma čitakovićon 02/23/2026 |
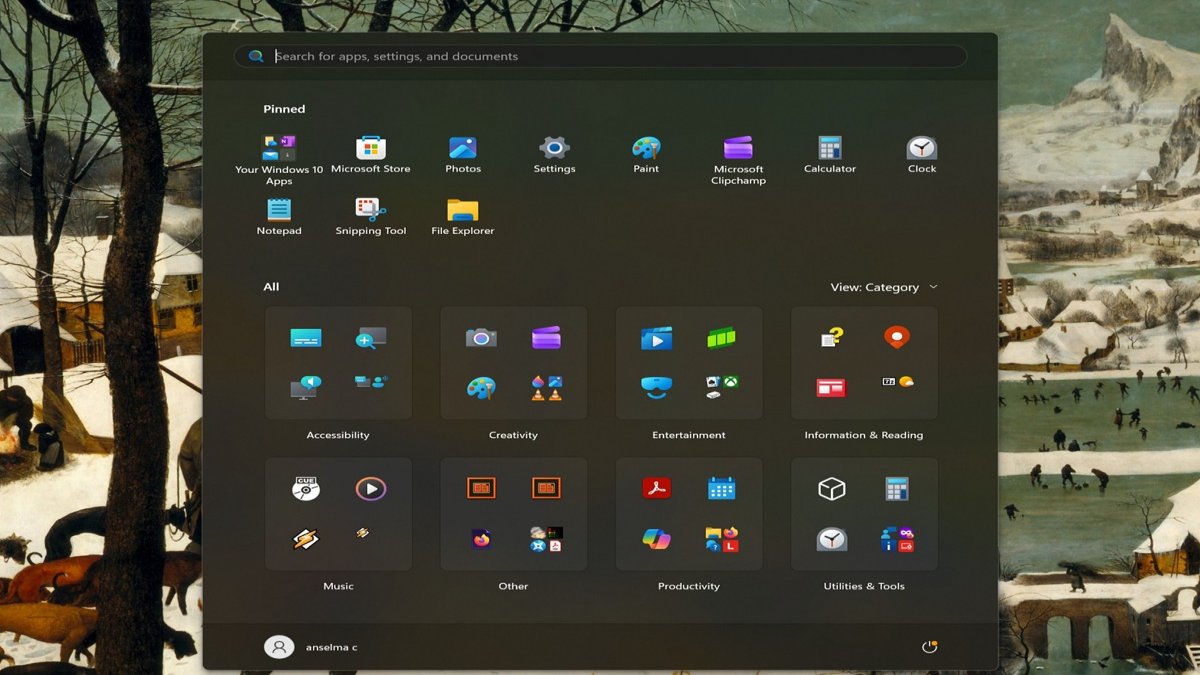
The new big Start menu is gradually rolling out for Windows 11 24H2 and 25H2. It's noticeably larger, with an expanded All section, and it displays apps in Category view by default. You can now also completely remove the Recommended section in the settings (finally!).
However, this redesign isn't exactly an upgrade.
The menu takes up almost the entire screen, and you can't resize it. The Category view arbitrarily sorts apps into groups without considering your preferences. Also, it doesn't include labels, so you'll have to play a guessing game with all the icons. Moreover, the All section is now always expanded, and you can't minimize it. Some users might like this, but others may find it visually overwhelming.
Unfortunately, if you're not a fan of the new look, you can't simply disable it in the Settings or use "official" tools to do so. You'll have to rely on ViVeTool instead. It's a free, open-source command-line tool that lets you try out experimental Windows features before their wider release. In this case, we can use it to disable the new menu and revert to the previous version.
I'll show you how to do it nice and easy, with each step explained.
Remove the new Start menu with ViVeTool
First, you should sign in as an administrator to be able to use ViVeTool. Then, follow these steps:
- Download ViVeTool. You can get the AMD/Intel version here on MajorGeeks. You can also find the Snapdragon and ARM64 version on GitHub.
- Right-click the downloaded ZIP and select Extract all from the context menu.
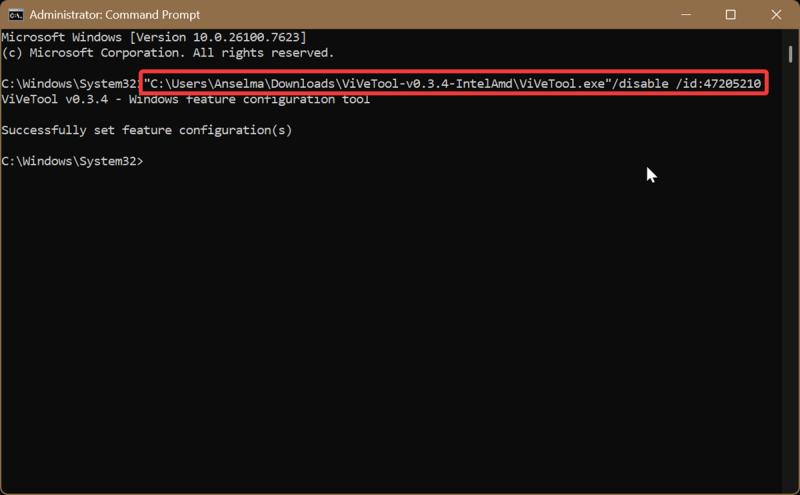
- Open the extracted ViVeTool folder and look for ViVeTool.exe. Right-click it and select Copy as path. You'll need the file path for it in a moment.
- Now, type CMD in Windows Search, and click on Run as administrator.
- Press Ctrl + V to paste the file path you just copied, and add the following: /disable /id:47205210. Hit Enter. The full command should look like this: "C:\Users\Anselma\Downloads\ViVeTool-v0.3.4-IntelAmd\ViVeTool.exe" /disable /id:47205210. Your file path will be different, of course.
- After pressing Enter, you should see a message saying: "Successfully set feature configuration(s)."
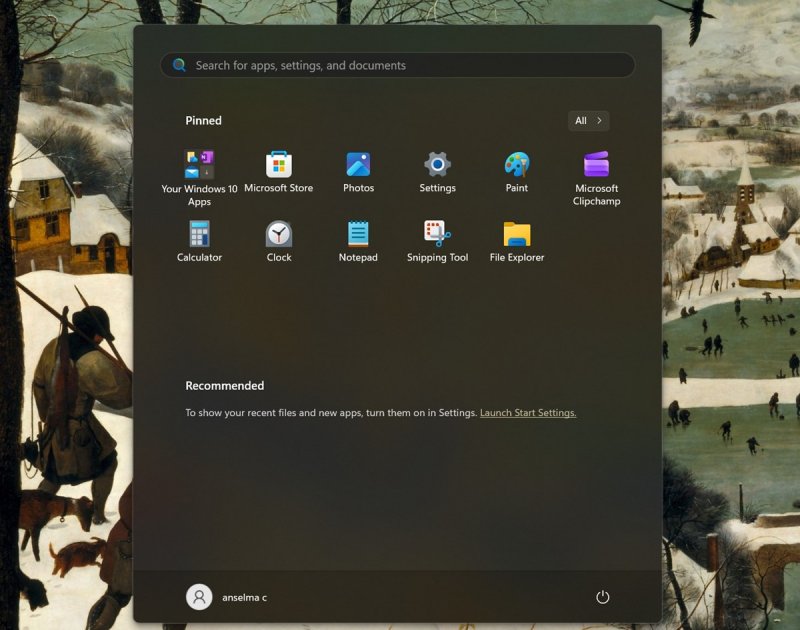
- Restart your PC to apply the changes, and check your Start menu. It should be back to the old one!
To undo it, just replace "/disable" with "/reset" in the command, press Enter, and restart. The rest of the command stays the same. This will remove the custom configuration and enable the default Windows setting.
Additionally, if you want to clean up the Start menu and remove some of the clutter, you can do so via Settings. Go to Settings > Personalization > Start, and toggle off the following:
- Show recently added apps
- Show recommended files in Start, recent files in File Explorer, and items in Jump Lists
- Show recommendations for tips, shortcuts, new apps, and more
- Show websites from your browsing history.
That should leave you with a pretty simple menu, as you can see below.
Overall, it's a shame that you can't switch to the older Start menu using official means. But hey, at least there's ViVeTool. Even if you're generally a bit apprehensive about command-line tools, the entire process should take only a couple of minutes.

|
selma citakovic
Selma is a gamer, geek and gremlin hunter with a passion for cyber security and smashing Windows bugs before they bite. She’s IBM-certified, loves real freeware, despises bloatware, and powers most of her troubleshooting with an unhealthy amount of coffee. |
comments powered by Disqus
