


How to Install or Uninstall Microsoft .Net Framework 2.0 and 3.0 in Windows 10 & 11
By Timothy Tibbettson 11/02/2022 |
Many older apps and games may require you to install older versions of Microsoft .Net Framework. While some apps might install the required versions of .Net, you can install .Net 2.0 and 3.0 in Windows Features in Windows 10 & 11.
Video tutorial:
Start by opening the Control Panel or press the Windows Key + R, type in optionalfeatures, and press Enter.
Click on Programs and then click on Programs and Features.
Click on Turn Windows features on or off.
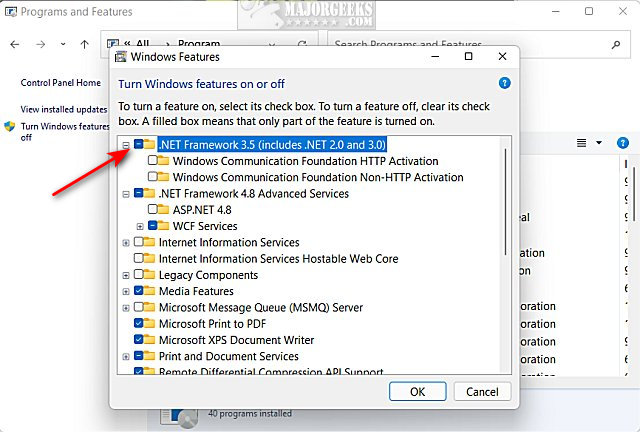
Click on the box next to .NET Framework 3.5 (includes .NET 2.0 and 3.0).
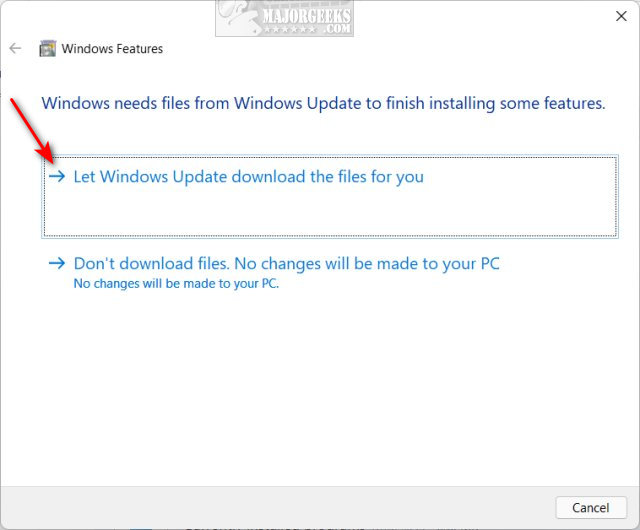
Click on Let Windows Update download the files for you.
Wait while Windows downloads and installs the required files, which should only take a few minutes.
Click on Close when you are notified that Windows has completed the requested changes.
You might need to reboot.
Running into .Net problems is nothing new. The biggest problem comes with applications built with Microsoft .Net before version 3.5 when backward compatibility was solved. For example, you might have a game that requires .Net 3.0. You have to find the exact version you need. Here's how to find out what versions of .Net you have installed.
The basic rule is if you need .Net 3.5 or older, download 3.5 and if you need .Net 3.5 or higher, download version 5.0.
Otherwise, if you know you need an older version of .Net, you can download them from MajorGeeks:
Microsoft .NET Framework Redistributable 5.0
Microsoft .NET Framework Redistributable 4.8
Microsoft .NET Framework Redistributable 4.5
Microsoft .NET Framework Redistributable 4.0
Microsoft .NET Framework Redistributable 3.5
Microsoft .NET Framework Redistributable 3.0
Microsoft .NET Framework Redistributable 2.0
Microsoft .NET Framework Redistributable 1.1
Microsoft .NET Framework Redistributable 1.0
Similar:
How to Check Which Microsoft .NET Version is Installed
Add All Tasks or God Mode to the Control Panel
6 Ways to Open Settings in Windows 10
12 Ways You Can Still Open the Control Panel in Windows 10
comments powered by Disqus
Start by opening the Control Panel or press the Windows Key + R, type in optionalfeatures, and press Enter.
Click on Programs and then click on Programs and Features.
Click on Turn Windows features on or off.
Click on the box next to .NET Framework 3.5 (includes .NET 2.0 and 3.0).
Click on Let Windows Update download the files for you.
Wait while Windows downloads and installs the required files, which should only take a few minutes.
Click on Close when you are notified that Windows has completed the requested changes.
You might need to reboot.
Running into .Net problems is nothing new. The biggest problem comes with applications built with Microsoft .Net before version 3.5 when backward compatibility was solved. For example, you might have a game that requires .Net 3.0. You have to find the exact version you need. Here's how to find out what versions of .Net you have installed.
The basic rule is if you need .Net 3.5 or older, download 3.5 and if you need .Net 3.5 or higher, download version 5.0.
Otherwise, if you know you need an older version of .Net, you can download them from MajorGeeks:
Similar:
comments powered by Disqus
