


How to Add 'Create Restore Point' Context Menu in Windows 10 & 11
By Timothy Tibbettson 08/26/2022 |
If you like to regularly create a restore point in Windows, there are multiple steps. Another option is to add Restore Point to your Context Menu to speed up the process.
A Restore Point will be created automatically for you with only a single click using our Registry files.
Download Add 'Create Restore Point' Context Menu in Windows 10 & 11 from MajorGeeks, and extract the two files.
Double-click on Restore Point Context Menu - Add.reg or Restore Point Context Menu - Remove.reg (Default).
Click Yes when prompted by User Account Control.
Click Yes when prompted by Registry Editor.
Click OK when prompted by the Registry Editor.
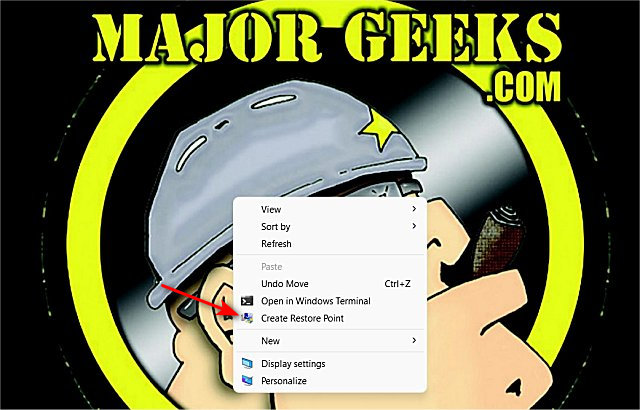
Right-click on your Desktop, and click on Create Restore Point. Windows 11 users will need to right-click on the Desktop, then click on Show more options.
You will see a PowerShell window appear briefly. Click Yes for the User Account Control prompt; then, a PowerShell window will appear again briefly for a second time.
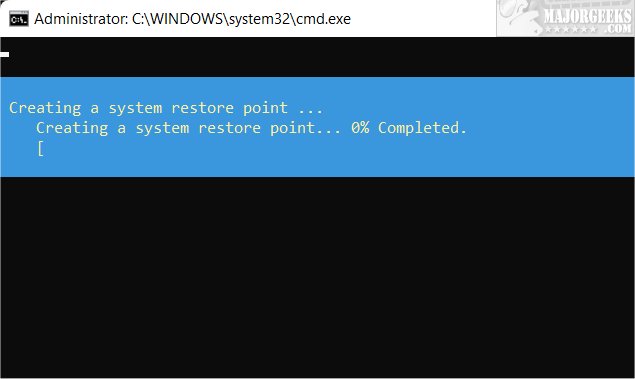
The entire process should only take about 10 seconds.
This tweak is included as part of MajorGeeks Windows Tweaks, and donations to the project and MajorGeeks are accepted here.
Similar:
How to Turn System Protection On or Off in Windows 10 & 11
Enable, Disable, Manage, Delete or Create a System Restore Point
How to Enable or Disable System Restore or Configuration in Windows 10
How to Automatically Back up the Registry on Windows 10
How to Back up or Restore the Windows Registry
comments powered by Disqus
A Restore Point will be created automatically for you with only a single click using our Registry files.
Download Add 'Create Restore Point' Context Menu in Windows 10 & 11 from MajorGeeks, and extract the two files.
Double-click on Restore Point Context Menu - Add.reg or Restore Point Context Menu - Remove.reg (Default).
Click Yes when prompted by User Account Control.
Click Yes when prompted by Registry Editor.
Click OK when prompted by the Registry Editor.
Right-click on your Desktop, and click on Create Restore Point. Windows 11 users will need to right-click on the Desktop, then click on Show more options.
You will see a PowerShell window appear briefly. Click Yes for the User Account Control prompt; then, a PowerShell window will appear again briefly for a second time.
The entire process should only take about 10 seconds.
This tweak is included as part of MajorGeeks Windows Tweaks, and donations to the project and MajorGeeks are accepted here.
Similar:
comments powered by Disqus
