


How to Turn System Protection On or Off in Windows 10 & 11
By Timothy Tibbettson 06/15/2023 |
System Protection or System Restore can undo changes to your computer following a problem. If you use Reset This PC, have a backup image, partition, or a registry backup, you can disable System Restore to improve performance and free up drive space.
It is recommended that you leave System Protection on as it can solve many short-term problems after installing software, drivers, or making changes to your computer. Some applications offer to create a Restore Point before installation, which can be useful.
You can disable System Protection in Settings or using our registry file.
Video tutorial:
How to Turn System Protection On or Off in Windows 11 - Settings
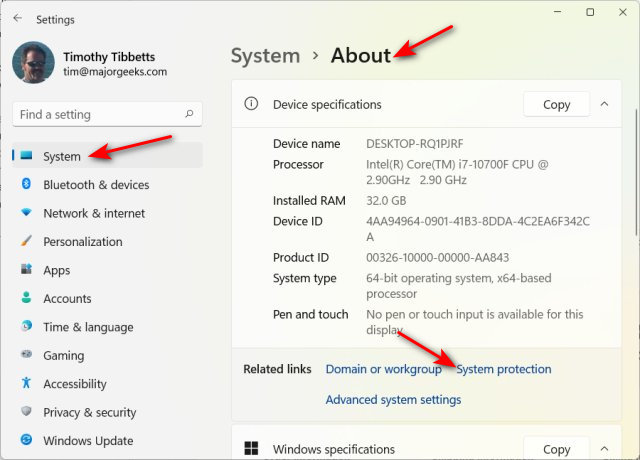
Click on Start > Settings or press the Windows Key + I.
Click on System on the left.
Click on About on the right.
Click on System protection.
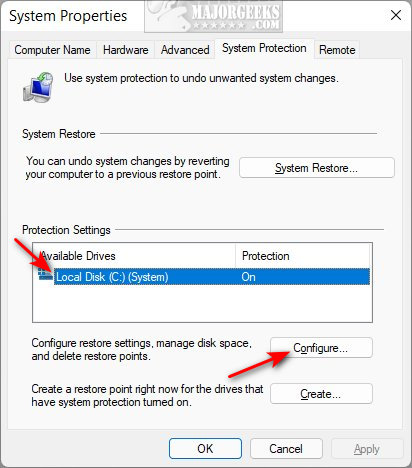
The Control Panel should open to System Properties.
Click on the drive you want to modify, typically C.
Click on Configure.
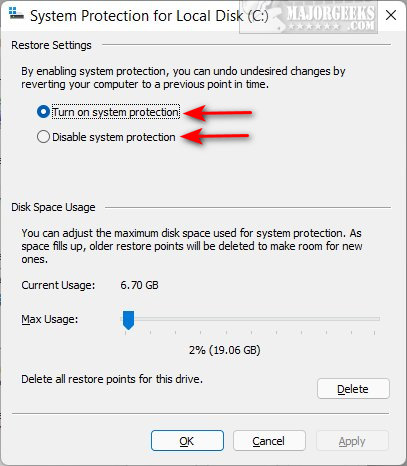
Click on Disable system protection or Turn on system protection.
Click on OK.
Click on Yes when prompted.
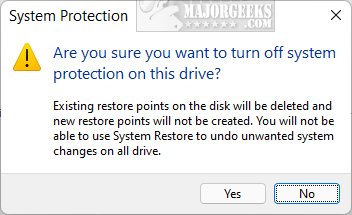
As you might have noticed, you can also adjust disk space usage or clean up some space by deleting all restore points. When you turn off system protection, your restore points will automatically be deleted.
How to Turn System Protection Off in Windows 11 - Registry
Our registry file makes it simple to disable System Protection.
Download Turn System Protection Off in Windows 10 & 11 from MajorGeeks, and extract the file.
Double-click on System Protection - Turn Off.reg.
Click Yes when prompted by User Account Control.
Click Yes when prompted by Registry Editor.
Click OK when prompted by the Registry Editor.
If you change your mind later, follow the instructions above to turn System Protection on in Settings.
This tweak is included as part of MajorGeeks Windows Tweaks, and donations to the project and MajorGeeks are accepted here.
Similar:
System Protection (System Restore) Shortcut
Add System Protection Context Menu
How to Reset or Reinstall Windows 10 & 11 Using the Cloud
Enable, Disable, Manage, Delete or Create a System Restore Point
How To Backup and Restore Your Drivers
comments powered by Disqus
It is recommended that you leave System Protection on as it can solve many short-term problems after installing software, drivers, or making changes to your computer. Some applications offer to create a Restore Point before installation, which can be useful.
You can disable System Protection in Settings or using our registry file.
How to Turn System Protection On or Off in Windows 11 - Settings
Click on Start > Settings or press the Windows Key + I.
Click on System on the left.
Click on About on the right.
Click on System protection.
The Control Panel should open to System Properties.
Click on the drive you want to modify, typically C.
Click on Configure.
Click on Disable system protection or Turn on system protection.
Click on OK.
Click on Yes when prompted.
As you might have noticed, you can also adjust disk space usage or clean up some space by deleting all restore points. When you turn off system protection, your restore points will automatically be deleted.
How to Turn System Protection Off in Windows 11 - Registry
Our registry file makes it simple to disable System Protection.
Download Turn System Protection Off in Windows 10 & 11 from MajorGeeks, and extract the file.
Double-click on System Protection - Turn Off.reg.
Click Yes when prompted by User Account Control.
Click Yes when prompted by Registry Editor.
Click OK when prompted by the Registry Editor.
If you change your mind later, follow the instructions above to turn System Protection on in Settings.
This tweak is included as part of MajorGeeks Windows Tweaks, and donations to the project and MajorGeeks are accepted here.
Similar:
comments powered by Disqus
