


How to Fix Oculus Rift Stuck on Three Dots Loading
By Timothy Tibbettson 06/15/2023 |
Recently, we bumped into the three dots loading screen in our Oculus Rift S headset. Here's how we fixed the problem.
1: Update Drivers
We solved our problem by updating our drivers. You want to update everything - video, audio, and motherboard.
If you know your drivers are current, don't waste your time and go to Step 2, which solved our problem.
2: Uninstall Oculus, Update Drivers, Reinstall Oculus
We hate reinstalling software and typically, it's the last thing we would try. In almost every situation, telling people to reinstall is a cop-out when you can't find the problem. Not in this case.
First, download the Oculus software from MajorGeeks.
Uninstalling in Windows isn't enough. Use a program like IObit Uninstaller to completely delete leftover files, folders, and registry entries. There can be hundreds or more leftovers, and that's not a complete uninstall.
As discussed in the first step, we'd also update our drivers before reinstalling Oculus.
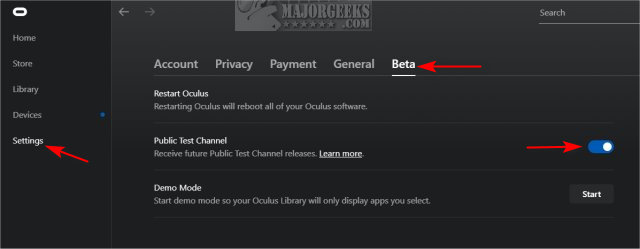
3: Join the Public Test Channel
In most situations, beta testing is for those who want to see upcoming releases and are used to dealing with bugs. Oculus has almost always been backward. We've always had better luck opting into the beta channel.
In the Oculus app, go to Settings > Beta, and turn on Public Test Channel. We've always said VR remains in its infancy, and it's just like beta testing.
After you turn on the Public Test Channel, you'll probably need to update your Oculus software and firmware.

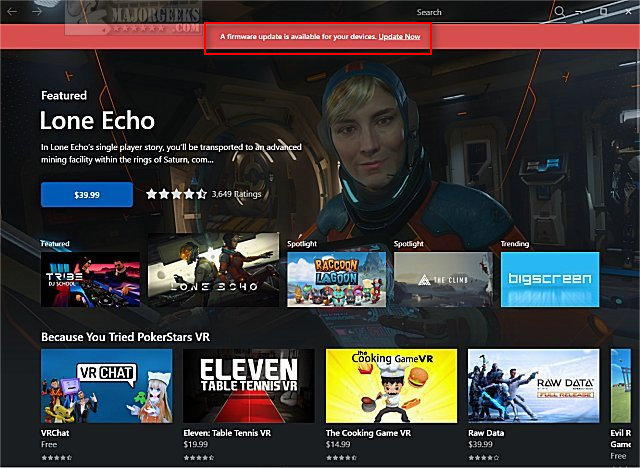
Odds are you'll also have to do some setup again following the updates. Yes, this caused us to need a drink, but it worked.
4: Disconnect and Reconnect your Rift
Unplug the USB cable from your computer
Unplug the Mini DisplayPort or DisplayPort cable from your computer
Plugin the USB cable (to a different port than previously used, if possible)
When the headset light comes on, plug in the HDMI cable.
5: Disconnect and Reconnect your Rift S Headset
Hold the front of the headset in your lap.
Gently pull away from the facial interface with the foam attached.
Unplug the cable from the headset and wait 5 seconds
Insert the cable back into your headset
Carefully replace the facial interface with the foam back into your headset.
Support MajorGeeks and Show Your Geek Pride With MajorGeeks T-Shirts, Cups, and More!
Similar:
Review - Oculus Rift S
Review: Oculus Quest Standalone Virtual Reality
Oculus Rift - Your Antivirus Software Blocked Installation
How to Fix 'Oculus Rift Continue Setup in VR' Black Screen
Error: Can't Reach Oculus Runtime Service
comments powered by Disqus
1: Update Drivers
We solved our problem by updating our drivers. You want to update everything - video, audio, and motherboard.
If you know your drivers are current, don't waste your time and go to Step 2, which solved our problem.
2: Uninstall Oculus, Update Drivers, Reinstall Oculus
We hate reinstalling software and typically, it's the last thing we would try. In almost every situation, telling people to reinstall is a cop-out when you can't find the problem. Not in this case.
First, download the Oculus software from MajorGeeks.
Uninstalling in Windows isn't enough. Use a program like IObit Uninstaller to completely delete leftover files, folders, and registry entries. There can be hundreds or more leftovers, and that's not a complete uninstall.
As discussed in the first step, we'd also update our drivers before reinstalling Oculus.
3: Join the Public Test Channel
In most situations, beta testing is for those who want to see upcoming releases and are used to dealing with bugs. Oculus has almost always been backward. We've always had better luck opting into the beta channel.
In the Oculus app, go to Settings > Beta, and turn on Public Test Channel. We've always said VR remains in its infancy, and it's just like beta testing.
After you turn on the Public Test Channel, you'll probably need to update your Oculus software and firmware.
Odds are you'll also have to do some setup again following the updates. Yes, this caused us to need a drink, but it worked.
4: Disconnect and Reconnect your Rift
Unplug the USB cable from your computer
Unplug the Mini DisplayPort or DisplayPort cable from your computer
Plugin the USB cable (to a different port than previously used, if possible)
When the headset light comes on, plug in the HDMI cable.
5: Disconnect and Reconnect your Rift S Headset
Hold the front of the headset in your lap.
Gently pull away from the facial interface with the foam attached.
Unplug the cable from the headset and wait 5 seconds
Insert the cable back into your headset
Carefully replace the facial interface with the foam back into your headset.
Support MajorGeeks and Show Your Geek Pride With MajorGeeks T-Shirts, Cups, and More!
Similar:
comments powered by Disqus
