


How To Permanently Disable Storage Sense
By selma čitakovićon 06/14/2026 |
![{$insert['content_title']](/content/file/6085_image1.png
)
You may have heard horror stories about Storage Sense deleting people's precious files on its own, even though it was turned off. That happens because it's designed that way: it will turn itself on automatically and empty your Recycle Bin and/or Downloads folder if you're critically low on disk space. It does its best to free up space, whether you like it or not.
Additionally, Windows keeps flip-flopping between keeping Storage Sense on or off by default. It's hard to keep up with all the changes!
So, if you don't use this feature and want to keep your peace of mind, you can disable it in a more permanent way. It will keep Storage Sense actually disabled and inactive - until you change your mind, that is.
Here's how!
Via Local Group Policy Editor
First, you can configure a policy to disable Storage Sense for all users. However, only some Windows editions (Pro, Enterprise, and Education) support this option.
To use it, sign in as an administrator and do the following:
- Press Win + R, type gpedit.msc, and hit Enter.
- Navigate to Computer Configuration\Administrative Templates\System\Storage Sense on the left pane.
- On the right side, double-click Allow Storage Sense.
- Select Disabled, and click OK.
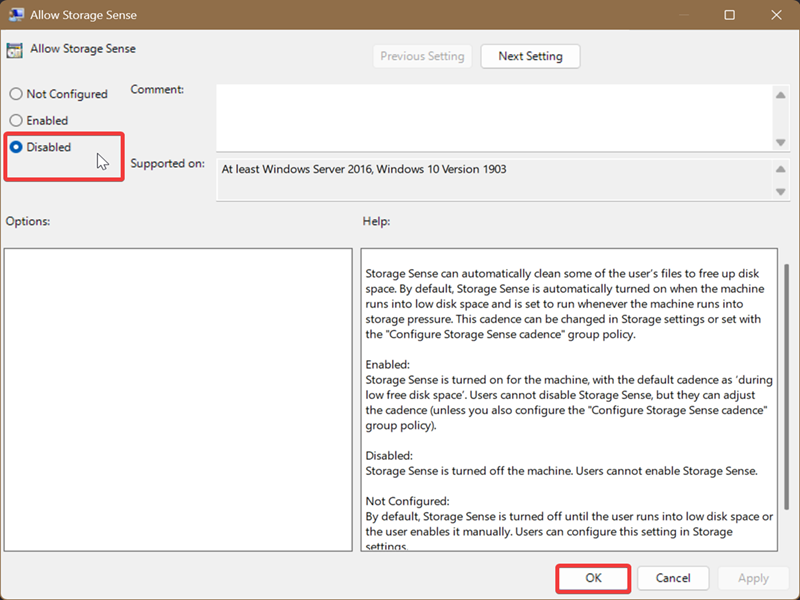
You can then go to Settings > System > Storage and check if it worked. The toggle for Storage Sense should be greyed out!
To undo this, select Not configured and click OK on the same policy (Allow Storage Sense).
Via Registry Editor
You can also use the Registry Editor. It's a bit more convoluted than the previous method, but as long as you closely follow the instructions, you'll be fine. Moreover, you can create a system restore point in case you misclick something.
Here are the steps:
- Type Registry Editor in Search, and click on Run as administrator.
- Go to Computer\HKEY_LOCAL_MACHINE\SOFTWARE\Policies\Microsoft\Windows. You can also paste this address in the bar at the top and hit Enter.
- Right-click the Windows folder, select New > Key. Name it StorageSense.
- In the newly made StorageSense folder, right-click an empty spot and select New > DWORD (32-bit) Value.
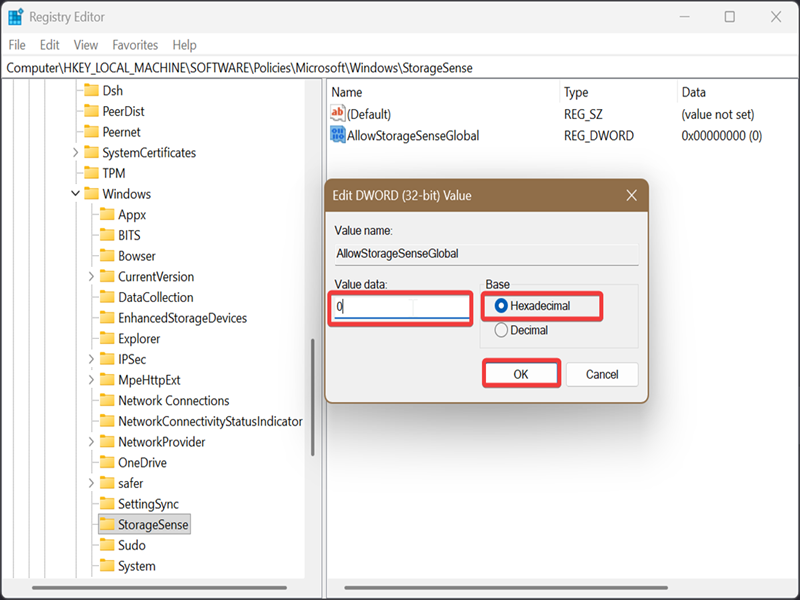
- Name it AllowStorageSenseGlobal.
- Double-click AllowStorageSenseGlobal, select Hexadecimal, and type 0 in the Value data field. Click on OK.
To restore the default settings and undo this, right-click the AllowStorageSenseGlobal value, and click on Delete. Until you do this, you won't be able to turn on Storage Sense in the Settings.

|
selma citakovic
Selma is a gamer, geek and gremlin hunter with a passion for cyber security and smashing Windows bugs before they bite. She’s IBM-certified, loves real freeware, despises bloatware, and powers most of her troubleshooting with an unhealthy amount of coffee. |
comments powered by Disqus
