


How to Show or Hide the File Explorer Status Bar in Windows 10
By Timothy Tibbettson 07/18/2023 |
The Windows 10 File Explorer is one of the most used Windows apps by many and comes with numerous options to customize it exactly as you wish. One such setting is the ability to hide or show the status bar. Here's how.
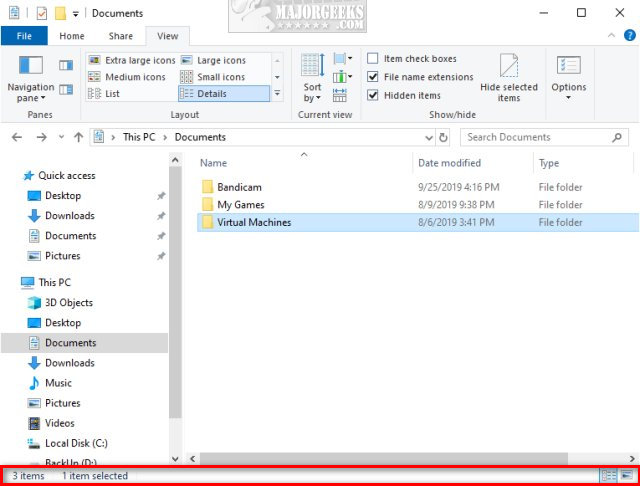
Start by opening File Explorer.
Click on View > Options.
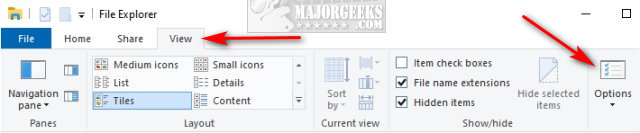
Click on the View tab.
Scroll down and check, or uncheck Show status bar.

Click on OK.
That's it.
Advanced users can also accomplish this or try to resolve problems by editing the registry. While that may seem pointless, it's worth checking if your status bar isn't working by using settings.
Open the Registry Editor and navigate to HKEY_CURRENT_USER\Software\Microsoft\Windows\CurrentVersion\Explorer\Advanced.
Double-click on the ShowStatusBar DWORD on the right side:
1 = Show the Status Bar.
0 = Hide the Status Bar.
Similar:
The Ultimate List of Every Known File Explorer Keyboard Shortcut
Here Are All the Copy, Paste, General, File Explorer and Windows Logo Keyboard Shortcuts Available in Windows
3 Ways to Restart File Explorer Without Rebooting
How to Show the Actual Path in Windows 10 File Explorer
Windows Forgets Folder View Settings
Disable Quick Access, Recent Files, Favorite Folders, and Other File Explorer Tips
File Explorer or Windows Explorer Crashes or Freezes
comments powered by Disqus
Start by opening File Explorer.
Click on View > Options.
Click on the View tab.
Scroll down and check, or uncheck Show status bar.
Click on OK.
That's it.
Advanced users can also accomplish this or try to resolve problems by editing the registry. While that may seem pointless, it's worth checking if your status bar isn't working by using settings.
Open the Registry Editor and navigate to HKEY_CURRENT_USER\Software\Microsoft\Windows\CurrentVersion\Explorer\Advanced.
Double-click on the ShowStatusBar DWORD on the right side:
1 = Show the Status Bar.
0 = Hide the Status Bar.
Similar:
comments powered by Disqus
