


How to Rename a Network Adapter in Windows
By Timothy Tibbettson 06/15/2023 |
Windows assigns simple names to each network connection. For example, you might have connections named Wi-Fi or Ethernet. If you prefer something more personal, you can change the name of your network connections in Windows 7, 8, and 10.
Rename a Network Adapter in Settings or Control Panel
Windows 10: Click Start > Settings > Network & internet. Click on Change adapter options.
Windows 7 and 8: Click Start > Control Panel > Network and Sharing Center. Click on Change adapter settings.
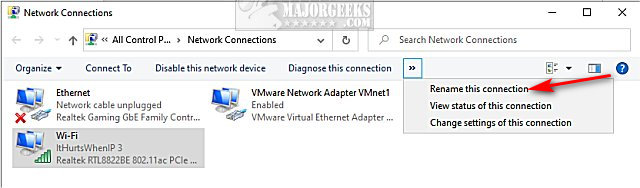
Click on the Network connection you want to rename.
Click on Rename this connection above.
If you don't see that option, expand the list by clicking the arrow, or make the window larger.
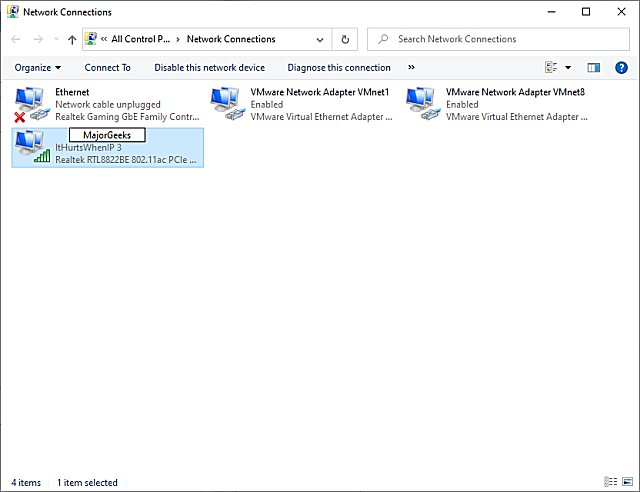
Type in the new name and press Enter.
Rename a Network Adapter in Registry Editor
If you are having problems with Settings or Control Panel, you can make the changes in the Registry.
Open Regedit and go to HKEY_LOCAL_MACHINESYSTEMCurrentControlSetControlNetwork
Press CTRL + F and type in the name of the adapter (for example, Wi-Fi) and press Enter.
Double-click on the Name that was found on the right.
Change the Value data to the network name you want.
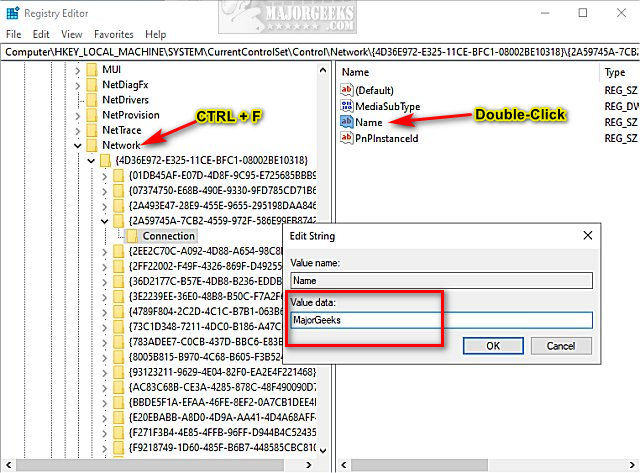
Press OK.
Rename a Network Adapter in Command Prompt or PowerShell
Type netsh interface show interface into Powershell or Command Prompt to identify the network you want to rename.
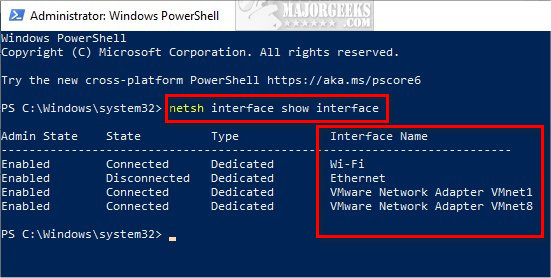
Type in the following lines replacing "Current Name" and "New Name" including the quotes.
Command Prompt: netsh interface set interface name="Current Name" newname="New Name"
PowerShell: Rename-NetAdapter -Name "Current Name" -NewName "New Name"
Similar:
How to Improve Your Wireless Network Performance
How to See Your Network Adapter Speed in Windows 10
How to Show Your Internet Upload, Download, and Usage on the Taskbar
How to Use the Ping Command in Windows
What is Windows Auto-Tuning?
comments powered by Disqus
Rename a Network Adapter in Settings or Control Panel
Windows 10: Click Start > Settings > Network & internet. Click on Change adapter options.
Windows 7 and 8: Click Start > Control Panel > Network and Sharing Center. Click on Change adapter settings.
Click on the Network connection you want to rename.
Click on Rename this connection above.
If you don't see that option, expand the list by clicking the arrow, or make the window larger.
Type in the new name and press Enter.
Rename a Network Adapter in Registry Editor
If you are having problems with Settings or Control Panel, you can make the changes in the Registry.
Open Regedit and go to HKEY_LOCAL_MACHINESYSTEMCurrentControlSetControlNetwork
Press CTRL + F and type in the name of the adapter (for example, Wi-Fi) and press Enter.
Double-click on the Name that was found on the right.
Change the Value data to the network name you want.
Press OK.
Rename a Network Adapter in Command Prompt or PowerShell
Type netsh interface show interface into Powershell or Command Prompt to identify the network you want to rename.
Type in the following lines replacing "Current Name" and "New Name" including the quotes.
Command Prompt: netsh interface set interface name="Current Name" newname="New Name"
PowerShell: Rename-NetAdapter -Name "Current Name" -NewName "New Name"
Similar:
How to Improve Your Wireless Network Performance
How to See Your Network Adapter Speed in Windows 10
How to Show Your Internet Upload, Download, and Usage on the Taskbar
How to Use the Ping Command in Windows
What is Windows Auto-Tuning?
comments powered by Disqus
