


Windows Couldn’t Automatically Bind the IP Protocol Stack to the Network Adapter
By Timothy Tibbettson 06/15/2023 |
Talk about a mouthful and an annoying error to fix - "There might be a problem with the driver for the Ethernet/Wi-Fi adapter. Windows couldn’t automatically bind the IP protocol stack to the network adapter." Let's do this.
The biggest problem with this error is that there are many possible solutions. We're just sitting here at our computer all day anyhow, so let's look at all of them and get you fixed up. Note that if one step does not fix your problem, be sure to reset that step back to where it was so we don't have two problems later.
1: Run Tweaking.Com Windows Repair
Tweaking.Com Windows Repair can look at your Windows settings, and reset them if they've changed. If you think a setting was changed by someone (your friends Uncles twin brother who knows everything about computers) or an application, Windows Repair might save you a lot of time. It could take a while to run from safe mode, but it might be just what you need. A video tutorial is available as well.
2: Update Windows and Drivers
Let's combine two steps in one here. Make sure Windows Update doesn't have any pending updates. If you update your drivers through Windows Update, this could be a win-win. If not, and you know your adapter and model number, you can download the driver from the manufacturer or use Driver Booster. Don't discount this because Windows Updates often uses outdated, generic drivers. We never use drivers from Windows Updates and neither should you. That said, if that's what you use, make sure your current.
3: Disable IP Helper and Turn on WLAN AutoConfig
Once again we're going to look at two possible fixes in one step because both are located in services. Try one, see if the problem is fixed. If not, restore the setting to what it was initially and try the other. Press the Windows Key + R and type in services.msc and press enter.
Scroll down to IP Helper Service, right-click and select Properties. Under Service Status press Stop and under Startup type change it to disabled and click Apply.
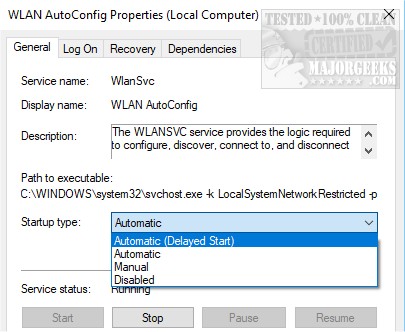
Now scroll further down and find WLAN AutoConfig, right-click and select Properties. Under Startup type this service should be set to Automatic. Change if needed and click Apply.
4: Verify Your Adapter Is Using the Right Items
Press the Windows Key + X and choose Network Connections. Click on Change adapter options and finally right-click on the adapter you're having trouble with. You should see this:
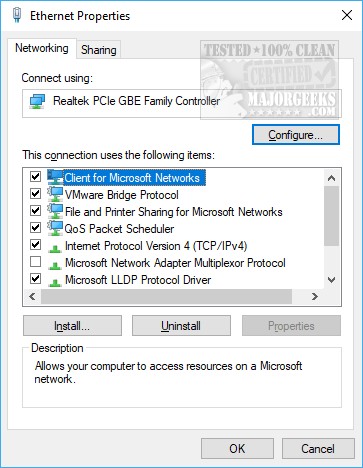
Under The connection uses the following items be sure all of the following are checked and uncheck anything not on this list. As mentioned earlier, take note of what you check or uncheck in case this doesn't work.
Client for Microsoft Networks
QoS packet scheduler
File and Printer Sharing
Internet Protocol v6
Internet Protocol v4
Link-Layer Topology Discovery Mapper I/O driver
Link-Layer Topology Discovery Reminder
5: Run the Troubleshooter
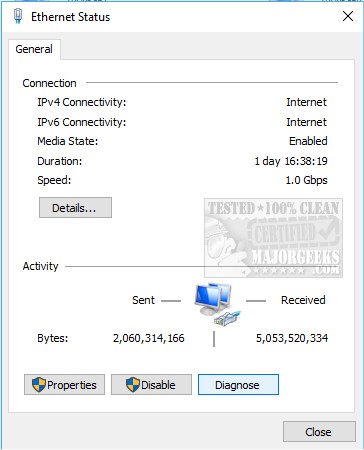
Like step 4 we want to Press the Windows Key + X and choose Network Connections. Click on Change adapter options and this time double-click on the adapter you're having trouble with. Click on Diagnose, and the troubleshooter will try and identify, and repair, any problems.
Hopefully, we solved your problem and made it easy for you. As always, let us know what worked, or didn't work for you.
Similar:
How to Improve Your Wireless Network Performance
Hide or Block Neighbor's Wi-Fi Networks on Windows
How to See Your Network Adapter Speed in Windows 10
How to Reset Network Settings in Windows 10
Network Diagnostics Troubleshooter Reports Problem With Wireless Adapter or Access Point
Windows Could Not the Start Peer Networking Grouping Service on Local Computer
Your Connection Was Interrupted - A Network Change Was Detected - ERR_NETWORK_CHANGED
Windows Can’t Get the Network Settings From the Router
comments powered by Disqus
The biggest problem with this error is that there are many possible solutions. We're just sitting here at our computer all day anyhow, so let's look at all of them and get you fixed up. Note that if one step does not fix your problem, be sure to reset that step back to where it was so we don't have two problems later.
1: Run Tweaking.Com Windows Repair
Tweaking.Com Windows Repair can look at your Windows settings, and reset them if they've changed. If you think a setting was changed by someone (your friends Uncles twin brother who knows everything about computers) or an application, Windows Repair might save you a lot of time. It could take a while to run from safe mode, but it might be just what you need. A video tutorial is available as well.
2: Update Windows and Drivers
Let's combine two steps in one here. Make sure Windows Update doesn't have any pending updates. If you update your drivers through Windows Update, this could be a win-win. If not, and you know your adapter and model number, you can download the driver from the manufacturer or use Driver Booster. Don't discount this because Windows Updates often uses outdated, generic drivers. We never use drivers from Windows Updates and neither should you. That said, if that's what you use, make sure your current.
3: Disable IP Helper and Turn on WLAN AutoConfig
Once again we're going to look at two possible fixes in one step because both are located in services. Try one, see if the problem is fixed. If not, restore the setting to what it was initially and try the other. Press the Windows Key + R and type in services.msc and press enter.
Scroll down to IP Helper Service, right-click and select Properties. Under Service Status press Stop and under Startup type change it to disabled and click Apply.
Now scroll further down and find WLAN AutoConfig, right-click and select Properties. Under Startup type this service should be set to Automatic. Change if needed and click Apply.
4: Verify Your Adapter Is Using the Right Items
Press the Windows Key + X and choose Network Connections. Click on Change adapter options and finally right-click on the adapter you're having trouble with. You should see this:
Under The connection uses the following items be sure all of the following are checked and uncheck anything not on this list. As mentioned earlier, take note of what you check or uncheck in case this doesn't work.
Client for Microsoft Networks
QoS packet scheduler
File and Printer Sharing
Internet Protocol v6
Internet Protocol v4
Link-Layer Topology Discovery Mapper I/O driver
Link-Layer Topology Discovery Reminder
5: Run the Troubleshooter
Like step 4 we want to Press the Windows Key + X and choose Network Connections. Click on Change adapter options and this time double-click on the adapter you're having trouble with. Click on Diagnose, and the troubleshooter will try and identify, and repair, any problems.
Hopefully, we solved your problem and made it easy for you. As always, let us know what worked, or didn't work for you.
Similar:
How to Improve Your Wireless Network Performance
Hide or Block Neighbor's Wi-Fi Networks on Windows
How to See Your Network Adapter Speed in Windows 10
How to Reset Network Settings in Windows 10
Network Diagnostics Troubleshooter Reports Problem With Wireless Adapter or Access Point
Windows Could Not the Start Peer Networking Grouping Service on Local Computer
Your Connection Was Interrupted - A Network Change Was Detected - ERR_NETWORK_CHANGED
Windows Can’t Get the Network Settings From the Router
comments powered by Disqus
