


How To Automatically Lock Your PC in Windows 11
By selma čitakovićon 02/28/2026 |
Win + L is great when you want to quickly lock your screen, but it's easy to forget when you step away from your PC. If you care about your privacy and don't want anyone snooping around, you can set your computer to lock itself automatically after inactivity.
Below, I'll show you four simple ways to do this in Windows 11, so read on.
Lock screen settings
You can set your computer to auto-lock when idle in the Settings. Let me show you how:
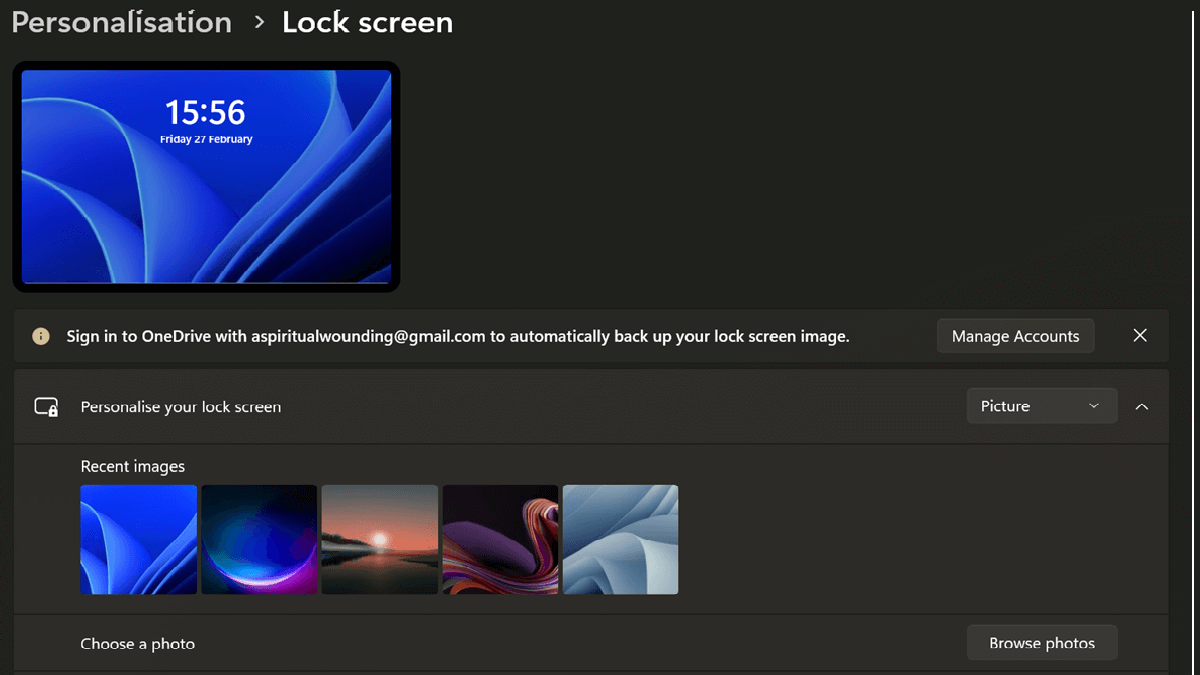
- Go to Settings > Personalization > Lock screen.
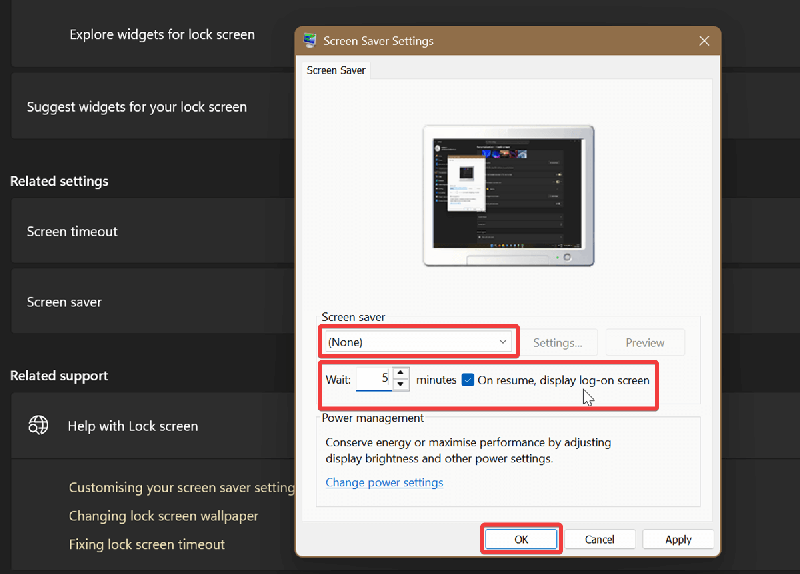
- Click on Screen saver under Related settings.
- In the new window, select (None) for Screen saver.
- Check " On resume, display log-on screen".
- Choose how many minutes you want your PC to wait while idle before automatically locking.
- Click OK.
To undo this and disable auto-lock, uncheck " On resume, display log-on screen" and click OK.
Dynamic Lock
A fairly obscure feature, I know, but it works! Basically, you pair your phone and PC via Bluetooth. When you walk away far enough with your phone, your PC will detect it and automatically lock. Dynamic Lock will activate when you're out of Bluetooth range.
Here's how to turn it on:
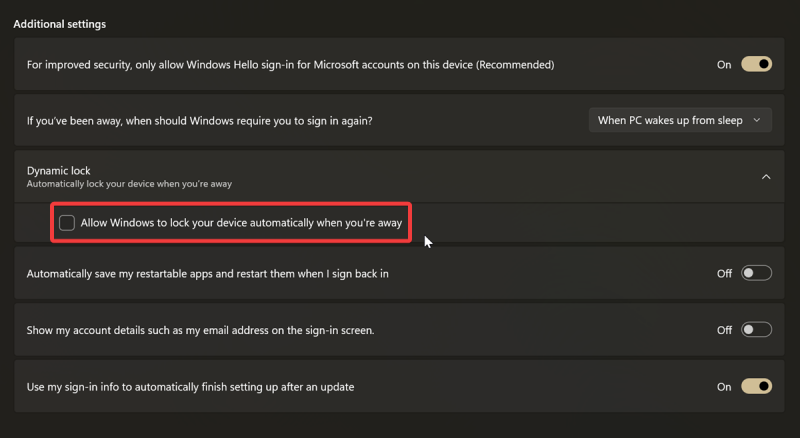
- Go to Settings > Accounts > Sign-in options.
- Click Dynamic lock under Additional settings.
- Check Allow Windows to automatically lock your device when you're away.
If you want to disable it, just uncheck the same option.
However, for this to work, you'll first have to add your phone as a paired device in Bluetooth & devices, and keep Bluetooth enabled on your phone. If you turn it off, Dynamic Lock will take that as you "being away" and lock your screen.
Local Security Policy
You can also configure your computer with the Local Security Policy to lock automatically after a certain period of inactivity. However, this tool is only available to Pro, Education, and Enterprise editions.
To use it, make sure you sign in as an administrator first, and do the following:
- Press Win + R, type secpol.msc, and press Enter.
- Navigate to Local Policies > Security Options.
- Double-click Interactive logon: Machine inactivity limit.
- Input a number between 0 and 599940 seconds (that's 9999 minutes), and click OK.
- Restart to apply the changes.

If you want to disable this policy, enter 0 and click OK.
Registry Editor
Alternatively, you can configure the same policy with the Registry Editor. It's completely safe, as long as you follow the instructions. Still, you can create a system restore point if you want to play it extra safe.
Here are the steps:
- Type regedit in Windows Search and click on Run as administrator.
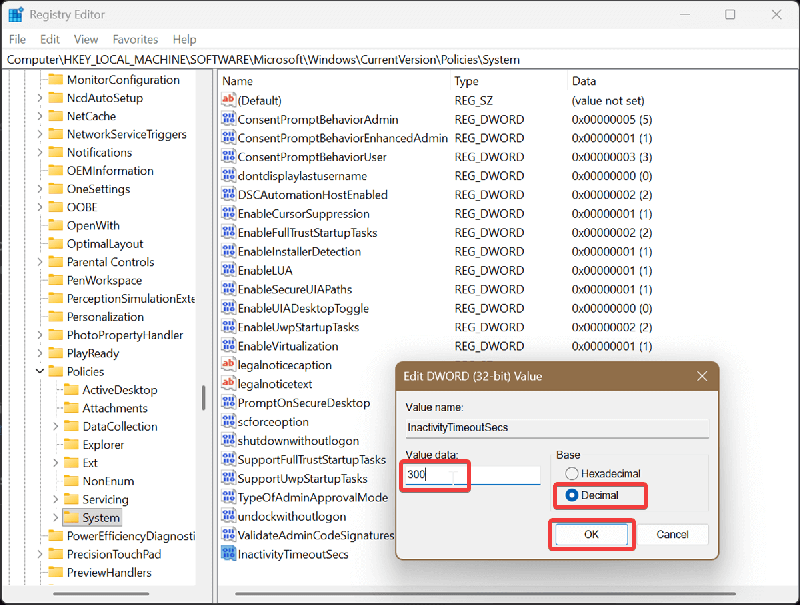
- Go to Computer\HKEY_LOCAL_MACHINE\SOFTWARE\Microsoft\Windows\CurrentVersion\Policies\System. You can paste this in the address bar at the top.
- While in the System key, double-click InactivityTimeoutSecs if available. If you can't find it, right-click an empty spot, select New > DWORD (32-bit) Value. Name it InactivityTimeoutSecs, and double-click it.
- Select Decimal, and type a number between 0 and 599940 for seconds of inactivity. Your PC will automatically lock after this specified time.
- Click OK.
- Restart to apply the changes.
If you want to undo this, type 0 in InactivityTimeoutSecs and click OK.
So, now you can rest easy knowing your PC will lock itself, even if you forget to do it. Your secrets will be safe. Probably.

|
selma citakovic
Selma is a gamer, geek and gremlin hunter with a passion for cyber security and smashing Windows bugs before they bite. She’s IBM-certified, loves real freeware, despises bloatware, and powers most of her troubleshooting with an unhealthy amount of coffee. |
comments powered by Disqus
