


How to Boot into Safe Mode on Windows 7, 8, 10 & 11
By Timothy Tibbettson 10/28/2022 |
Booting into safe mode to diagnose issues is a simple, well-known problem solver. Just reboot and tap or hold the F8 key after you see the black and white BIOS screen but before the Windows Splash screen and choose "Safe Mode" or "Safe Mode with Networking." If F8 isn't working, be sure to check out How to Restore a Missing F8 Boot Option
What is safe mode? Safe mode disables most of your processes, services, startup items, and drivers, allowing you to run malware scans or look for other potential problems quickly. Most malware can be tricky to remove if you’re not in safe mode because you can't delete files that are in use. By booting into safe mode, those files will no longer be locked.
If you're looking for a Clean Boot, that's entirely different.
But what if F8 isn't working? We can give you numerous ways to find out why F8 is not working, but we're guessing you don’t want to waste time doing diagnostics to get to diagnostics.
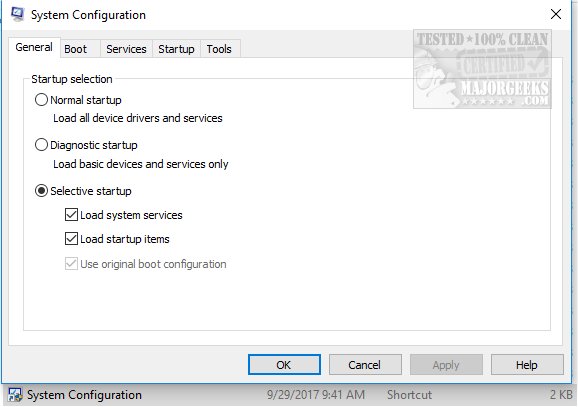
Click on the Windows Key + R and type in msconfig and press the Enter key. Optionally, press the Windows Key + S and begin typing Administrative and click on Administrative Tools. Double-click System Configuration.
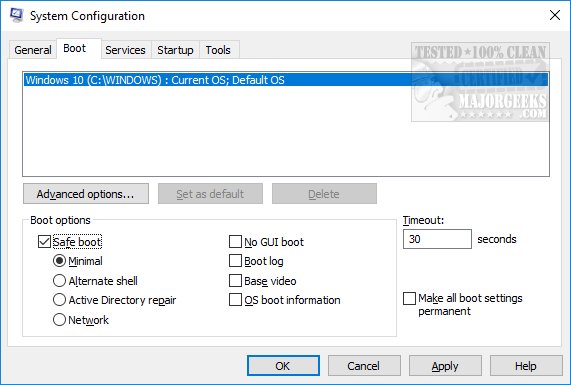
Click on the Boot tab.
Near the bottom, you will see Boot options. Click on Safe boot and Minimal should be the default. We recommend you use Network if you think you'll need the internet. By default, we always start with Network. Once you click on OK or Apply, you will be asked to reboot. Your computer will now reboot into safe mode.
To go back to normal boot, bookmark this page, follow the steps above, and uncheck Safe boot.
As you might have noticed, you can select additional boot options, so if you need them, let's take a look at what they do. You can choose from four boot options and another four sub-options that we rarely use.
Boot options
Safe Boot > Minimal - Starts Windows using as few drivers and services as possible but still has the Windows Graphical User Interface (GUI).
Safe Boot > Alternate Shell - Starts Windows using as few drivers and services as possible only in DOS or command-prompt mode.
Safe Boot > Active Directory repair - If you installed new hardware and corrupted the Active Directory, this is used to restore system stability by repairing or adding corrupted or new data to the directory.
Safe Boot > Network - Our favorite choice, oddly listed last. You'll have to start over if you need the internet to download tools or do online scans unless this is checked. While there are a few extreme cases of malware where you might want the internet disabled, we've used this almost every time.
Sub- Options
Safe Boot > No GUI boot - Starts Windows without the GUI splash screen, making Windows boot faster. If you look to the right, you can also set the timeout to 1 second to speed things along.
Safe Boot > Boot log - This mode will log the boot to diagnose boot issues. The log will be named ntbootlog.txt and should be found under C:\Windows. If not, search for ntbootlog.txt in File Explorer.
Safe Boot > Base video - This is for diagnosing display issues. The base video has also been called "enable low-resolution video mode" and "Enable VGA Mode" back in the day.
Safe Boot > OS boot information - Have you used safe mode before and seen all the text flying by in black and white? That's what this does. If you checked no GUI boot, you should check this. The two combined can help diagnose a driver causing Windows to crash on startup, for example.
Similar:
How to Create Safe Mode Desktop Shortcuts
How to Perform a Clean Boot in Windows
How to Restore a Missing F8 Boot Option
How to Identify Processes or Services on Your Computer
comments powered by Disqus
What is safe mode? Safe mode disables most of your processes, services, startup items, and drivers, allowing you to run malware scans or look for other potential problems quickly. Most malware can be tricky to remove if you’re not in safe mode because you can't delete files that are in use. By booting into safe mode, those files will no longer be locked.
If you're looking for a Clean Boot, that's entirely different.
But what if F8 isn't working? We can give you numerous ways to find out why F8 is not working, but we're guessing you don’t want to waste time doing diagnostics to get to diagnostics.
Click on the Windows Key + R and type in msconfig and press the Enter key. Optionally, press the Windows Key + S and begin typing Administrative and click on Administrative Tools. Double-click System Configuration.
Click on the Boot tab.
Near the bottom, you will see Boot options. Click on Safe boot and Minimal should be the default. We recommend you use Network if you think you'll need the internet. By default, we always start with Network. Once you click on OK or Apply, you will be asked to reboot. Your computer will now reboot into safe mode.
To go back to normal boot, bookmark this page, follow the steps above, and uncheck Safe boot.
As you might have noticed, you can select additional boot options, so if you need them, let's take a look at what they do. You can choose from four boot options and another four sub-options that we rarely use.
Boot options
Safe Boot > Minimal - Starts Windows using as few drivers and services as possible but still has the Windows Graphical User Interface (GUI).
Safe Boot > Alternate Shell - Starts Windows using as few drivers and services as possible only in DOS or command-prompt mode.
Safe Boot > Active Directory repair - If you installed new hardware and corrupted the Active Directory, this is used to restore system stability by repairing or adding corrupted or new data to the directory.
Safe Boot > Network - Our favorite choice, oddly listed last. You'll have to start over if you need the internet to download tools or do online scans unless this is checked. While there are a few extreme cases of malware where you might want the internet disabled, we've used this almost every time.
Sub- Options
Safe Boot > No GUI boot - Starts Windows without the GUI splash screen, making Windows boot faster. If you look to the right, you can also set the timeout to 1 second to speed things along.
Safe Boot > Boot log - This mode will log the boot to diagnose boot issues. The log will be named ntbootlog.txt and should be found under C:\Windows. If not, search for ntbootlog.txt in File Explorer.
Safe Boot > Base video - This is for diagnosing display issues. The base video has also been called "enable low-resolution video mode" and "Enable VGA Mode" back in the day.
Safe Boot > OS boot information - Have you used safe mode before and seen all the text flying by in black and white? That's what this does. If you checked no GUI boot, you should check this. The two combined can help diagnose a driver causing Windows to crash on startup, for example.
Similar:
comments powered by Disqus
